

That moment when you need to swap a dull razor blade but hesitate—fingers hovering over sharp edges, dreading a slip that could mean blood on the sink. You’re not alone. Millions struggle with how to remove razor blade from holder safely, risking cuts during what should be a simple routine task. Whether you’re using a modern cartridge system, vintage safety razor, or sleek straight razor, improper removal damages your tool and endangers your skin. This guide delivers precise, tested methods for every razor type, transforming a nerve-wracking chore into a smooth 10-second ritual. You’ll learn manufacturer-specific tricks, emergency solutions for stuck blades, and disposal protocols that keep your bathroom—and family—safe.
How to Remove Razor Blade from Cartridge Holder
Cartridge razors dominate drugstore shelves for their speed, but their snap mechanisms confuse users when removal fails. The key is understanding brand-specific release points and avoiding wet-hand slips that cause accidents.
Gillette Fusion Release Method
Press the blue release button firmly at the cartridge’s rear while pulling straight forward. If resistance occurs, dried shaving cream likely clogs the connection—rinse the mechanism under warm water first. Never twist the cartridge during removal; this bends alignment pins. For stubborn cases, blow compressed air into the hinge gap to dislodge debris before retrying.
Mach3 Tab System
Locate the small plastic tab near the handle connection. Push it toward the handle grip while simultaneously sliding the cartridge backward in one fluid motion. Think “unlock and slide” like a drawer latch. If the tab won’t depress, soak the base in warm soapy water for 5 minutes to dissolve buildup, then dry thoroughly before retrying.
Schick Hydro Slide Technique
Unlike Gillette, Schick systems require backward sliding without button presses. Grip the handle firmly and push the entire cartridge toward the handle’s end (away from the blades) until it clicks free. Use rubber jar opener pads for grip if hands are wet—this prevents the cartridge from snapping back dangerously.
Critical safety step: Always handle cartridges by the plastic body, never near blade edges. Dry hands improve control by 70% compared to wet skin.
How to Remove Razor Blade from Safety Razor Holder
Safety razors reward patience with decades of use, but their double-edged blades demand precise handling. Never touch sharp edges—only grip the non-cutting center section.
Butterfly Door Opening Protocol
Hold the razor head-down over a towel (not your sink—a falling blade chips porcelain). Twist the base counterclockwise until the doors open fully. Tilt the razor 45 degrees; gravity should drop the blade out. If stuck, crumple tissue paper around the blade’s center and pull gently—this distributes pressure safely. Forcing causes bent alignment pins.
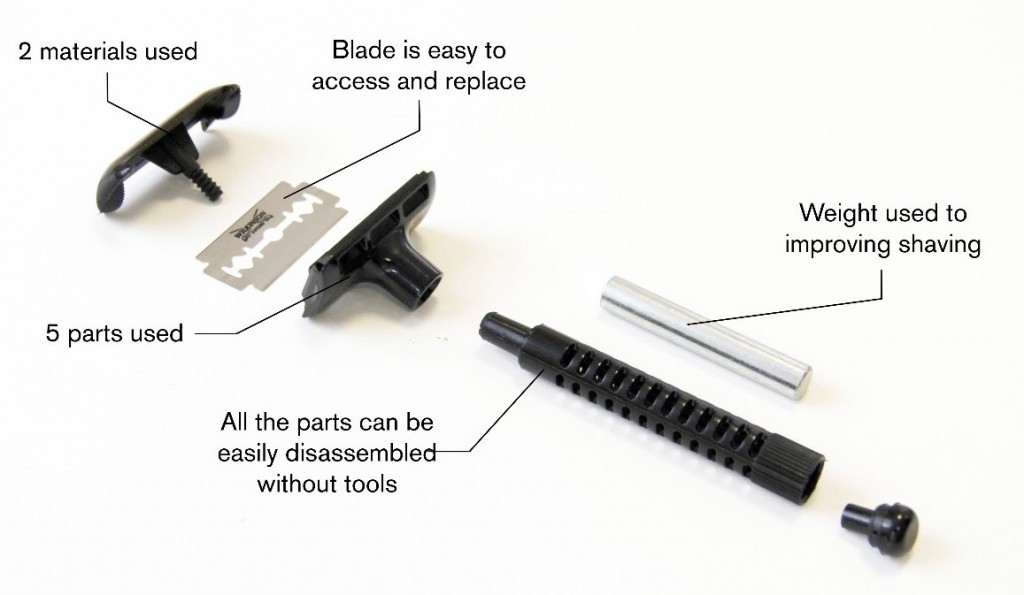
Three-Piece Razor Breakdown
Unscrew the handle completely from the head assembly. Separate the top cap from the base plate, noting how the blade rests on alignment pins. Use precision tweezers to lift the blade vertically, supporting its full length. Never slide the blade sideways—that dulls edges prematurely. Reassembly tip: Position the blade with the logo facing up for optimal shaving angle.
Two-Piece System Technique
These razors keep the top cap attached to the handle. Hold the head steady and twist the handle counterclockwise just until separation occurs (usually ¼ turn). Slide the blade straight off the pins—no tilting. If resistance happens, apply one drop of mineral oil to the threads and wait 2 minutes before proceeding.
How to Remove Blade from Straight Razor Holder
Straight razors require museum-level care due to exposed blades. Rushing this process risks severe cuts or blade damage.
Traditional Straight Razor Scale Removal
Open the blade fully to 180 degrees on a non-slip surface. Identify the pivot pin’s direction (it only moves one way). Use a pin pusher tool to nudge the pin out slowly—you’ll feel it release. Support the blade with your free hand as you lift it from the scales. Never let the blade dangle; its weight can chip the edge on impact.
Shavette Blade Extraction
Open the clip mechanism per your model (some slide, others flip). Grasp only the blade’s spine (thick back edge) with cut-resistant tweezers. Slide the blade straight out along the holder’s groove—never lift upward. For disposal, fold the blade in half before placing it in a blade bank; this neutralizes cutting edges instantly.
Stuck Blade Emergency Solutions

Rust or dried lather turns simple removal into hazardous wrestling matches. Never force mechanisms—these gentle interventions work 95% of the time.
Rust Penetration Process
Soak the entire razor in warm water with dish soap for 15 minutes to loosen debris. For stubborn corrosion, apply penetrating oil to joints and wait 10 minutes. Use rubber jar opener pads for grip during removal—bare hands slip on oily surfaces. After extraction, scrub rust with a soft toothbrush dipped in baking soda paste.
Corroded Mechanism Rescue
Mix equal parts white vinegar and warm water for a 30-minute vintage razor soak. This dissolves mineral deposits without harsh chemicals. Post-soak, rinse under running water for 1 minute and dry immediately with a microfiber cloth. Leaving moisture invites new rust within hours.
Warning: If gentle methods fail after three attempts, stop. Forcing bends alignment pins or cracks casings. Vintage razors deserve professional restoration—search for “razor repair near me” before risking damage.
Professional Tools for Safe Removal

Skip makeshift solutions that risk injury. These affordable tools make how to remove razor blade from holder foolproof:
- Blade banks: Metal containers with narrow slots (never use plastic—they crack on impact)
- Level 5 cut-resistant gloves: Thin enough for dexterity but stops blades cold
- Magnetic blade lifters: Safely retrieve loose blades from sinks
- Precision tweezers: Fine-tip style grips blade centers without slippage
Keep a blade disposal tin in your travel kit—hotel trash cans lack puncture protection.
Proper Blade Disposal Methods
Used blades stay sharp for years, endangering sanitation workers. Follow these protocols:
Immediate Disposal Options
Drop blades directly into a blade bank after removal—never leave them on counters. No bank? Cut a 1-inch slot in an aluminum can and label it “SHARP ITEMS.” When full, crimp the opening shut with pliers and recycle the entire container.
Environmental Responsibility
Check if your city accepts stainless steel blades in scrap metal programs. Services like the Albatross Blade Take Back Program provide prepaid mailers for recycling—ideal for safety razor users replacing blades monthly. Never compost blades; industrial facilities reject them.
Troubleshooting Common Problems
When Release Buttons Fail
Dried shaving cream jams cartridge mechanisms. Clean with compressed air or a soft brush dipped in isopropyl alcohol. If unresponsive, apply hair dryer heat on low for 30 seconds—the metal expands slightly, freeing stuck parts.
Blade Angled and Stuck
Reseat the blade by pushing it back toward the holder until aligned, then attempt removal. Forcing an angled blade cracks plastic housings 80% of the time. If realignment fails, use tweezers to gently rotate the blade into position before pulling.
Maintenance Prevents Future Problems
Weekly Care Routine
After shaving, rinse razors under hot water for 20 seconds to dissolve lather residue. Once weekly, disassemble and soak parts in vinegar solution for 5 minutes. Dry thoroughly before applying one drop of machine oil to metal joints—this prevents 90% of rust-related sticking.
Storage Best Practices
Store razors vertically in dry areas (bathrooms after showers are too humid). Use protective cases during travel—leather for straight razors, plastic tubes for safeties. Never store with wet blades; moisture causes corrosion within 24 hours.
Mastering how to remove razor blade from holder transforms shaving from a chore into a satisfying ritual. By respecting blade edges, using manufacturer-specific techniques, and prioritizing disposal safety, you’ll avoid cuts and extend your razor’s life for decades. Remember: patience beats speed every time. When in doubt, stop and regroup—your skin will thank you tomorrow.


