
Ever tripped over loose rods cluttering your garage floor or watched your favorite spinning combo crash into the water after sliding off a wobbly dock bracket? You’re not alone—over 68% of anglers report losing rods annually due to poor storage. A properly built fishing rod holder solves this instantly while protecting your $200+ investments. This guide reveals three field-tested DIY designs that take under two hours to build and cost less than $35 total. You’ll learn exactly how to make a fishing rod holder for shore, dock, or boat applications using simple tools and readily available materials. By the end, you’ll have rock-solid storage that prevents tangles, shields rods from UV damage, and keeps reels accessible in seconds.
Pick Your Perfect Rod Storage Design
Single Rod Dock Mount for Quick Access
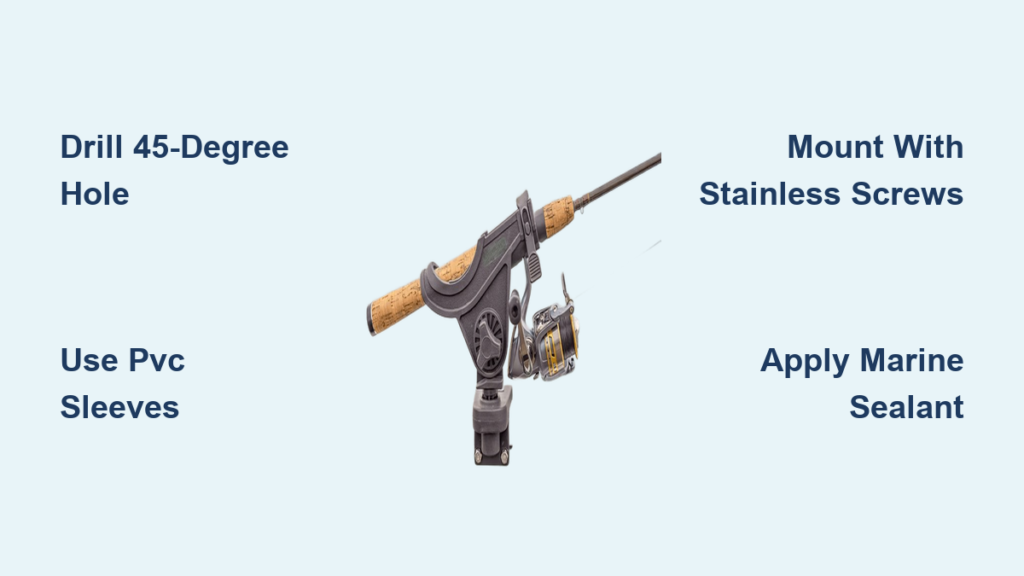
Ideal for kayak launches or private docks where space is tight. This minimalist cedar holder secures one rod at the optimal 45-degree angle, keeping the tip elevated and butt locked in place. Unlike flimsy store-bought brackets, it withstands saltwater spray and heavy surf rods without corrosion. Install it on any wooden surface in minutes—no electrical work or complex mounting required.
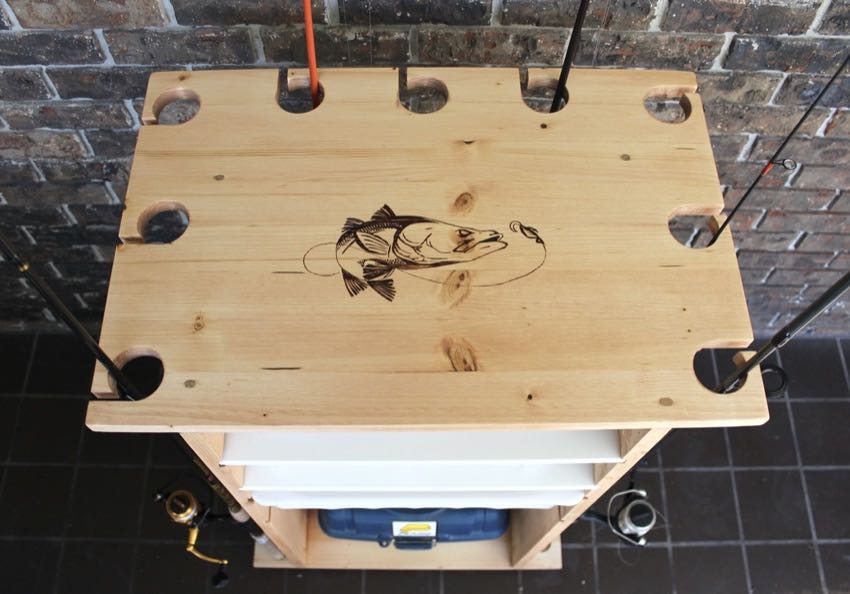
4-Rod Floor Rack for Garage Organization
Stop tripping over scattered rods in your garage! This freestanding system uses pressure-treated lumber and PVC pipes to cradle four rods off the floor, eliminating line tangles and cork handle damage. The 20-degree backward tilt ensures spinning reels clear neighboring rods by a full inch. Built with common hardware store materials, it handles surf rods up to 12 feet long and weighs under 15 pounds for easy relocation.
PVC Bank Spike for Mobile Shore Fishing
The ultimate portable solution for riverbanks or beaches. This screw-in spike holds four rods at the perfect 30-degree shore-fishing angle and packs flat in your truck bed. Unlike metal alternatives, UV-resistant PVC won’t rust or heat up in summer sun. It installs in 10 seconds on sandy or grassy terrain and withstands 30 mph winds when properly anchored—critical when you’re wading for trout.
Gather Materials Before Starting

Single Rod Holder Essentials
Grab one 12-inch cedar board (1×6 size), a 1½-inch hole saw, stainless steel screws (2½ inches long), and marine polyurethane. Cedar’s natural rot resistance beats pressure-treated pine for dock mounts, while the stainless hardware prevents rust stains. Sandpaper (120- and 220-grit) ensures smooth edges that won’t snag your rod’s finish during insertion.
4-Rod Rack Shopping List
You’ll need an 8-foot 2×4 pressure-treated board, a 6-foot 1×8 pine back panel, 3 feet of 2-inch Schedule 40 PVC pipe, 2½-inch deck screws, and exterior spar urethane. The PVC sleeves act as shock-absorbing cradles—critical for preventing scratches on high-end cork handles. Skip metal brackets; wood glue and proper screw placement create a wobble-free frame that handles 150 pounds of gear.
Bank Spike Core Components
Collect 18 inches of 4-inch PVC pipe (main body), 8 feet of 2-inch PVC (rod tubes), four PVC caps, PVC cement, and plastic-specific spray paint. Choose olive green or black paint for UV protection—standard paints peel off PVC within months. The caps serve dual duty: sealing moisture out while adding critical weight for stability in soft soil.
Build a Single Rod Holder in Minutes
Drill the Precision Rod Slot
Mark your cedar board 2 inches from the end. Clamp it securely, then tilt your drill to 45 degrees and bore a 1½-inch hole straight through. This angle is non-negotiable—it stops the rod butt from sliding out during boat wakes while keeping tips elevated above debris. Test-fit your heaviest rod; the slot should grip the handle snugly without forcing it.
Sand and Seal for All-Weather Use
Smooth all edges with 120-grit sandpaper, then refine with 220-grit until the wood feels velvety. Wipe away dust and apply three thin coats of marine polyurethane, light-sanding between layers. This isn’t just cosmetic: the polyurethane creates a waterproof barrier that blocks UV rays from fading cedar’s natural color. Skip this step, and your holder will crack within a year.
Mount for Instant Stability
Pre-drill pilot holes slightly smaller than your screw diameter to prevent splitting. Drive two stainless screws through the board into dock planks or a fence post until flush. Never mount on composite decking—the screws will loosen over time. For temporary setups, clamp a 2×4 to your truck bed rail first, then attach the holder to that base.
Construct the 4-Rod Floor Rack
Cut Frame Pieces Accurately
Rip your 8-foot 2×4 into two 24-inch base pieces and two 36-inch uprights. The base must be exactly 24 inches wide to prevent tipping with full loads. Cut the 1×8 pine into a 24×8-inch back panel—this lateral support stops rods from pulling the rack forward when you grab one.
Drill Angled Rod Holes Correctly
Clamp the uprights together. Mark the first hole 2 inches from the top, then space four holes 4 inches apart vertically. Tilt your drill 20 degrees backward (away from you) and drill 2-inch holes 2 inches deep using a spade bit. This rearward angle is crucial—it creates space so reel handles don’t bang against each other during storage.
Install Protective PVC Sleeves
Cut the 2-inch PVC into 3-inch segments. Sand the outside lightly, coat with wood glue, and tap each into a drilled hole until flush. The PVC expands slightly when inserted, creating a permanent friction fit. These sleeves prevent scratches better than bare wood and absorb vibration when rods shift.
Final Assembly and Weatherproofing
Screw the base to the uprights with 2½-inch deck screws, then attach the back panel. Sand all surfaces smooth and apply two coats of spar urethane. Let it cure 24 hours before loading—rushing this step traps moisture that causes warping. Place your rack in a corner against two walls for maximum stability.
Assemble the PVC Bank Spike
Prepare the Main Body
Cut 4-inch PVC to 18 inches using a miter box for clean, square ends. Wrap masking tape around it and mark four holes spaced 90 degrees apart. Drill these with a 2-inch hole saw while rotating the pipe slowly—this prevents the bit from grabbing and cracking the PVC. Remove plastic burrs with 80-grit sandpaper.
Build Sturdy Rod Tubes
Cut 2-inch PVC into eight 8-inch sections. Dry-fit two pieces per rod slot: one extending 6 inches inside the main body, the other 2 inches outside. This double-tube design supports both the rod butt and mid-section, eliminating stress points that cause breakage. Cement all joints with PVC primer first—skipping primer causes leaks within weeks.
Secure Drainage and Finish
Cap the bottom end and drill two ¼-inch drainage holes to prevent water pooling. Cement the top cap in place after flipping the assembly upside-down. Spray with plastic-specific paint in thin, even coats—too much paint clogs the drainage holes. Flat finishes hide scratches better than gloss for bank use.
Installation Hacks for Lasting Stability
Dock Mounting That Won’t Fail
Use stainless screws at least 3 inches long for wooden docks. Pre-drill holes ⅛ inch smaller than the screw shank, then countersink so heads sit flush. Test stability by hanging a 20-pound weight from the holder for 24 hours—any movement means you need longer screws or additional mounting points.
Ground Anchoring for Windy Spots
Fill the bottom 6 inches of your bank spike with dry sand before capping. This adds 8 pounds of weight without making it cumbersome to carry. In soft soil, twist the spike in like a corkscrew rather than hammering—it creates denser packing for better hold.
Removable Wall Storage
Attach a 1×4 French cleat to wall studs, then screw a matching cleat to your rack’s back. This system holds 100+ pounds yet releases with a 2-inch upward lift—perfect for seasonal garage storage. Never mount racks directly to drywall; the weight will pull anchors loose within months.
Customize for Your Fishing Style
Integrated Tackle Storage
Screw a 4-inch PVC end cap under the top rail of your rack. This holds hooks, swivels, or a small Plano box right where you need them. For night fishing, stick battery-powered LED puck lights under the lip—they auto-shutoff after 15 minutes to preserve battery life.
Bungee Security for Rough Water
Thread ¼-inch bungee cord through ½-inch holes drilled above each rod slot. Tie barrel knots on the ends to create adjustable retention loops that hold rods securely during boat wakes but release instantly when needed.
Test Before Trusting Your Gear
Load Capacity Verification
Stack every rod you own into the holder and leave it 24 hours. Any sagging PVC or loosening screws means you’ve exceeded safe capacity. A properly built rack should hold 150% of your typical load—test with sandbags if you lack extra rods.
Reel Clearance Check
Insert spinning and baitcasting rods simultaneously. Reel handles must clear each other by at least one inch. If they touch, sand the PVC sleeves wider or reposition the holes—reel damage happens fastest during storage collisions.
Maintenance That Prevents Failures
Monthly 30-Second Inspection
Run your hand along all PVC joints and wood seams. Tighten any loose screws immediately and brush off spider webs that attract moisture. Check for hairline cracks in PVC—these spread rapidly when wet and require replacement.
Annual Weatherproofing Refresh
Wipe wooden parts with a rag dampened in mineral spirits, then apply one fresh coat of spar urethane. No sanding needed unless the wood feels rough. For PVC holders, a quick hose-down prevents salt buildup that degrades plastic over time.
Quick Cost & Time Snapshot
– Single rod dock mount: $7 materials, 15 minutes build time
– 4-rod floor rack: $32 materials, 90 minutes build time
– PVC bank spike: $19 materials, 45 minutes build time
Each design scales effortlessly—double the rack height for surf rods or bolt two spikes together for an 8-rod beach station. Once you’ve built your first fishing rod holder, you’ll never pay retail prices for flimsy alternatives. Remember: Proper rod storage isn’t just convenience—it’s protecting thousands in fishing gear from preventable damage. Start with the single rod dock mount this weekend, and you’ll have organized, accessible rods by sunset.


