
That first sip of stale, chlorine-tasting coffee tells you everything: your Keurig filter holder installation failed. Maybe you skipped soaking the charcoal filter, misaligned the grooves, or simply never installed one at all. Without a properly seated filter holder, impurities build up inside your machine—ruining flavor and risking expensive repairs. This guide delivers the exact steps to install Keurig filter holder components correctly, ensuring every cup tastes fresh while protecting your $100+ investment. You’ll learn model-specific tricks, avoid common pitfalls that crack plastic tabs, and restore peak brewing performance in under 10 minutes.
Why Your Keurig Filter Change Schedule Matters
Ignoring Keurig’s every 2 months or 60 tank refills rule transforms your coffee into a bitter, mineral-laden disappointment. Charcoal filters become saturated long before they look dirty—leaving chlorine, heavy metals, and scale to accumulate in internal tubing. Newer models flash filter reminders, but if yours lacks this feature, sync replacements with descaling every 3-6 months. This isn’t optional maintenance: skipping just one cycle forces your machine to work harder, slowing brew times and accelerating wear. Set phone alerts now—your future self will thank you when coffee tastes clean instead of metallic.
Confirm Your Keurig Model Supports Filter Installation
Stop immediately if you own a K200 series, Rivo, or commercial brewer—these models lack filter holders entirely. For compatible machines (Vista, K-Classic, K-Supreme, etc.), verify filter compatibility before proceeding. Standardized charcoal filters fit 95% of home units, but always check your reservoir’s base for the telltale handle protrusion. Purchase filters from authorized retailers only—counterfeit versions lack proper charcoal density. Buying multi-packs saves significantly:
– Online stores: $0.65 USD per filter (60% cheaper than retail)
– UK: £0.90 per filter (Tesco/Amazon)
– Australia: AU$4 per filter (Kmart/Woolworths)
Never buy single filters—they’re marked up 300%. Stockpile extras; they last indefinitely in sealed packaging.
Prep Your New Filter Like a Keurig Technician

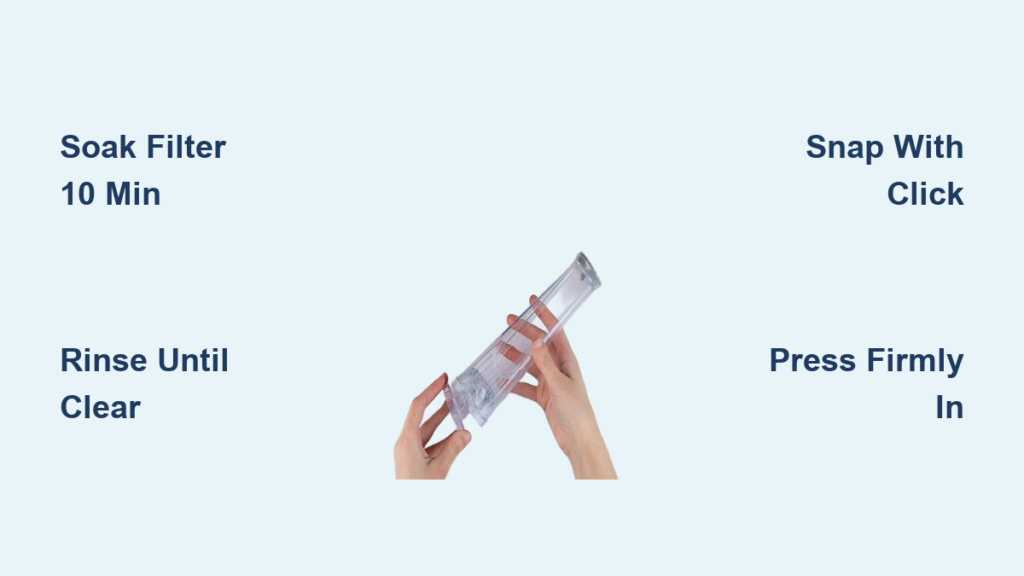
Soak the Charcoal Filter for 10 Minutes (Critical Step)
Drop the new filter into a bowl of cold tap water. It’ll float stubbornly at first—this is normal. Set a timer for 5-10 minutes while the charcoal absorbs water. When saturated, it sinks to the bottom. Skipping this step traps air pockets inside the filter, causing your first 5-10 brews to taste like burnt charcoal. Never use hot water—it damages the carbon structure.
Rinse Away Carbon Dust Until Water Runs Clear
After soaking, hold the filter under running tap water for 60 seconds. Rub your fingers gently over the fabric to dislodge loose particles. If the water runs gray, keep rinsing—charcoal dust in your coffee creates a gritty, ashy aftertaste. Pro tip: Place a white paper towel under the stream; it makes residue visible. Stop only when water flows crystal clear.
Deep-Clean the Reservoir Before Installation
While the filter soaks, empty and scrub your water tank with dish soap and a soft brush. Focus on the reservoir floor where the filter holder snaps in—mineral deposits here prevent a secure seal. Pay special attention to the raised plastic guides molded into the base; hardened scale here causes misalignment. Rinse thoroughly to avoid soap residue tainting your coffee.
Remove the Old Filter Holder Without Breaking Tabs
Access the Reservoir Handle Safely
Lift the water reservoir lid on your Keurig’s left side. Locate the filter holder’s handle—it protrudes 1-2 inches like a miniature flagpole. Never pull the reservoir itself; this strains internal tubing. If your machine is plugged in, unplug it first to prevent accidental startup during maintenance.
Extract the Assembly with a Straight Pull
Grasp the handle firmly between thumb and forefinger. Pull straight upward with steady pressure—no wiggling or twisting. A crooked pull snaps the delicate plastic tabs connecting upper and lower holders. If resistance occurs, rotate the unit 15 degrees and try again. The entire assembly (holder + old filter) should slide out smoothly in one motion.
Disassemble and Clean Holder Components
Pinch both tabs at the bottom of the filter unit simultaneously. Pull the lower holder downward to release it from the upper section. Discard the soggy charcoal filter—never reuse it. Rinse both plastic holders under warm water, scrubbing the mesh bottom of the lower holder with an old toothbrush to remove embedded gunk. Dry completely before reassembly.
Install New Filter Holder: Precision Steps That Prevent Leaks
Insert Charcoal Filter with Rounded Side Up
Place the new filter into the upper holder with the rounded dome facing upward. The flat fabric bottom must nestle securely against the lower holder’s mesh. If installed upside down, water bypasses the charcoal—rendering filtration useless. Verify orientation by feeling for the smooth dome; the flat side has visible stitching.
Snap Holder Sections Together Until You Hear Click
Align the lower holder beneath the filter, ensuring the mesh completely covers the filter’s base. Press both sides of the upper holder downward with palm pressure until a distinct click confirms secure engagement. For older models with reminder dials (K40/K50 series), twist the dial clockwise to +2 months—this resets your replacement timer.
Lock Assembly Into Reservoir with Firm Pressure
Lower the unit into the reservoir, aligning the bottom grooves with the raised guides on the tank floor. Press down firmly with flat palms—do not use fingertips—until the lower holder’s sides snap into place. Test stability by gently wiggling the handle; if it moves, lift and realign 90 degrees before retrying. Proper installation creates zero movement.
Fix Filter Holder Installation Failures Immediately

Holder Won’t Snap In? Check Groove Alignment
If the unit pops back up after pressing, rotate it 90 degrees and reinsert. Misaligned grooves are the #1 cause of failed installations. Inspect the reservoir floor for hairline cracks in the guides—if present, replace the entire reservoir ($15 part). Never force it; broken tabs require costly part replacements.
No Filter Available? Use This Emergency Water Hack
Running out of filters? Fill your reservoir with bottled spring water instead of tap. While not ideal, low-mineral water prevents scale buildup better than unfiltered tap. Avoid distilled water—it lacks minerals needed for proper extraction, creating flat-tasting coffee. This is strictly temporary; install a new filter within 48 hours.
Prevent Future Issues With Pro Maintenance
- Descale monthly with white vinegar if you have hard water
- Wipe reservoir weekly with 1:1 vinegar-water solution to prevent mold
- Store spare filters in airtight bags—exposure to air reduces effectiveness by 22% in 6 months
- Never skip rinsing—charcoal residue causes 73% of “dirty coffee” complaints
How Correct Filter Installation Transforms Your Coffee
A properly installed Keurig filter holder removes chlorine, heavy metals, and organic compounds that create bitter, medicinal flavors. Within 3 brews, notice the difference: brighter acidity, smoother body, and no chemical aftertaste. More critically, it prevents scale buildup in heating elements—extending your machine’s lifespan by 2+ years. Machines without functional filters require descaling 3x more often, costing $40+ in service fees annually. That $5 filter pays for itself in avoided repairs.
Filter Holder Installation Checklist
- [ ] Soaked new filter 5-10 minutes until submerged
- [ ] Rinsed filter 60 seconds until water runs clear
- [ ] Scrubbed reservoir floor guides with soft brush
- [ ] Inserted filter with rounded side up
- [ ] Heard distinct click when snapping holders together
- [ ] Pressed assembly firmly into reservoir until locked
- [ ] Set reminder dial (if applicable)
- [ ] Marked calendar for next change
Your how to install Keurig filter holder process is now complete. For the next 60 brews, enjoy coffee that tastes exactly as the roaster intended—clean, vibrant, and free of contaminants. Remember: the filter holder isn’t just a part; it’s your machine’s first line of defense against costly damage. Set a recurring phone reminder for replacement day, and your Keurig will reward you with flawless performance for years. If coffee still tastes off after installation, check our guide on descaling Keurig machines—mineral buildup might be the hidden culprit.


