
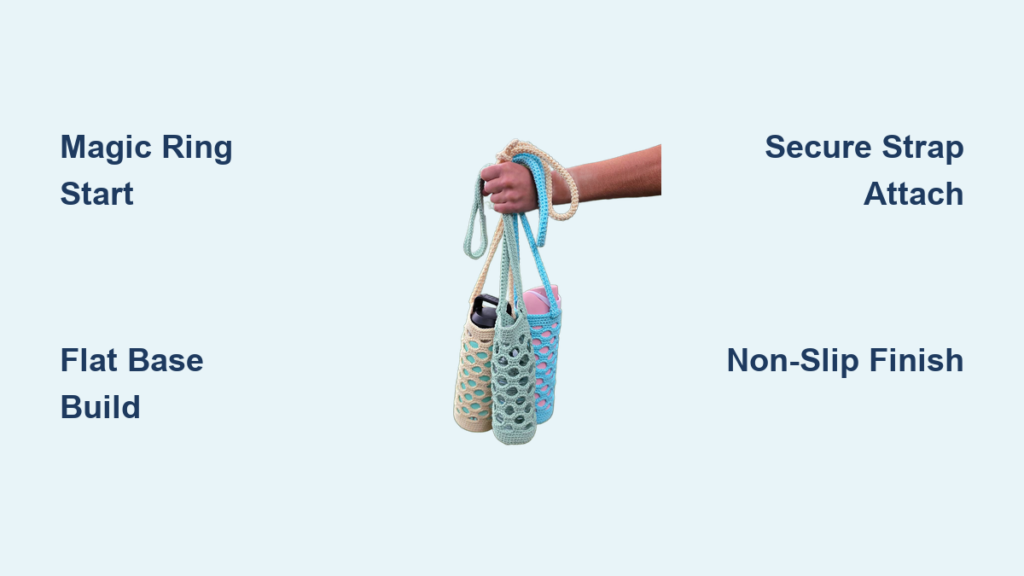
You’re mid-hike, juggling a water bottle that keeps slipping from your sweaty grip while you try to snap photos. Or maybe you’re rushing to yoga class, fumbling with a reusable bottle that won’t stay put in your tote. A handmade crochet bottle holder solves this daily frustration instantly—transforming simple yarn into a secure, hands-free carrier that matches your style. Best of all, this beginner-friendly project requires only basic stitches yet delivers genuinely useful results. Within hours, you’ll create a custom-fit holder that survives sweaty gym sessions and muddy trails while adding personality to your everyday routine.
Whether you’re crafting a thoughtful gift or treating yourself, this guide cuts through confusing tutorials to deliver foolproof steps for perfect results. We’ll walk you through selecting water-resistant cotton yarn, building a non-slip base, and attaching a comfortable strap—all while avoiding common pitfalls like stretching or bottle slippage. By the end, you’ll have a durable holder that keeps your favorite 2.5–3.5-inch diameter bottle secure through countless adventures.
Pick Water-Resistant Yarn and Tools
Why Cotton Yarn Beats Every Alternative
Start with 100% cotton yarn—it’s non-negotiable for functional bottle holders. Unlike acrylic, cotton won’t stretch when wet from condensation or spills, maintains its shape after machine washing, and dries quickly. Opt for worsted weight (Category 4) like Lion Brand 24/7 Cotton or Hobby Lobby’s I Love This Cotton for the ideal balance of durability and stitch definition. If your bottle is petite (under 2.5 inches), switch to DK weight (Category 3); for heavy-duty use with large bottles, grab bulky cotton (Category 5).
Critical yarn considerations:
– Quantity: Buy 55–110 grams (102–220 yards) based on bottle size—most projects finish with one skein
– Color tricks: Solid colors hide minor tension issues; use scrap yarn for stripes to test new techniques
– Avoid: Pure acrylic or wool—they stretch under water weight and felt when washed
Must-Have Tools for Zero-Fail Construction
Gather these essentials before starting:
– Hooks: US G/4.0mm for worsted cotton (standard), US H/5.0mm for aran, or US I/5.5mm for bulky
– Tapestry needle: Blunt tip weaves ends invisibly without snagging stitches
– Measuring tape: Verify base diameter matches your bottle’s bottom before building the body
– Stitch markers: Clip one at the start of each round to track increases (prevents miscounting)
Skip the “beginner kit” traps—scissors and a tape measure from your junk drawer work perfectly.
Build a Flat, Non-Wobbling Base
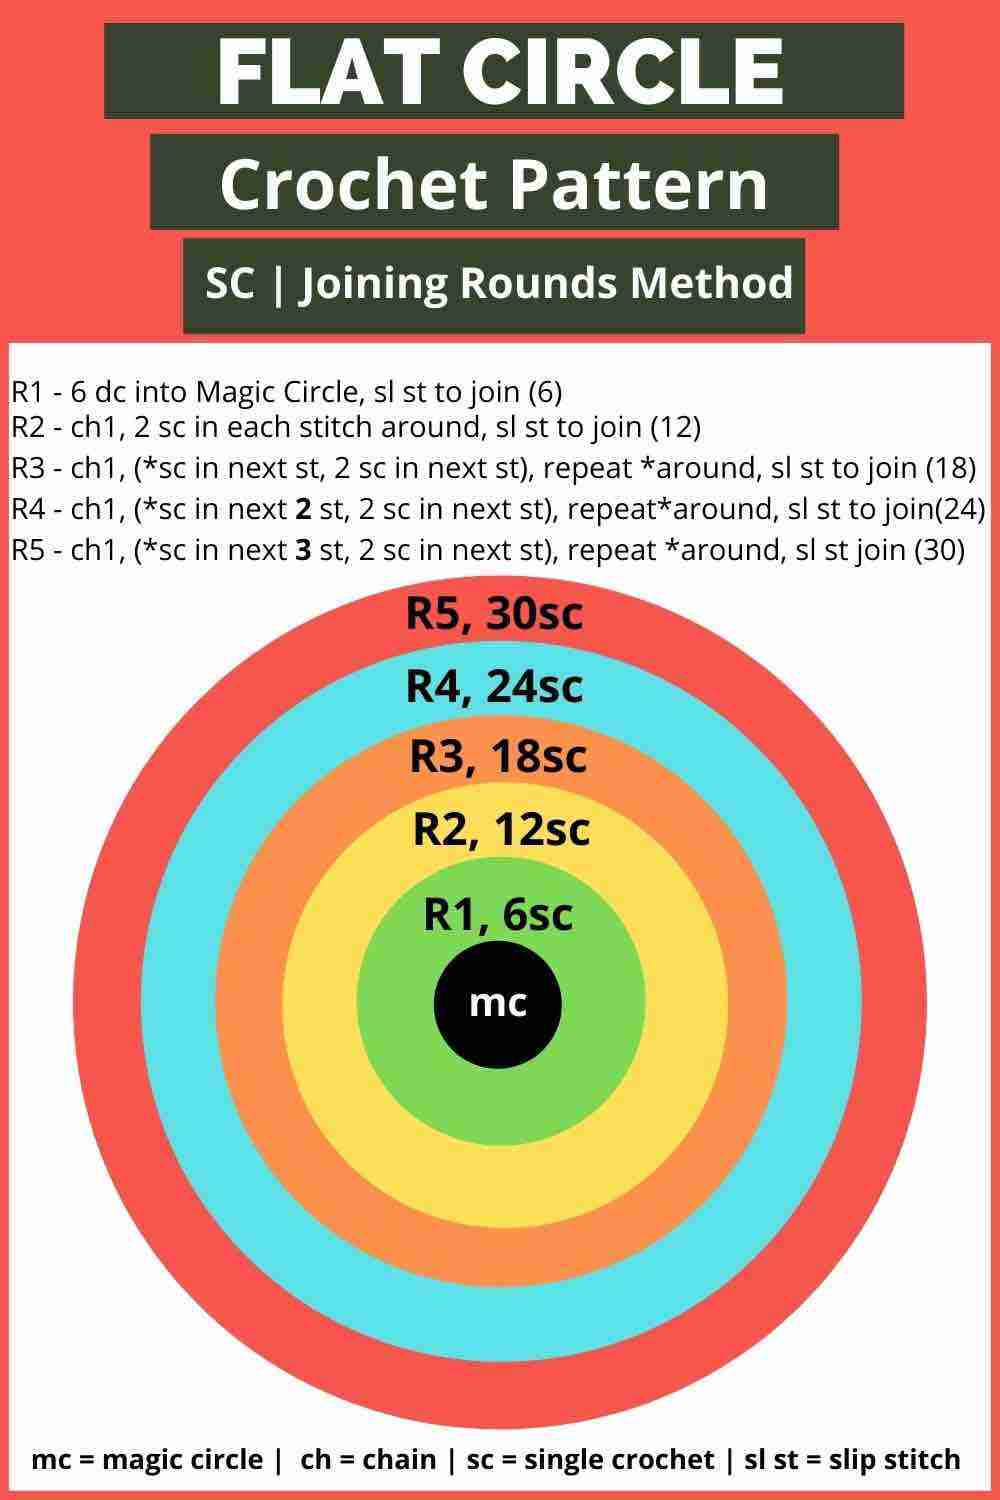
Magic Ring Start for Seamless Centers
Begin with a magic ring instead of chaining 4 and joining—it eliminates the annoying hole beginners get with chain foundations. Pinch the loop tightly after working 6 single crochets (sc) into it. Pull the tail to close the ring completely. This creates a solid center that won’t sag under bottle weight.
Precision Increase Formula for Flat Circles
Follow this exact increase pattern so your base lies perfectly flat—no cupping or ruffling:
1. Round 1: 6 sc in magic ring (6 sts)
2. Round 2: 2 sc in each st around (12 sts)
3. Round 3: Sc in next st, 2 sc in next st; repeat 6x (18 sts)
4. Round 4: Sc in next 2 sts, 2 sc in next st; repeat 6x (24 sts)
5. Round 5: Sc in next 3 sts, 2 sc in next st; repeat 6x (30 sts)
6. Round 6: Sc in next 4 sts, 2 sc in next st; repeat 6x (36 sts)
Stop increasing when:
– Your base measures 2.5 inches for standard 12oz bottles (6 rounds = 36 sts)
– 3.0 inches for larger 16oz bottles (7 rounds = 42 sts)
– 3.5 inches for wide-mouth bottles (8 rounds = 48 sts)
Pro tip: Place your bottle on the base after Round 4—it should sit snugly without gaps.
Construct the Body: Solid vs. Mesh Options

Single-Crochet Tube for Maximum Security
Once the base matches your bottle diameter, stop increasing and work even rounds:
– Round 7+: 1 sc in each st around (maintain 36/42/48 sts)
– Continue until height = 7–9 inches (measure against your bottle)
– Join rounds with a slip stitch to prevent spiraling
Why this works: Tight single crochets grip tapered bottles better than openwork. For slippery glass bottles, add 1–2 decrease rounds near the top: Sc2tog, sc around to gently narrow the opening.
Quick-Dry Mesh for Gym or Beach Days
Choose this breathable alternative when speed and airflow matter most:
1. Round 7: Ch 3 (counts as dc), dc in same st, ch 1, skip 1 st, dc in next st; repeat around
2. Join with sl st to top of ch-3
3. Repeat Round 7 until body reaches 7–8 inches tall
Critical check: Hold the mesh up to light—gaps should be smaller than your bottle’s diameter to prevent slippage.
Create a Twist-Free Strap That Lasts
Simple Row Strap (Beginner’s Best Choice)
This flat strap won’t twist when worn:
1. Chain 6
2. Row 1: Sc in 2nd ch from hook and each ch across (5 sc)
3. Rows 2–N: Ch 1, turn, sc in each st across
4. Continue until strap = 30–36 inches (measure unstretched)
Key reinforcement: Work the final 3 rows through back loops only (blo) for a sturdy seam when attaching.
Foundation Chain Strap for Speed
Skip turning rows with this faster method:
1. Chain 180 (for standard strap length)
2. Join end to body with sl st at opposite rim point
3. Work dc back across chain
4. Add 3 rows of sl st blo along both edges
Warning: Chain too loosely? Your strap will stretch 20% under bottle weight—test tension by hanging a full bottle before finishing.
Secure Straps Without Weak Points
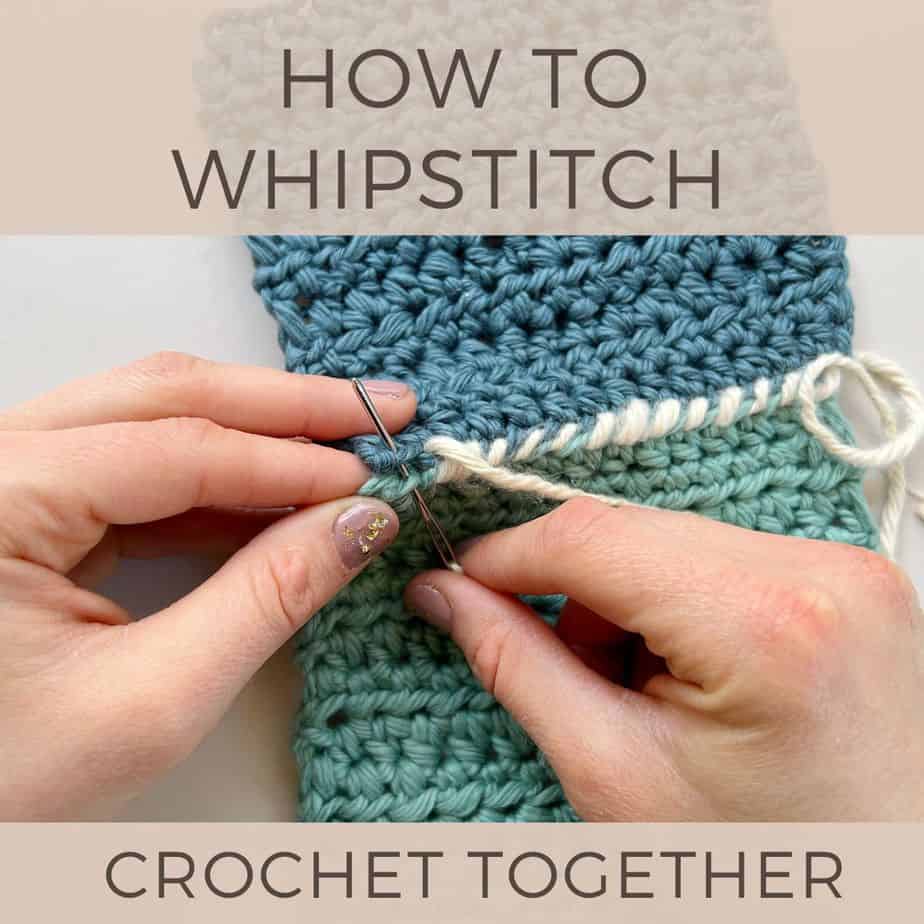
Placement and Attachment Secrets
Position strap ends exactly 180 degrees apart on the holder’s rim—use stitch markers to mark spots before attaching. Then:
1. Align strap edge with body rim
2. Whip-stitch through both layers with yarn tail (not live stitches)
3. Weave tail through 4 stitches, reverse direction, then trim
Avoid this mistake: Attaching straps while the body is stretched on a bottle—they’ll twist when removed.
Prevent the “Corkscrew Strap” Disaster
Straps twist because they’re worked in the round. Fix it permanently:
– Work strap flat (as in Simple Row method)
– Fold it lengthwise with right sides together
– Whip-stitch the long edge closed before attaching to body
Fix Common Problems Before They Ruin Your Project
Stop Stretching Before It Starts
Cotton relaxes 15–20% under load—don’t learn this the hard way:
1. Hang the finished holder with a full water bottle overnight
2. Trim strap 10% shorter than your desired length
3. For mesh bodies, use a smaller hook (e.g., US G instead of H)
Eliminate Bottle Slippage in 2 Steps
If your bottle slides out:
1. Add decrease rounds near the top: Sc2tog, sc around until opening grips bottle
2. Switch to single crochet body (not mesh) for smooth bottles like Hydro Flasks
Gauge Check for Beginners
Your fabric should feel firm but pliable. Test now:
– Crochet a 4×4 inch swatch in dc
– If holes show >1 inch: downsize hook
– If fabric curls tightly: upscale hook
Care for Long-Lasting Holders
Washing That Preserves Shape
Machine wash cold on gentle cycle—but never use hot water. Always lay flat to dry on a towel; hanging wet holders stretches straps irreversibly. Cotton softens beautifully with washing but retains structure for years.
Storage to Prevent Distortion
Store holders rolled loosely in your bag—never hang them empty long-term. If straps lose shape, refresh with a handheld steamer (hold 6 inches away) while reshaping.
Realistic Time and Cost Breakdown
Budget-Friendly Project Timeline
- Material prep: 10 minutes (cut yarn, thread needle)
- Active crochet: 1.5–2 hours for worsted cotton version
- Finishing: 20 minutes (weave ends, attach strap)
Total time: Under 2.5 hours—less than one Netflix episode.
Cost Comparison Per Holder
- Budget cotton (Hobby Lobby): $3.50/skein → $4 total
- Premium mercerized (Lion Brand): $8.99/skein → $9 total
- Eco-plarn (recycled): Free (use plastic bags) → $0
Pro tip: Make 3 holders from one $5 skein as gifts.
Quick Reference Crochet Cheat Sheet
Critical abbreviations:
– MR: Magic ring (not chain 4)
– sc2tog: Single crochet two together (decrease)
– blo: Back loop only (for reinforced edges)
– RS: Right side (outward-facing surface)
Your handmade bottle holder isn’t just practical—it’s a confidence booster proving you can craft genuinely useful items. Start with the basic single-crochet version, then experiment with mesh bodies or color-blocked straps as your skills grow. Within weeks, you’ll have custom holders for every bottle in your life, ready to gift or keep. Grab that half-used cotton skein from your stash and start crocheting freedom today—your hands (and hydration habits) will thank you.


