

Your Kohler toilet paper holder installation can make the difference between a bathroom that feels professionally finished and one that looks hastily thrown together. When installed correctly, it provides smooth operation and stays securely mounted for years. But improper installation leads to frustrating wobbles, wall damage, and the constant need for tightening. Whether you’re replacing an outdated model or installing your first Kohler holder, this guide ensures your installation looks factory-perfect and functions flawlessly.
Most homeowners don’t realize that toilet paper holder placement affects bathroom accessibility and daily convenience. The right height and positioning prevent awkward reaching and ensure comfort for all household members. With Kohler’s premium fixtures, you’ve invested in quality—now protect that investment with proper installation techniques that prevent common problems like wall damage and misalignment. Follow these steps to achieve a secure, level installation that enhances your bathroom’s functionality.
Measure and Mark Your Ideal Installation Position
Getting the height and placement right makes all the difference in daily usability. Kohler recommends installing toilet paper holders between 26-30 inches from the finished floor, but this standard might not work for your specific bathroom layout or household needs.
Determine Optimal Height for Your Household
Consider who uses your bathroom most frequently when deciding on height. For households with children, you might install a lower secondary holder while keeping the primary at standard height. Taller individuals often prefer holders closer to 30 inches, while shorter users may find 26 inches more comfortable. Always measure from the finished floor—not the base of the toilet—to ensure consistency. Take multiple measurements at different points along your chosen wall to account for any floor irregularities.
Position Relative to the Toilet
The perfect placement sits 8-12 inches from the front edge of the toilet bowl when seated. Stand where the toilet would be and visualize your natural arm movement—your hand should reach the paper without straining or twisting. For right-handed users, install the holder on the right side of the toilet; switch to the left for left-handed household members. Never finalize placement while standing—actually sit on the toilet with a tape measure to confirm comfortable reach before marking your wall.
Locate Solid Mounting Points for Maximum Stability

Your Kohler holder will only be as secure as its mounting points. Finding solid backing prevents future loosening and wall damage that comes from anchors pulling through drywall.
Identify Wall Studs with Precision
Run your stud finder horizontally across the wall at your desired height, marking both edges of each stud you locate. Focus on finding at least one stud within your preferred placement zone—if both mounting points can hit studs, you’ll achieve maximum holding strength. When marking stud locations, extend the lines vertically with a pencil to create clear reference points. For older homes with inconsistent stud spacing, verify each mark by drilling a tiny pilot hole to check for solid wood.
Plan for Drywall Installations Without Studs
When your ideal placement doesn’t align with studs, quality wall anchors become essential. Choose anchors specifically rated for bathroom humidity and the weight capacity of your Kohler model. For standard drywall, toggle bolts provide superior strength compared to plastic anchors. Mark your drilling points with extreme precision—most Kohler brackets have minimal adjustment range once mounted. Apply painter’s tape over the marked area to prevent the drill bit from slipping and damaging your wall finish.
Prepare the Installation Area for Professional Results
Skipping proper surface preparation leads to weak adhesion and premature failure. Bathrooms present unique challenges with moisture and residue that compromise installation integrity.
Clean Wall Surface Thoroughly
Wipe the installation area with rubbing alcohol on a lint-free cloth to remove invisible soap scum, oils, and residue that prevent proper anchor seating. Pay special attention to the exact spots where bracket mounting points will contact the wall. For tile installations, clean grout lines thoroughly as they often harbor moisture-trapping debris. Allow the surface to dry completely—any moisture during installation creates pathways for future moisture damage behind the fixture.
Assess Wall Condition Before Drilling
Examine your wall for soft spots, cracks, or previous repair work that could compromise installation. Gently press around the planned mounting area—if the wall flexes noticeably, you’ll need reinforcement. For minor drywall damage, apply spackle and let it cure fully before drilling. When working with tile, check for loose or cracked pieces near your installation zone—repairing these first prevents further damage during drilling. Never mount into compromised surfaces; the extra time spent on repairs now prevents costly fixes later.
Mount the Kohler Bracket System Correctly
The mounting bracket forms the critical connection between your wall and the visible holder components. Proper bracket installation ensures everything else aligns perfectly.
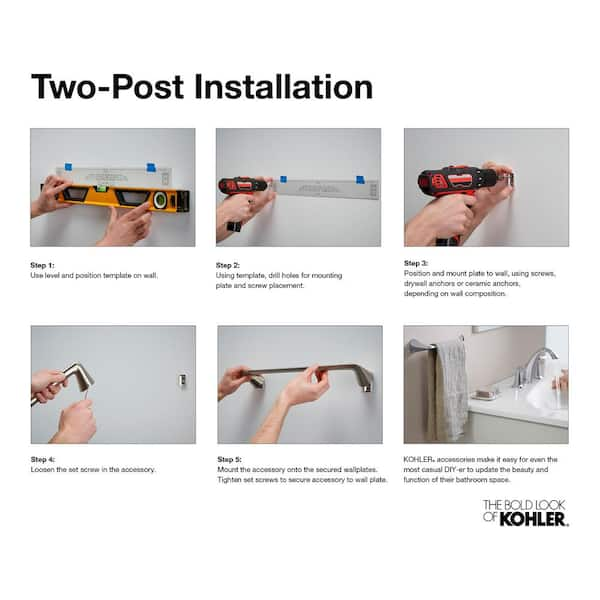
Position and Level the Mounting Template
Hold Kohler’s provided template firmly against the wall at your predetermined height. Place a quality level across the top of the template—don’t trust the wall’s appearance alone, as slight tilts become glaringly obvious once installed. Mark the bracket holes with a sharp pencil through the template’s guides. For perfect alignment, have a second person verify the level while you hold the template steady. Double-check measurements from fixed points like the floor or adjacent fixtures to ensure consistent placement.
Drill Precise Pilot Holes
Select the correct drill bit size based on your wall type and anchors—typically 1/4 inch for standard drywall installations. For tile walls, start with a small masonry bit to create a starter hole before switching to the proper size. Drill slowly at a 90-degree angle to prevent wall damage, especially near edges where cracking occurs easily. When drilling into studs, use a wood-rated bit slightly smaller than your screw diameter. Vacuum or blow out dust from the holes before inserting anchors—debris prevents proper seating and reduces holding strength.
Secure the Bracket Without Overtightening
Insert wall anchors until they sit flush with the wall surface, then position the Kohler bracket over the holes. Begin threading screws by hand to ensure proper alignment before using a drill. Drive screws firmly but stop when you feel significant resistance—overtightening strips anchors and cracks tile. The bracket should sit completely flat against the wall with no gaps or movement. Test stability by gently wiggling the bracket before proceeding to the next step.
Assemble and Attach the Visible Components
With the bracket securely mounted, installing the visible parts of your Kohler holder should be straightforward when following the correct sequence.
Install the Base Plate Properly
Slide the Kohler base plate onto the secured bracket, applying even pressure across the mounting points. Most models feature a positive click when properly engaged—listen for this confirmation. Gently wiggle the base to verify secure attachment; if resistance occurs, don’t force it. Remove and check bracket alignment, as even slight misalignment prevents proper seating. The base should sit flush against the wall with no visible gaps or tilting.
Mount the Roll Bar Correctly
Insert the roll bar through the base mounting points according to your specific Kohler model. Spring-loaded models require compressing one end while inserting the other—use a small tool if needed for leverage. Test the bar’s movement by extending and retracting it several times; it should operate smoothly without binding. For models with set screws, use the provided Allen key to tighten just enough to secure the bar without restricting movement.
Apply Finishing Touches Professionally
Snap decorative caps into place over visible mounting hardware for that clean, factory appearance. Press firmly until each cap sits flush with the holder’s surface—gaps around caps collect dirt and look unprofessional. For adjustable models, set your preferred roll extension length now, as changing it later requires partial disassembly. Inspect all components from multiple angles to ensure perfect alignment before considering the installation complete.
Verify Installation Quality Before Final Use
Thorough testing prevents embarrassing failures and ensures your Kohler holder performs as expected under real-world conditions.
Test Structural Integrity
Apply gradual pressure in multiple directions—downward, upward, and side-to-side—to verify bracket security. The holder shouldn’t flex or move away from the wall under normal use. Try pulling directly on the roll bar with moderate force; any movement indicates loose mounting that needs immediate correction. Pay special attention to the bracket-to-wall connection point, as this is where failures typically begin.
Confirm Smooth Operation
Load a standard toilet paper roll and test rotation through multiple revolutions. The roll should spin freely without catching against the wall or base components. For pivoting models, verify smooth 180-degree rotation in both directions. Check that the roll stays securely on the bar during normal use but releases easily when replacing paper. Any binding or resistance indicates misalignment that needs adjustment.
Address Common Installation Issues Immediately
Even careful installations sometimes encounter problems. Knowing how to fix these issues prevents wall damage from repeated drilling attempts.
Strengthen Loose Mounting
If your holder shows any movement, remove it and inspect anchor seating. For persistent loosening in drywall, replace standard anchors with toggle bolts for superior holding power. In tile installations, epoxy anchors provide the strongest bond in challenging surfaces. Never ignore minor wobbling—it accelerates wall damage with each use. When relocating, fill old holes with spackle and wait for full cure before reinstalling.
Correct Alignment Problems Efficiently
Slight tilts become glaringly obvious once loaded with paper. Remove the holder and drill new holes approximately 1/2 inch away from originals—this provides fresh wall material for anchors. Fill old holes with spackle before painting over them. Double-check level placement using two different reference points to ensure accuracy. Many alignment issues stem from improper initial marking rather than installation errors.
Final Quality Check and Maintenance Protocol
Your installation should look professionally done and function flawlessly. These final steps ensure lasting satisfaction with your Kohler fixture.
Conduct Comprehensive Inspection
Verify all set screws sit completely flush and decorative caps click securely into place. Run your hand along all edges to check for sharp points or gaps that collect dirt. Test paper roll changes to ensure smooth operation. These finishing details transform a functional installation into one that looks professionally done.
Establish Simple Maintenance Routine
Tighten mounting screws annually, especially in high-humidity bathrooms where moisture affects wall integrity. Clean your Kohler holder with non-abrasive cleaners to maintain its finish and prevent corrosion. Inspect wall anchors yearly for early signs of loosening—catching problems early prevents major repairs. Document your installation location for future reference during bathroom renovations.
A properly installed Kohler toilet paper holder elevates your bathroom from basic to refined with its smooth operation and secure mounting. By taking time with precise measurements and careful drilling, you’ll enjoy reliable performance and a professional appearance for years to come. Remember that the extra few minutes spent ensuring perfect level placement and secure mounting pays dividends every time you reach for the toilet paper. Your attention to detail transforms this simple fixture into a highlight of your bathroom’s functionality.


