
You’re frantically digging through your purse for a tissue, only to pull out a shredded plastic wrapper and a cloud of loose squares. This daily frustration ends with a handmade tissue holder – a project so simple it takes just 15 minutes using fabric scraps you already own. Not only does it protect pocket tissue packs from tearing, but it also transforms boring essentials into personalized accessories you’ll actually want to carry. Whether you’re sewing for yourself or making gifts, this guide delivers professional results without complicated patterns.
Forget intimidating sewing projects. With three beginner-friendly methods detailed below, you’ll create holders that fit standard Kleenex or Puffs packs perfectly. Each technique uses minimal supplies and includes troubleshooting fixes for common mistakes. By the end, you’ll never buy another flimsy tissue wrapper again.
Best Fabrics and Tools for Sewing a Tissue Holder

Skip expensive specialty fabrics – quilting cotton is your secret weapon for success. Its crisp drape holds sharp folds while resisting fraying, making it ideal for beginners. For elegant gifts, choose lightweight linen that develops a beautiful lived-in look. Avoid stretchy knits or heavy upholstery fabrics that won’t fold cleanly around tissue packs.
Must-have supplies for foolproof results:
– Standard sewing machine needle (size 70-80)
– 1/4″ seam allowance foot (critical for precision)
– Point turner or chopstick (for sharp corners)
– Clips instead of pins (faster for small projects)
Pro tip: Measure your actual tissue pack first. Most standard 10-count packs need 5½” x 6½” outer fabric and 5½” x 7½” lining. Add 1″ to width and ½” to height for custom sizing – this prevents frustrating gaps or tight fits later.
Why Your Needle Choice Matters
A dull or incorrect needle causes skipped stitches that unravel under tension. For quilting cotton, use a fresh size 80 needle set at 2.0 stitch length. Test on scraps first: if threads pull tight or fabric puckers, increase presser foot pressure. This small adjustment prevents ripped seams when you pull tissues through the opening.
Exact Measurements for a Snug-Fitting Tissue Holder

Don’t guess your dimensions. Horizontal-opening packs (like Kleenex) require different folds than vertical-pull packs (Puffs). Measure your specific tissue box with a ruler before cutting:
Horizontal pack formula:
– Outer fabric: Pack width + 1″ × Pack height + ½”
– Lining: Same width × Pack height + 1¾”
Vertical pack formula:
– Outer fabric: Pack width + 1″ × Pack height + ½”
– Lining: Same width × Pack height + 2¼”
Critical Fold Measurements
Get these wrong and tissues won’t dispense properly. For horizontal packs: fold left side 1½” inward, right side 2″ inward. For vertical packs: fold top 1½”, bottom 3½”. These asymmetrical folds create tension that holds tissues securely while allowing smooth pulls. Mark fold lines with chalk before sewing – this prevents second-guessing during assembly.
Self-Binding Method: Create a Professional Edge Without Extra Fabric
This technique uses the lining as self-binding – no separate bias tape needed. It’s the fastest professional-looking method for beginners and works for both horizontal and vertical tissue packs.
Prepare Fabric Layers Correctly
Place outer fabric and lining right sides together, aligning one short edge. The lining will extend 1″ below the outer fabric – this intentional overhang becomes your binding. Pin along both long edges, ensuring no fabric shifts. Mistake alert: If layers aren’t perfectly aligned, the binding will show unevenly after turning.
Stitch and Turn for Perfect Edges
Sew both long edges with precise ¼” seam allowance. Clip curves at corners (don’t cut stitches!), then turn right-side out. Use a chopstick to push out corners firmly. Press with steam, allowing exactly ¼” of lining to show as a clean border on both sides. This creates the illusion of purchased binding.
Fold and Secure the Opening
With outer fabric facing up:
1. Fold left side 1½” toward center (horizontal packs) or top 1½” down (vertical packs)
2. Fold right side 2″ toward center (horizontal) or bottom 3½” up (vertical)
3. Pin layers together where folds overlap – this creates the tissue slot
Add a ribbon loop now: Sandwich a 1½” ribbon piece between layers on the non-folded short side before stitching ends. Backstitch twice to prevent ripping.
Close and Finish the Holder
Stitch both open ends with ¼” seam, reinforcing the fold overlap area with a second line of stitching. For a boxy pouch, pinch each corner to form triangles and stitch ⅜” from the point. Turn right-side out, push corners sharp, and insert tissues immediately to maintain shape.
Simple Rectangle Method: Sew a Tissue Holder in 5 Minutes
When you need instant results, this no-pattern method works with identical outer and lining fabrics. It’s perfect for matching holiday prints or using up tiny scraps.
Cut and Stitch in One Pass
Cut both fabrics 7″ x 6″. Place right sides together, pinning along both 6″ edges. Sew with ½” seam allowance, leaving both short ends open. Clip corners diagonally, then turn right-side out through one short end. Press flat with seams centered.
Create the Tension Pocket
Fold the holder in half lengthwise with wrong sides out, matching the stitched edges. Pin through all layers where the raw edges meet. This creates the crucial tension zone that holds tissues securely. Sew both short ends ½” from edge, backstitching at fold points.
Prevent Fraying Without Serger
Finish raw edges before final stitching:
– Zig-zag stitch ⅛” from edge
– Or use pinking shears for quick fray resistance
– For luxury feel, hand-stitch folded bias tape over edges
Turn right-side out, press, and test with tissues immediately. The folded raw edges should create slight resistance when pulling tissues.
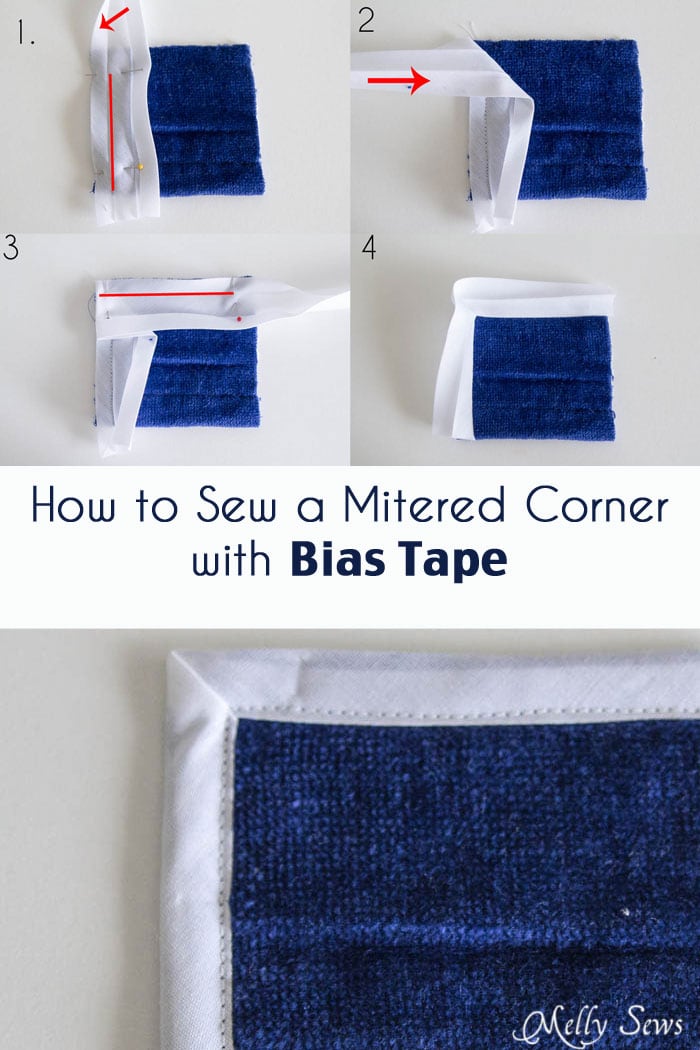
Bias-Trim Method: Add Decorative Edges to Your Tissue Holder
Transform basic holders into heirloom pieces with contrasting bias trim. This method adds visual interest while reinforcing stress points.
Make Perfect Bias Strips
Cut two 7″ x ¾” strips from coordinating fabric on the true bias (45-degree angle to selvage). Fold long edges toward center and press to create double-fold bias tape. Topstitch along both folded edges for durability before applying.
Apply Trim to Outer Fabric
Position bias strips across both short ends of your 6″ x 7″ outer fabric piece. Pin meticulously, mitering corners at 45 degrees. Stitch ⅛” from inner edge using a zipper foot. This creates clean, professional-looking bound edges that won’t fray.
Assemble the Holder
Fold trimmed edges inward so they overlap by ½”. Pin through all layers, matching mitered corners precisely. Stitch both long sides with ⅜” seam allowance. Turn right-side out using a point turner – the bias trim will protect raw edges during turning.
Fix These 4 Common Tissue Holder Sewing Mistakes
Holder too tight? Add precise ease
If tissues won’t insert smoothly, your sizing is off. Re-cut using the custom formula: Pack width + 1¼” (not 1″) and height + ¾”. This extra ¼” accommodates fabric thickness without compromising tension.
Binding rolls inward? Adjust lining length
When the lining edge disappears inside the holder, your lining strip is too short. Add 1½” instead of 1¼” to the height measurement. After turning, the lining should extend 3/16″ beyond the outer fabric for a crisp finish.
Tissues catch on opening? Verify fold measurements
Horizontal packs require exactly 1½” left fold and 2″ right fold. Vertical packs need 1½” top fold and 3½” bottom fold. Measure twice before folding – even 1/8″ error causes snagging.
Bulky corners? Trim seams strategically
After boxing corners, trim seam allowances to ⅛” but leave stitching intact. For extra-flat corners, press seams open before turning instead of to one side.
Turn Tissue Holders into Thoughtful Gifts: Creative Ideas
Skip store-bought gifts with these personalized touches that take minutes:
Teacher appreciation: Use school colors with iron-on vinyl initials. Add a 3″ ribbon loop for backpack attachment.
Bridal favors: Stitch in wedding palette fabrics with satin ribbon loops. Attach mini poem tags: “Wipe away tears of joy!”
Holiday stocking stuffers: Festive prints with metallic thread topstitching. Pair with matching handkerchief.
Travel sets: Use luggage-tag fabric scraps. Attach a 2″ carabiner clip to the ribbon loop for purse or belt attachment.
Keep Your Sewn Tissue Holder Looking New: Washing Tips
Preserve your handmade holder with proper care:
– Machine wash cold on gentle cycle inside a mesh bag
– Never use bleach – it degrades elastic tension
– Air-dry flat away from direct sunlight
– Press with warm iron before first use
Critical maintenance step: After each washing, re-press the fold lines with steam. This restores the tension zone that prevents tissues from falling out. Replace holders when fabric shows pilling or the opening stretches.
Pre-Use Checklist: Avoid These 5 Tissue Holder Problems
Before inserting tissues, verify these points:
– [ ] Tissue pack orientation matches holder style (horizontal vs. vertical)
– [ ] Fold measurements exact (1½” and 2″ for horizontal; 1½” and 3½” for vertical)
– [ ] Ribbon loop securely stitched with 4 backstitches
– [ ] Raw edges finished to prevent fraying
– [ ] Corners fully turned and pressed sharp
If tissues pull too easily, add a second line of stitching ¼” from the opening edge. If they stick, gently rub beeswax along the dispensing slot.
With these techniques mastered, you’ll never struggle with torn tissue wrappers again. Keep a stack of fabric scraps and thread in your car for impromptu sewing sessions – these take so little time, you’ll make extras for every purse, glove compartment, and desk drawer. The next time someone asks where you got your stylish tissue holder, you’ll smile knowing you created it yourself in less time than it takes to run errands.


