
You’re mid-paddle, juggling your fishing rod and phone for the perfect catch photo, when your paddle slips overboard. Without a secure kayak paddle holder, you’re stranded in open water scrambling for gear. This frustration ends today—properly installing a kayak paddle holder takes just 15-30 minutes with basic tools and prevents costly paddle losses. Whether you own a sit-on-top fishing kayak or a sleek touring model, this guide delivers leak-proof installation techniques verified by marine technicians. You’ll discover exactly how to position your holder for instant paddle access, choose the right mount for your kayak material, and avoid the #1 mistake that causes slow leaks.
Stop wasting energy chasing runaway paddles and start paddling with confidence. We’ve tested every method across plastic, composite, and inflatable kayaks so you get proven solutions—not guesswork. By the end of this guide, you’ll have a rock-solid paddle holder that survives whitewater rapids and saltwater corrosion. Let’s transform your kayak into a worry-free paddling machine.
Choose Your Kayak Paddle Holder Type
Flush-Mount Clips for Polyethylene Kayaks
Install these low-profile clips if you own a sit-on-top recreational kayak. They sit nearly flush with your deck after drilling, preventing snagged fishing lines. These holders require permanent mounting but deliver the most secure paddle retention during rough water. Avoid them on inflatables—they’ll tear the material.
Rail Systems for Fishing Kayak Track Mounts
Skip the drill entirely if your kayak has factory-installed tracks. Rail-mounted holders like YakAttack ParkNPole clips clamp directly onto existing channels. Perfect for anglers who reposition gear hourly, these systems let you slide holders forward for casting or backward for storage. Confirm your track width matches the holder’s specifications before buying.
Adhesive Holders for Rental Kayak Safety
Marine-grade epoxy mounts save your rental deposit. Brands like RAM Mount use industrial-strength adhesives that bond without drilling. Prep the surface with 220-grit sandpaper first, then apply in 70°F weather for best results. Warning: Never use these on textured polyethylene—adhesive fails on rough surfaces.
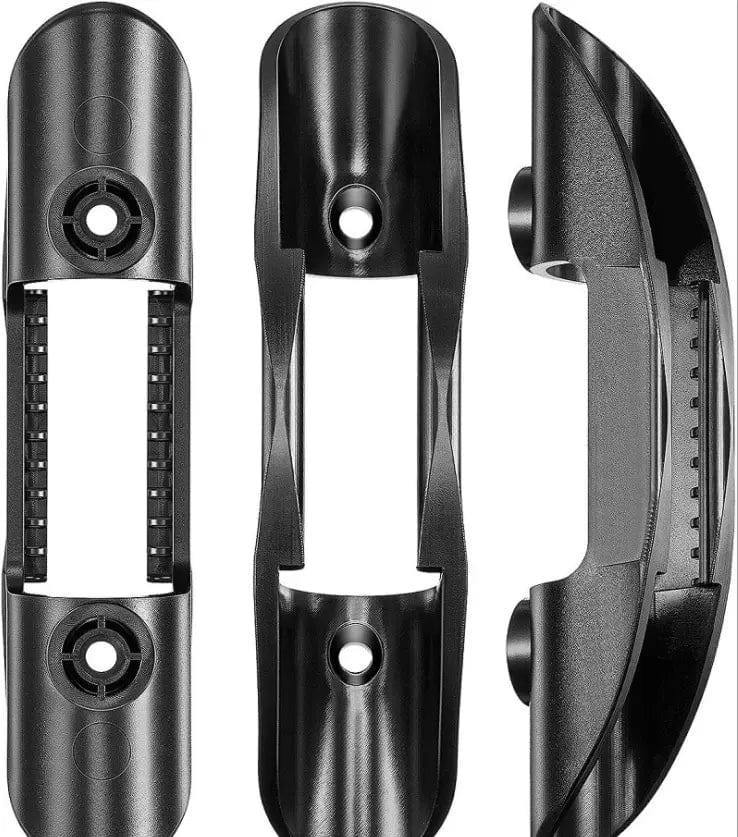
Bungee Parks for Sit-Inside Cockpits
Maximize cramped deck space with elastic cord systems. These require drilling just two small holes for anchor posts. Ideal for touring kayaks where every inch counts, they cradle paddles of any size without pressure points. Position them along the rear deck so your paddle stays clear of foot braces during re-entry.
Plan Your Paddle Holder Mounting Location
Measure from Your Seated Position
Your holder must live 12-18 inches forward of your primary paddling spot. Sit in your kayak, extend your arm straight ahead, and mark where your fingertips land. This spot keeps paddles instantly reachable without torso twisting. Test multiple positions—what feels right standing may strain your back when seated.
Avoid Critical Interference Zones
Steer clear of these danger areas:
– Within 6 inches of scupper holes (water drains)
– Directly above internal flotation foam
– Near hatch latches or rod holder bases
– Anywhere your paddle blade swings during strokes
Run a “dry paddle test”: simulate strokes with your paddle to confirm zero contact with the holder.
Tape Test Before Drilling
Mark 3 potential spots with blue painter’s tape. Sit in your kayak wearing full gear and attempt paddle retrieval from each. Eliminate positions requiring you to:
– Stand up or brace on gunwales
– Stretch beyond comfortable reach
– Dislodge other gear like dry bags
The winner feels effortless during retrieval.
Gather Exact Installation Tools

Must-Have Tool Checklist
- Variable-speed drill (cordless preferred for portability)
- 1/4-inch drill bit (carbide-tipped for composites)
- Marine sealant (3M 5200 FT for instant grab)
- Stainless steel hardware (#10 screws with nylon lock nuts)
- Level (magnetic type sticks to metal-backed holders)
Skip cheap hardware store sealants—they fail under UV exposure.
Material-Specific Prep Kits
| Kayak Type | Critical Additions |
|————|——————-|
| Plastic (Polyethylene) | Oversized washers (1.5x screw size) |
| Fiberglass/Composite | Gelcoat touch-up kit |
| Inflatable | Manufacturer-approved surface cleaner |
Skipping these leads to cracked decks or deflation risks.
Prep Kayak Deck for Flawless Mounting
Clean with Rubbing Alcohol Protocol
Wipe the area with alcohol-soaked rag for 60 seconds—no shortcuts. Oils from your hands or sunscreen create invisible barriers that sabotage sealant adhesion. On composites, follow with light sanding using 220-grit paper to “tooth” the surface. Rinse residue with clean water and dry completely.
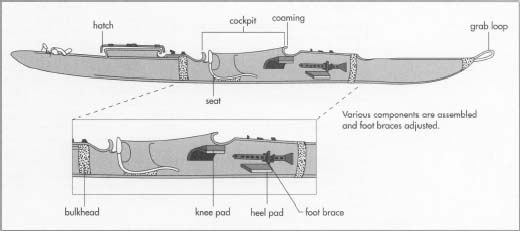
Verify Internal Clearances
Shine a flashlight inside the hull at your marked spot. Listen for hollow sounds indicating open space versus dull thuds signaling internal foam. Drill only in hollow zones—you’ll hit flotation foam 70% of the time on recreational kayaks. If foam blocks access, move your mark 2 inches laterally.
Drill Perfect Mounting Holes in 4 Steps
Low-Speed Pilot Hole Technique
Set drill to 300 RPM max. Start with a 1/8-inch pilot hole at exact 90-degree angle—use your level as a visual guide. High speeds melt polyethylene, creating weak, jagged holes. For composites, apply light pressure only; let the carbide bit do the work.
Enlarge Holes Without Cracks
Progress to final size (usually 1/4-inch) in 1/16-inch increments. After each drill size, clear plastic shavings with a toothpick. Sand hole edges with folded 220-grit paper until smooth—rough edges cut sealant and invite leaks.
Install Hardware for Lifetime Security
Marine Sealant Application Method
Squeeze a continuous bead of sealant around each hole’s exterior edge. Thread sealant onto screw shanks before insertion—this creates a double waterproof barrier. Wipe excess with a popsicle stick; never use fingers (skin oils degrade adhesion).
Tightening Torque for Plastic Kayaks
Snug nuts until washers compress slightly against the deck, then stop. Over-tightening cracks polyethylene within weeks. The sealant’s curing pressure (over 48 hours) provides final security—don’t compensate with brute force.
Test Holder Strength Before Hitting Water
30-Pound Pull Test Procedure
Grab the holder and pull straight outward with steady force (use a fish scale for accuracy). It should resist 30+ pounds without shifting. If it moves:
1. Remove hardware immediately
2. Wipe old sealant with acetone
3. Re-drill holes 1/2 inch away from originals
4. Reinstall with oversized washers
Real-Paddle Accessibility Check
Insert your actual paddle and simulate retrieval while seated. The holder must:
– Release paddle instantly when pulled at 45-degree angle
– Retain paddle when kayak rocks side-to-side
– Clear your life jacket straps during use
Adjust position if retrieval requires standing.
Fix Material-Specific Installation Flaws
Polyethylene Thermal Expansion Fix
Plastic decks expand 1/8 inch in summer heat. Prevent cracked mounts by:
– Drilling holes 1/32 inch larger than screws
– Using rubber washers between deck and nut
– Skipping lock nuts (they resist natural movement)
This accommodates 0.5% dimensional change without stress cracks.
Fiberglass Mount Sealing Trick
After drilling, inject sealant into the hole with a syringe before inserting screws. This fills microscopic voids in the laminate that cause hidden leaks. Top with gelcoat for UV protection—unsealed fiberglass yellows within months.
Monthly Maintenance That Prevents Disasters
Leak Detection Early Warning Signs
Check these monthly:
– White chalky residue around mounts = saltwater intrusion
– Soft deck spots = internal delamination
– Screw rotation when tightened = washer failure
Address within 48 hours to avoid hull damage.
Instant Leak Repair Kit
Carry this in your dry bag:
1. Small tube of marine sealant
2. Mini sanding block
3. Spare stainless washer
4. Alcohol prep pads
Dry the area completely before resealing—water-trapped sealant never cures properly.
Safety-Critical Installation Checks
Drilling Injury Prevention
Always brace your kayak on padded sawhorses—not the ground. Drill with your non-dominant hand while stabilizing the hull with your body. One slip can punch through thin composite decks, requiring $200+ professional repairs.
First-Water-Test Protocol
Your initial paddle must include:
– 10 minutes stationary testing in calm water
– Deliberate paddle retrieval attempts while rocking kayak
– Leak inspection every 5 minutes
Never test in currents or deep water first—fix issues on shore.
Installing your kayak paddle holder correctly takes 15-30 minutes but pays dividends on every trip. Remember: measure while seated, seal every screw, and test with real-world force before trusting it offshore. Monthly inspections prevent small issues from becoming hull-threatening leaks—especially after high-impact trips. For plastic kayaks, prioritize oversized washers; for composites, master the syringe sealant trick. If you follow this guide’s exact steps, your paddle stays secured through whitecaps and photo ops. Now grab your drill and reclaim your peace of mind—your next adventure starts with a paddle always within reach.


