
Nothing ruins a perfect fishing spot faster than juggling rods while trying to bait hooks or reel in your catch. A reliable rod holder transforms your fishing experience from frustrating to effortless, letting you focus on what matters—catching fish. Whether you’re bank fishing, boating, or surf casting, learning how to make a rod holder saves money while creating a custom solution for your exact needs. This guide walks you through three proven construction methods that solve the universal angler’s problem: unstable rod setups causing missed strikes and lost catches.
Building your own rod holder gives you complete control over durability, placement, and functionality—critical when fighting a trophy fish. Unlike store-bought versions that cost $50+ and break within seasons, your DIY creation will withstand harsh elements while fitting your specific fishing style. You’ll master techniques that work in rocky soil, sandy beaches, or boat gunwales, turning frustrating moments into successful hauls.
PVC Rod Holder for Bank Fishing
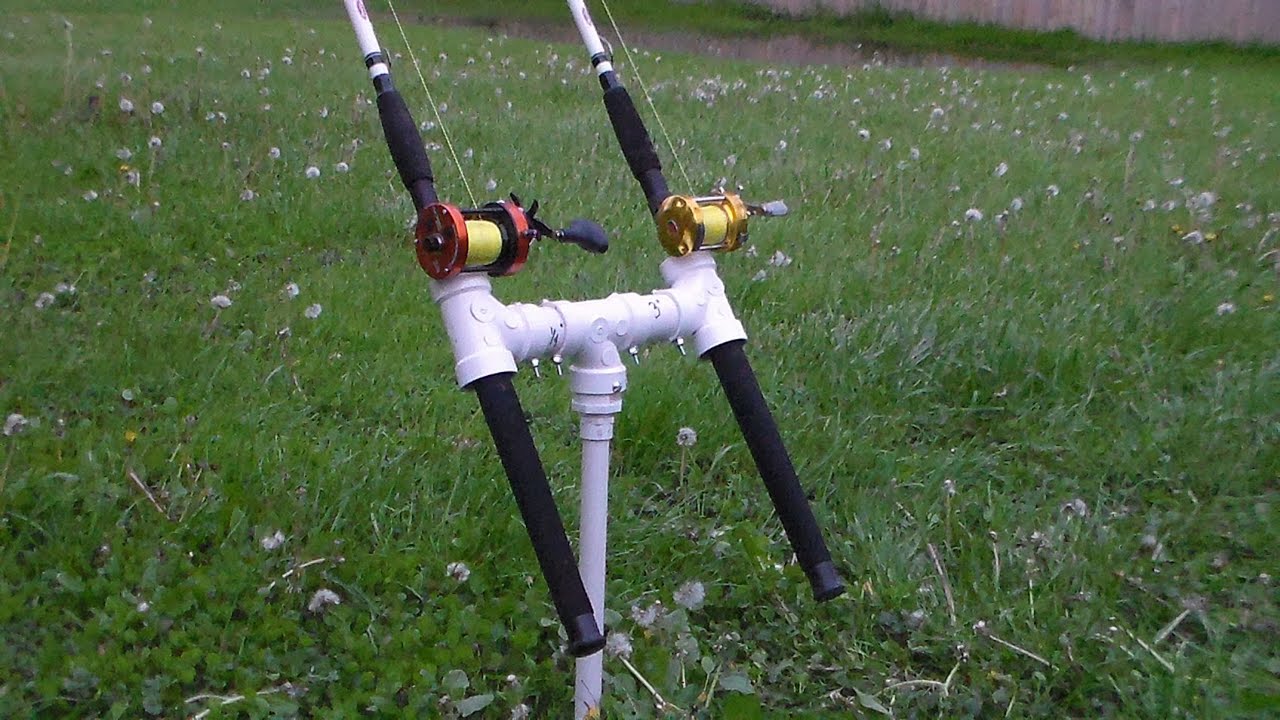
PVC rod holders offer the perfect starting point for DIY anglers. Costing under $25 in materials, these weather-resistant holders work anywhere you can drive them into the ground. Their lightweight design makes them ideal for portable bank fishing setups where stability meets convenience.
Required Materials List
- 1.5-inch Schedule 40 PVC pipe (36 inches)
- 1.5-inch PVC T-junction
- PVC slip-fit end cap
- 1/4-inch steel rod (12 inches)
- PVC cement and primer
- Rubber end caps
- UV-resistant spray paint
Critical mistake to avoid: Using thin-walled PVC piping that cracks under pressure. Schedule 40 provides the necessary thickness to withstand rod torque during fish fights. Always inspect pipes for stress marks before assembly—hairline cracks worsen rapidly when driven into soil.
Cutting and Preparation Steps
Start by cutting your main PVC pipe to 30 inches using a miter saw or PVC cutter. This length provides optimal leverage for ground insertion while keeping rod handles accessible. Cut a 6-inch section from the remaining pipe—this becomes your rod cradle support. Pro tip: Sand all cut edges immediately after cutting. Rough edges damage fishing line and create stress points that lead to cracks. For saltwater use, double the sanding time to eliminate microscopic ridges that accelerate corrosion.
Assembly Process
Dry-fit your components first: insert the T-junction onto your main shaft at a 15-degree upward angle. This angle prevents rods from sliding out while maintaining visibility of rod tips. Once satisfied with alignment:
1. Apply PVC primer to all joining surfaces
2. Brush cement onto primed areas
3. Immediately assemble joints with firm pressure
4. Hold each joint for 30 seconds to ensure proper bonding
Insert your 6-inch section into the top of the T-junction, creating a Y-shaped cradle. Drill a 1/4-inch drainage hole through the bottom cap—standing water rots rod handles and breeds mosquitoes. Warning: Skip this step, and you’ll face warped handles within weeks during humid seasons.
Ground Spike Installation
Sharpen one end of your steel rod to a 45-degree point using a bench grinder. Drill through the PVC end cap, then insert the steel rod with 8 inches exposed for ground penetration. Secure with marine-grade epoxy. The steel spike needs to penetrate at least 12 inches into soil for stability in windy conditions. For rocky terrain, pre-drill holes with a masonry bit to prevent bending. Test stability by applying downward pressure—any wobble means deeper insertion is needed.
Wooden Bank Holder Construction
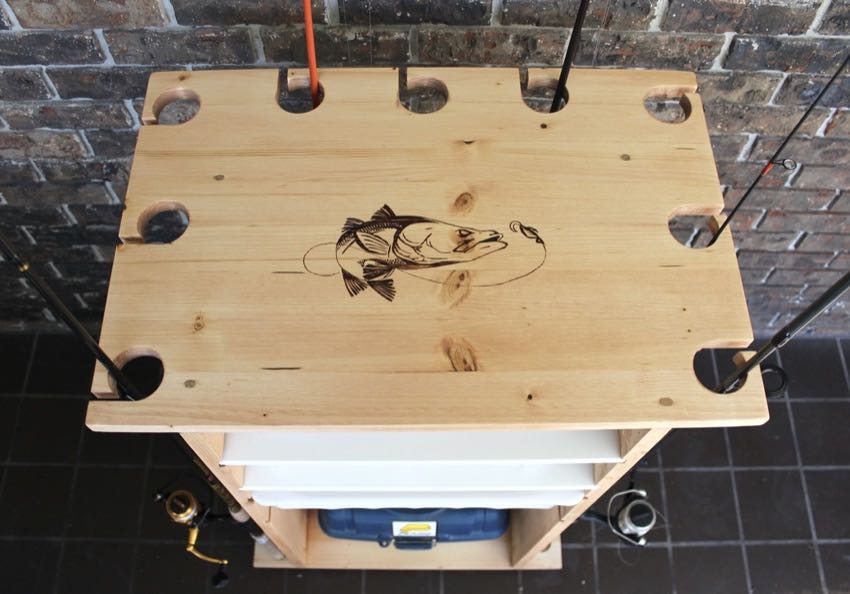
Wooden rod holders excel in rocky soil where PVC spikes bend or break. Using hardwood dowels and pressure-treated lumber creates durable, adjustable systems that last for years. This method solves the critical problem of soil resistance while providing natural aesthetics that blend with shore environments.
Material Selection Guide
- Hardwood dowel: 1-inch diameter, 48-inch length (oak or maple)
- Cradle lumber: 2×6 pressure-treated (12 inches)
- Hardware: 3/8-inch carriage bolt with wing nut
- Fasteners: 2.5-inch galvanized screws
- Protection: Exterior wood sealer and wood glue
Environmental note: Never use treated lumber for the shaft itself. Chemicals in pressure-treated wood contaminate soil and waterways. Opt for untreated hardwood like oak, which naturally resists rot without harmful chemicals. Cedar makes an excellent cradle alternative for its water-resistant properties.
Main Shaft Preparation
Cut your hardwood dowel to 36 inches using a miter saw. Sharpen the bottom end to a 30-degree point using a belt sander—this angle penetrates ground more easily than PVC spikes. Apply two coats of exterior sealer, allowing 24 hours between coats for maximum protection. Pro tip: For saltwater use, add a third coat of marine varnish to prevent swelling. Check the shaft annually for cracks at stress points near the cradle connection.
Rod Cradle Fabrication
Cut your 2×6 lumber into a Y-shape using a jigsaw. Create a 1.5-inch deep V-notch at 60 degrees—this angle accommodates most rod handles without allowing rotation. Drill a 3/8-inch hole through both cradle and dowel, 6 inches from the top. This creates your adjustable pivot point. Assemble using the carriage bolt and wing nut. The wing nut allows on-the-fly angle adjustments based on fishing conditions. Apply additional sealer to all connections, paying special attention to the pivot joint where moisture enters most easily.
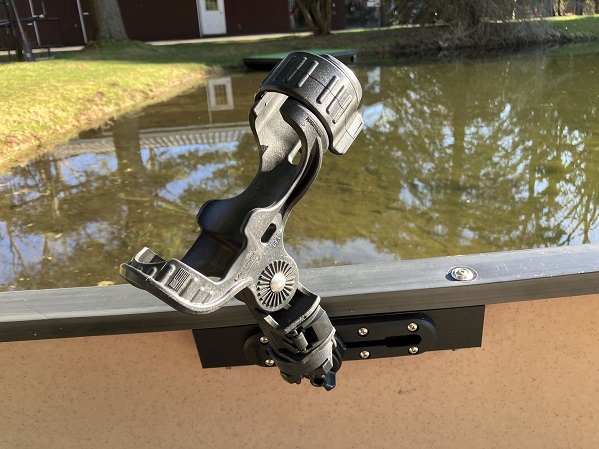
Metal Fabrication Method
Metal rod holders provide maximum durability for boat mounting and permanent installations. Using electrical conduit creates professional-grade holders at a fraction of marine store prices. This method solves the critical weakness of plastic holders in high-wind or saltwater environments where corrosion and UV damage destroy cheaper alternatives.
Tools and Materials
- 3/4-inch electrical conduit (EMT)
- Conduit bender
- Welding equipment or compression fittings
- Marine-grade hardware
- Rust-preventive paint
- Rubber end caps and insulation
Critical upgrade: For saltwater use, switch to stainless steel conduit despite the higher cost—it lasts 3-5 times longer. Aluminum works for freshwater but requires internal reinforcement to prevent bending under heavy rod pressure.
Bending Process
Cut your conduit to 30 inches for most applications. Using a conduit bender, create a 30-degree bend 6 inches from one end—this forms your rod angle. For boat mounting, create a secondary 90-degree bend 4 inches from the opposite end for flush mounting. Expert note: Practice bends on scrap conduit first. EMT kinks easily if bent too sharply or without proper support. A kinked conduit creates weak points that fail under stress.
Connection Methods
Choose your connection method based on needs:
– Welded construction: Permanent, strongest option for fixed installations
– Compression fittings: Removable and adjustable for seasonal use
– Threaded connections: Collapsible for storage in tight spaces
After fabrication, clean all metal with degreaser and apply two coats of metal primer. Finish with marine-grade paint or consider powder coating for professional appearance. Warning: Skip surface prep, and rust will appear within weeks in humid conditions.
Installation Systems That Work
Ground Installation Techniques
Drive your holder straight down—never angle it backward. In rocky soil, pre-drill using a 1/4-inch masonry bit. For sandy conditions, use auger-style bases or wide foot plates to prevent sinking. Critical safety step: Always call 811 before installation to locate underground utilities. Hitting a gas line could be catastrophic. Test stability by applying downward pressure equal to a fighting fish’s pull—any movement means deeper insertion is needed.
Installation checklist:
– Check for underground utilities (call 811)
– Test stability with downward pressure
– Adjust angle based on wind conditions
– Mark location with reflective tape for night fishing
Boat Mounting Options
Gunwale clamps work for temporary mounting, while track systems offer unlimited positioning. For permanent installation, use backing plates to distribute load and prevent hull damage. Pro tip: On inflatable boats, use clamp-on mounts that won’t puncture the hull. Position holders 30 degrees from vertical for optimal trolling performance.
Maintenance and Longevity
PVC System Care
Apply UV-resistant spray annually—unprotected PVC becomes brittle within two seasons. Disassemble and store indoors during winter to prevent freeze damage. Check quarterly for stress cracks at joints, especially after heavy winds. Critical fix: If cracks appear, replace the T-junction with Schedule 80 PVC for twice the wall thickness.
Metal Maintenance
Inspect monthly for rust spots, particularly around welds and hardware. Touch up paint immediately—surface rust spreads quickly in marine environments. Apply marine grease to adjustable threads every few months to prevent seizing. Warning: Saltwater anglers must perform this maintenance bi-weekly during peak season.
Wooden System Upkeep
Reapply exterior sealer each spring. Check ground insertion points yearly for rot—cut back damaged sections and treat with wood hardener. Tighten all hardware monthly; expansion and contraction loosen joints over time. Pro tip: Sand away surface mold immediately with coarse grit paper before it penetrates the wood.
Performance Optimization Tips
Rod Security Features
Add bungee cord retention systems for high-wind conditions. Install rubber grips or textured surfaces to prevent rod rotation. Quick-release lever systems let you grab rods instantly when fish strike. Critical upgrade: For heavy surf rods, add a secondary locking pin to prevent accidental dislodging during wave impacts.
Ergonomic Positioning
Position holders 30-36 inches from your standing surface for comfortable monitoring. Angle rods 30-45 degrees for optimal visibility—too flat makes strike detection difficult. Ensure clear sight lines to rod tips without obstructions. Pro tip: During night fishing, add glow-in-the-dark tape to rod butts for instant strike recognition.
Building your own rod holder saves 60-80% over commercial versions while creating custom solutions for your specific fishing style. Start with PVC for simplicity, then graduate to metal as your skills improve. Each holder you build teaches valuable techniques for the next project.
Remember: the best rod holder is the one you actually use. Build one system perfectly suited to your favorite fishing spot, then expand your collection as needs arise. Your future self—relaxed and watching multiple rods instead of juggling them—will thank you. Always remove installations when leaving to preserve fishing areas for others. With these proven techniques for how to make a rod holder, you’ll transform frustrating fishing trips into successful adventures where every strike counts.


