Your sewing machine hums along perfectly until suddenly—stitch failure. The telltale sign? Your bobbin holder not spinning as you attempt to create clean seams. This common but frustrating issue strikes sewers of all skill levels, whether you’re hemming pants or creating intricate embroidery designs. When your bobbin holder stops rotating, your machine can’t form proper stitches, leaving you with tangled thread and unfinished projects.
A non-spinning bobbin holder typically stems from preventable issues rather than catastrophic machine failure. Most problems originate from simple mechanical obstructions or maintenance oversights you can address in under 15 minutes. The good news is that with proper diagnosis and the right approach, you can resolve 90% of bobbin holder rotation issues without professional help. This guide delivers immediate solutions to get your sewing machine back in action and prevent future occurrences.
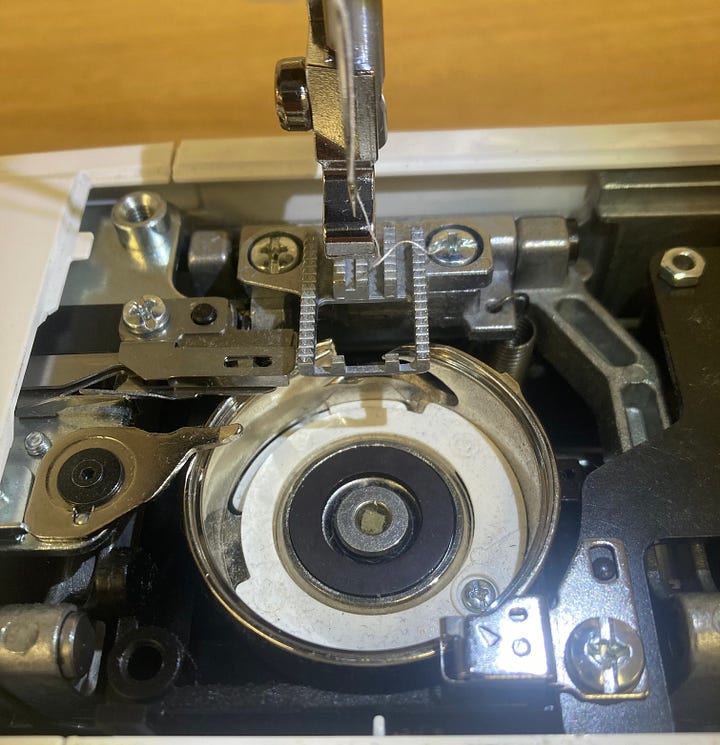
Identify Thread Jams Blocking Rotation
Locate Hidden Thread Tangles Under Bobbin Case
Thread loves to wrap around the bobbin case holder’s central post, creating a tight noose that prevents rotation. These jams often occur when thread breaks mid-seam and you continue sewing without noticing. To find these hidden tangles:
- Remove your needle plate using a small screwdriver
- Take out the bobbin case by lifting the hinged latch
- Inspect the central post for multiple thread layers wrapped tightly around it
- Use tweezers to carefully extract thread in the direction it’s wound
Look for thread wrapped multiple times around the metal center—these hidden tangles create significant resistance that stops your bobbin holder not spinning properly. Pay special attention to the area beneath the bobbin case where thread fragments accumulate unnoticed during regular sewing.
Clear Hook Assembly Trapped Threads
The hook assembly—the rotating mechanism that encompasses your bobbin holder—can trap thread fragments between the case and assembly walls. This creates a dragging effect that stops rotation entirely. You’ll often hear clicking sounds when this occurs.
Check for trapped threads by:
– Removing the bobbin case completely
– Rotating the hand wheel slowly while watching the hook assembly
– Looking for thread caught between the hook race and the assembly housing
– Using a piece of unwaxed dental floss to “floss” tight spaces where brushes can’t reach
Remove Race Area Buildup Causing Resistance
The race (the circular track your bobbin holder sits in) collects compressed lint and dust over time. This buildup forms hardened masses that physically block rotation. Regular sewers should check this area weekly, while occasional users can inspect monthly.
To clear race area buildup:
– Use a small lint brush with short, gentle strokes
– Apply compressed air from 6 inches away to avoid forcing debris deeper
– Wipe the race area with a clean, lint-free cloth
– For stubborn buildup, use a cotton swab dipped in rubbing alcohol
Restore Proper Bobbin Mechanism Function
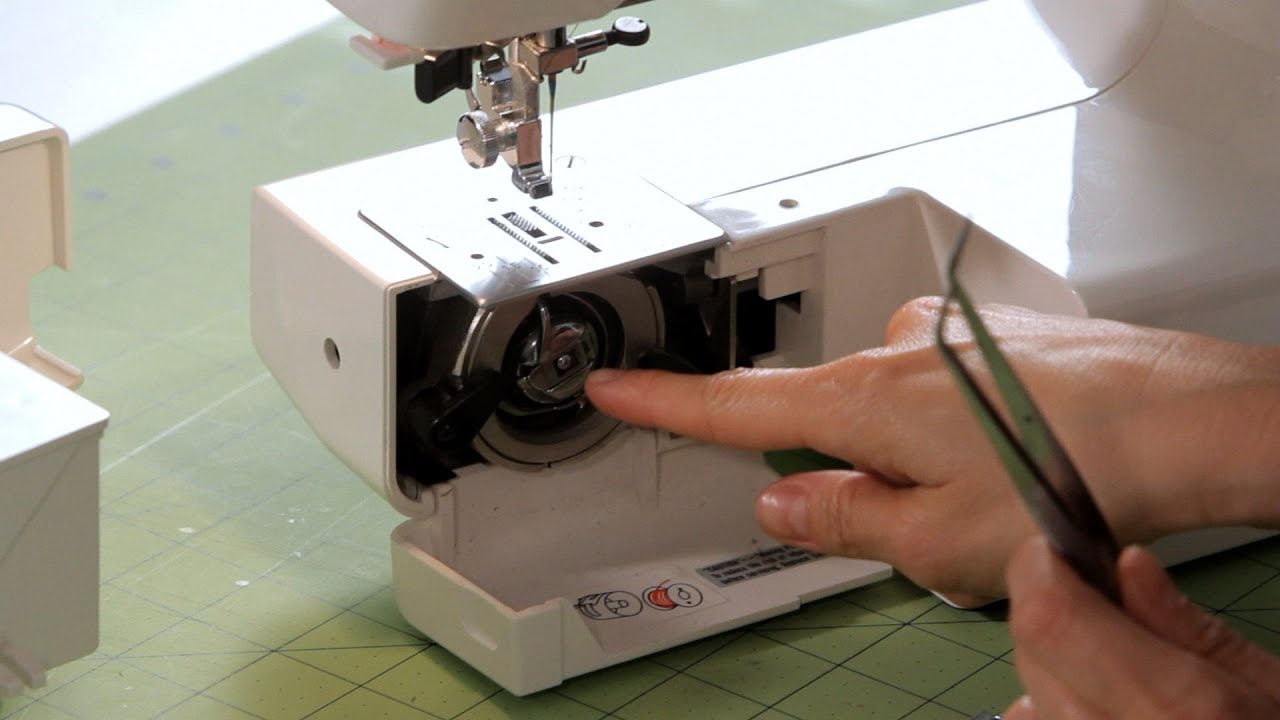
Clean Bobbin Area Without Causing Damage
Always unplug your machine before cleaning the bobbin area. This prevents accidental needle movement that could cause injury. Gather these essential tools first: small lint brush, tweezers, compressed air canister, and sewing machine oil. Never use household oils—they’ll gum up mechanisms and attract more lint.
Follow this precise cleaning sequence:
1. Remove the bobbin and set it aside
2. Take out the bobbin case by lifting the hinged latch
3. Brush away loose debris using short, gentle strokes
4. Use compressed air sparingly—hold the can 6 inches away
5. Wipe the race area with a clean, lint-free cloth
6. Apply one drop of sewing machine oil to designated points
Pro tip: For stubborn lint buildup, use a piece of unwaxed dental floss to “floss” around the race edges. This reaches tight spaces where brushes can’t access and removes compacted debris that prevents your bobbin holder not spinning smoothly.
Correct Common Reassembly Mistakes
Most alignment issues happen during reassembly. When reinstalling your bobbin case, ensure the finger (the small metal tab) points toward the machine’s back and clicks securely into its slot. A misaligned case creates resistance that mimics mechanical failure.
Check these critical alignment points:
– Bobbin case orientation (front-loaders require specific angles)
– Throat plate positioning—must sit flush without gaps
– Bobbin case latch mechanism—should engage with audible click
If your needle hits the bobbin case when turning the hand wheel, you’ve likely developed a timing problem. Timing issues require professional service—attempting DIY fixes can cause expensive damage. This is especially true for computerized machines where electronic sensors monitor timing precision.
Replace Critical Worn Components
Recognize Damaged Bobbin Case Symptoms
Examine your bobbin case for hairline cracks, chips around the edges, or a bent finger. Even minor damage creates friction points that stop rotation. A damaged case won’t improve with cleaning—replacement is necessary.
Signs your bobbin case needs replacing:
– Visible cracks or chips along the edges
– Bent or misaligned finger mechanism
– Uneven wear patterns on contact points
– Persistent rotation issues after thorough cleaning
Bobbin cases typically cost $15-50 depending on your machine model. Always use manufacturer-recommended replacements—generic cases often create more problems than they solve.
Identify Hook Assembly Wear Before Failure
Listen for grinding sounds during operation. This indicates worn bearings or damaged gears within the hook assembly. While you can’t replace these yourself, recognizing the symptoms helps you seek service before complete failure.
Warning signs of hook assembly problems:
– Unusual grinding or clicking noises during sewing
– Inconsistent bobbin holder rotation (smooth then resistant)
– Visible metal shavings in the bobbin area
– Oil appearing dirty immediately after application
Check your machine’s manual for belt-driven models. Loose or cracked belts prevent power transfer to the bobbin area. Belts should feel firm but not overly tight—about 1/4 inch deflection when pressed.
Prevent Future Bobbin Holder Rotation Failures
Implement Daily Maintenance Routine
After each sewing session:
– Remove the needle plate and brush away visible lint
– Check for thread fragments around the bobbin case
– Run a test stitch on scrap fabric before storing
This 2-minute routine prevents 80% of bobbin holder not spinning issues. Quality thread significantly reduces lint production—invest in premium thread appropriate for your project to minimize future problems.
Machine-Specific Prevention Strategies
Front-loading machines often develop thread jams in the vertical bobbin race. These models require removing the accessory compartment for access. Pay special attention to the bobbin case orientation—many front-loaders use a specific angle for proper seating.
For top-loading drop-in systems:
– Ensure the clear cover clicks closed completely
– Check bobbin tension regularly
– Clean the race area after every 5 hours of sewing
Vintage mechanical machines benefit from professional cleaning every 1-2 years. The original oil in these machines may have hardened, creating sticky deposits that impede rotation. Modern computerized machines often display specific error codes like “E6” (thread jam) or “C4” (bobbin sensor error)—consult your manual for precise troubleshooting steps.
When Professional Service Becomes Essential

Recognize Critical Repair Red Flags
Seek professional service if:
– Timing appears off (needle hits bobbin case)
– Grinding sounds persist after thorough cleaning
– Electronic error codes indicate sensor issues
– Internal mechanisms appear damaged or broken
Professional cleaning typically costs $50-100, while component replacement runs $75-200. Compare these costs to your machine’s value—older mechanical machines often justify higher repair costs than newer computerized models with complex electronics.
Emergency Workaround for Critical Projects
For immediate project completion, manually turn the hand wheel slowly toward you. This allows you to finish short seams while monitoring stitch quality. Use this method sparingly—it’s not a long-term solution but can save an urgent project.
Keep a backup machine or hand-sewing supplies for critical projects. Many sewers maintain a basic mechanical machine as a backup for when their primary machine needs service. Consider borrowing from a sewing friend for urgent repairs.
Key Takeaway: Most bobbin holder not spinning issues resolve with thorough cleaning and proper reassembly. Make bobbin area maintenance part of your regular sewing routine—spend 2 minutes after each session removing lint and checking for thread fragments. When you encounter resistance, address it immediately before it develops into a complete stoppage. Remember—consistent maintenance prevents 95% of rotation problems, saving you time, frustration, and costly repairs down the road. If you’ve followed all cleaning steps and your bobbin holder still won’t spin, professional service becomes the smart investment to protect your machine’s longevity.