
Handing over a bare gift card feels like serving cake without frosting—it gets the job done, but lacks that special touch. With how to fold a gift card holder techniques, you transform flimsy plastic into a cherished keepsake that teachers, teens, and family members will display long after the balance runs dry. This isn’t just origami—it’s strategic thoughtfulness in paper form. In under six minutes, you’ll craft a secure, wallet-style pocket that cradles standard 3.375″ × 2.125″ gift cards while showcasing your personality through paper choices. No crafting degree required—just follow these precise folds to make every gift feel personalized.
Why settle for receipt-like presentation when handmade elegance takes zero extra shopping? Your recipient’s eyes will light up when they discover their Starbucks card nestled in a holder made from their child’s artwork or vintage map paper. Plus, this technique solves the universal gift-giving panic: “What do I wrap this in?” Spoiler: You’ll never buy gift card sleeves again. By the end of this guide, you’ll have mastered a foolproof folding sequence that works with printer paper, wrapping scraps, or magazine pages—turning “meh” into “marvelous” before your coffee gets cold.
Essential Tools for Flawless Gift Card Holder Folding

Skip specialty stores—your kitchen junk drawer holds everything needed for crisp results. Start with 9-inch square paper (cut an 8.5″x11″ sheet into a square) or standard A4 printer paper flipped printed-side down. For visual impact, grab metallic scrapbook sheets for weddings, comic book pages for teens, or watercolor paintings from your kids’ art stash. Thinner papers like magazine pages prevent bulky seams, while cardstock adds structure for frequent handling.
Your critical allies:
– Creasing tool: A bone folder (or even a spoon edge) for razor-sharp folds
– Closure extras: 6-inch baker’s twine for rustic charm, washi tape for pop, or pipe cleaners twisted into bows
– Precision aid: Your thumbnail—press firmly along each fold three times to lock creases
Pro Tip: Test paper flexibility first. Crisp folds require paper that bends cleanly without tearing. If your scrap cracks when folded, switch to thinner material—this makes or breaks professional-looking results.
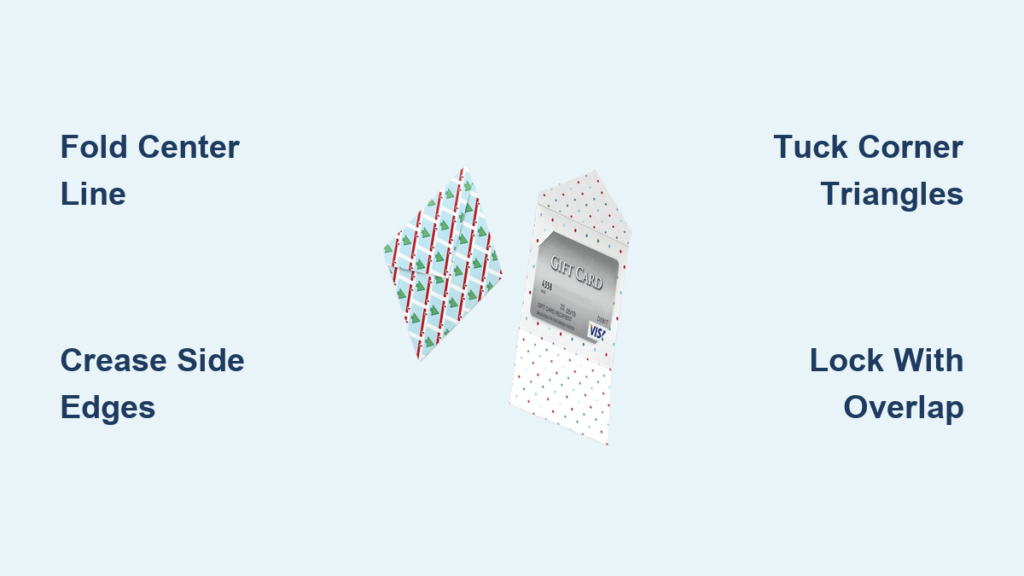
Step 1: Create Laser-Strait Center Guidelines
Place paper printed side down on a hard surface like a table or cutting mat. Align edges perfectly before folding vertically in half. Run your thumbnail from top to bottom three times: once forward, once backward, then forward again. This triple-crease method creates a deep valley line that won’t vanish during subsequent folds. Immediately unfold—this center spine is your navigation system for all future steps.
Why Skipping This Causes Disaster
Rushing this step guarantees asymmetrical corners later. If your center line wobbles, refold before proceeding. I’ve seen holders collapse because creators eyeballed this fold—take 10 extra seconds here to save 10 minutes of frustration later.
Step 2: Establish Bulletproof Side Creases
Fold the left edge toward the center crease until it aligns perfectly with the guideline. Repeat with the right edge. Unfold both sides completely. You should now see three parallel lines: center valley plus two mountain folds flanking it. These become invisible rails for corner alignment in Step 3.
Critical Check: Hold paper against a window. If creases don’t form perfect parallel lines, refold edges. Misaligned side creases cause pockets that gape or pinch cards.
Step 3: Fold Corners to Form Perfect Diamond Points
Working corner by corner, fold each point inward until it touches the nearest side crease. The corner’s tip should land precisely where the side crease meets the paper’s edge. Your paper now resembles a diamond with four triangular flaps pointing toward the center.
Fixing Common Corner Errors
- Problem: Corners won’t meet at center
Solution: Adjust corner placement until right angles form at side creases - Problem: Paper buckles when folding
Solution: Score fold lines first with an empty ballpoint pen
Pro Tip: Fold diagonally opposite corners first (top-left + bottom-right), then the other pair—this maintains balance.
Step 4: Create Self-Locking Side Flaps

Fold the right flap inward, sliding it toward the center until it overlaps the left flap by ¼ inch. Repeat with the left flap over the right. The overlap creates tension that keeps the holder closed without adhesives. Your shape should now be a narrow rectangle with tucked corner triangles visible inside.
Why Overlap Matters More Than You Think
Too little overlap = holder springs open. Too much = cards jam during insertion. Test with an actual gift card here—if it slides in smoothly with slight resistance, you’ve nailed it.
Step 5: Form the Top Edge for Snug Card Retention
Flip paper over to reveal the future exterior. Locate the small white triangle visible at the top center. Fold the top edge down so it aligns exactly with this triangle’s tip. This measurement creates the perfect pocket depth:
– Fold too high = card sticks out unsafely
– Fold too low = pocket looks stubby
Pro Tip: For thicker cards (like layered gift cards), lower this fold by ⅛ inch. Always test with your actual card before finalizing.
Step 6: Complete Pocket Assembly in 20 Seconds
Fold the bottom edge upward to match the top fold’s height. The top and bottom flaps should overlap by ¼ inch. Slide the bottom flap under the top flap—this interlocking action forms the wallet structure. Gently press seams to set the shape.
Assembly Hack for Instant Polish
Hold folded edges together for 5 seconds after tucking. This “heat seal” technique uses body warmth to strengthen the bond, preventing accidental unfolding.
Insert and Secure Your Gift Card Like a Pro
Slide the card into the pocket with the magnetic strip facing inward (toward the folded seams). It should fit snugly without bending. Now add your closure:
– Twine method: Wrap twice around holder, tie bow on front
– Washi tape: Apply 1-inch strip vertically for decorative seal
– Pipe cleaner: Twist ends into hearts or stars before securing
Warning: Avoid tape directly on gift cards—it can damage magnetic strips during removal.
Creative Variations for Every Recipient
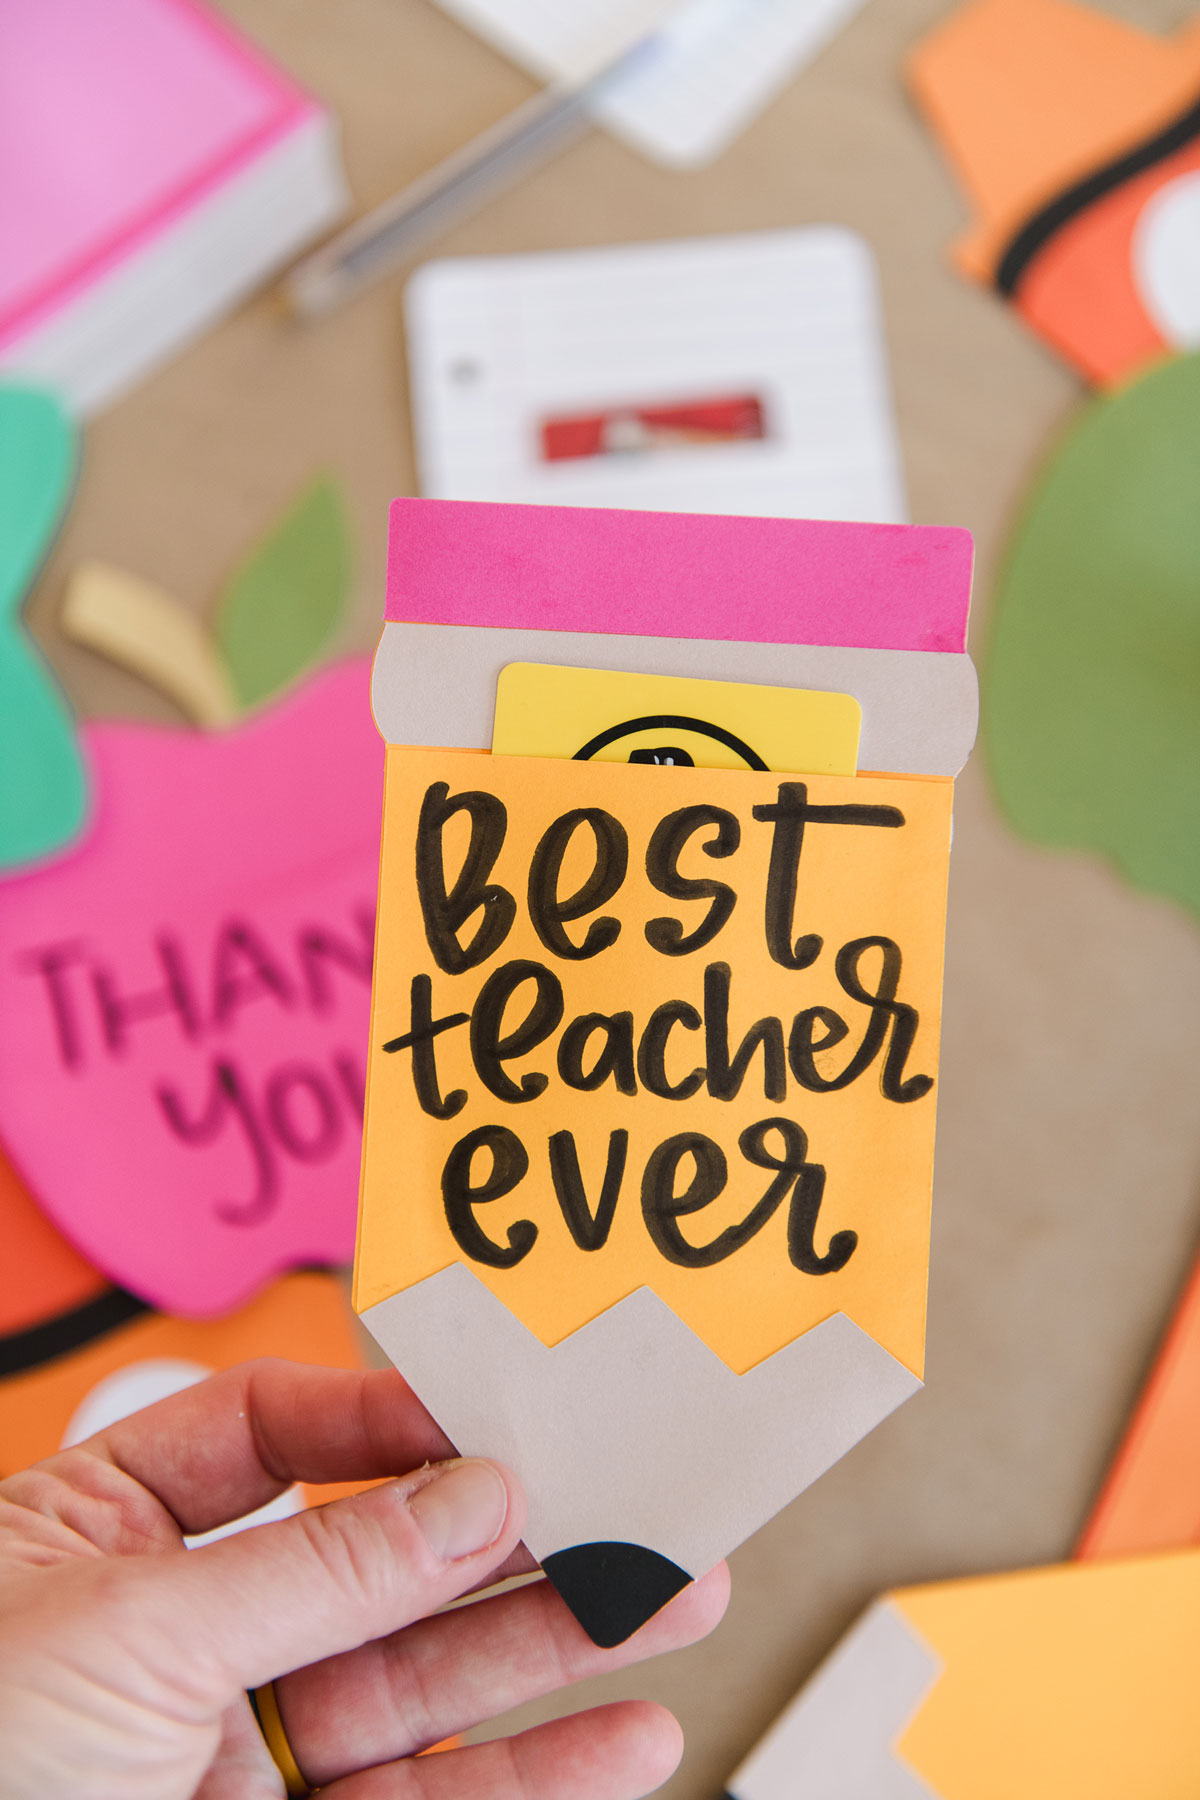
Teacher Appreciation Holder
Use construction paper with handwritten “Thank You” notes visible through the pocket. Add a washi tape border matching school colors—teachers display these on classroom doors all year.
Teen-Nephew Gaming Edition
Fold with magazine pages featuring his favorite game characters. Secure with neon pipe cleaners twisted into controller buttons. Pro tip: Leave the top ¼ inch of card visible so he sees the game logo immediately.
Holiday Magic Trick
Start with wrapping paper showing snowflakes. After folding, tuck a small ornament into the pocket above the card. When recipient opens it, the ornament dangles like a surprise bonus.
4 Costly Folding Mistakes That Ruin Holders
Mistake #1: Ignoring Paper Grain
Folding against paper’s natural fibers causes cracks. Fix: Tear a small strip—fold parallel to the tear line for clean bends.
Mistake #2: Skipping Unfolds
That initial center crease? Skipping the unfold step means no reference for side folds. Fix: Always unfold after creating guidelines—those ghost lines are your map.
Mistake #3: Weak Creasing
Soft folds = floppy holders. Fix: Use a ruler edge for creasing—press firmly while sliding toward you.
Mistake #4: Rushing the Flip
Flipping too early distorts triangles. Fix: Only flip after Step 4’s side flaps are locked.
60-Second Troubleshooting Guide
Problem: Holder won’t stay closed
Solution: Refold Step 4 with ½-inch overlap instead of ¼-inch. Thick paper needs extra tension.
Problem: Card slides out when tilted
Solution: Lower Step 5’s top fold by ⅛ inch to deepen the pocket.
Problem: Corners won’t stay tucked
Solution: Apply tiny dot of glue (to paper only—not card) where triangles meet side flaps.
Problem: Holder looks lopsided
Solution: Check Step 2 creases with a ruler—realign if lines aren’t parallel.
Transforming gift cards into treasures takes less time than brewing coffee. By mastering how to fold a gift card holder, you’ve unlocked a gift-giving superpower that costs nothing but wow recipients instantly. Next time you grab a Starbucks card, remember: that crumpled receipt in your wallet could become a glittering snowflake holder with 6 precise folds. Teachers will pin yours to bulletin boards, teens will show friends your gaming edition, and grandparents will keep yours as art. The real magic? Knowing your effort outlasts the gift card’s balance. Now go raid that scrap paper drawer—your next masterpiece is six minutes away.


