
Your grandmother’s china deserves better than a wobbly store display that costs more than the plates themselves. When plates slide off cheap racks or get scratched by flimsy holders, it’s time to craft your own solution. This guide reveals exactly how to make a plate holder stand that fits your dishes perfectly while protecting delicate surfaces. You’ll discover three field-tested methods—from a 30-minute pine stand to an elegant multi-tier system—using materials costing less than $40. By the end, you’ll have professional-quality displays that match your home’s style and your collection’s needs.
Forget generic kits that force you to compromise on size or stability. Building your own plate holder stand gives you complete control over dimensions, angles, and finishes. Whether showcasing heirloom china or organizing everyday dinnerware, these designs prevent scratches, eliminate tipping risks, and transform storage into art. Let’s get your tools ready to create stands that last decades, not just seasons.
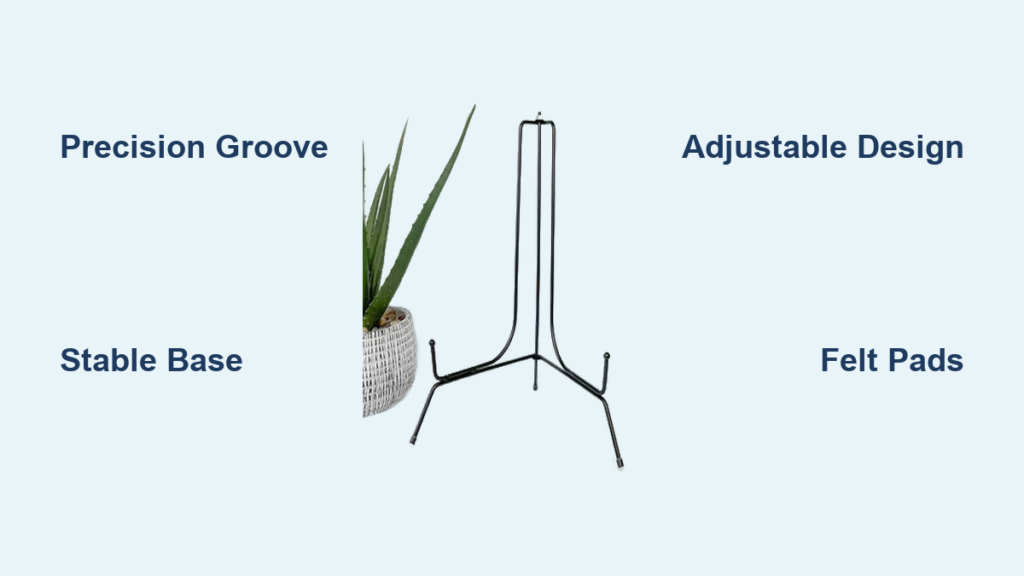
Essential Materials and Tools for Any Plate Holder Stand

Wood vs. Metal: Choosing Your Build Foundation
Pine boards ($3-5 per 8-foot length) deliver unbeatable value for beginners, while oak or maple provides museum-grade durability for heirloom displays. For modern flair, ¼-inch aluminum rods bend easily without rust concerns. Your choice dictates tool requirements: wood projects need basic saws and sanders, while metal stands require bending jigs and torches. Always match material thickness to plate weight—use ¾-inch wood for standard dinner plates but step up to 1-inch for heavy chargers.
Critical supply checklist:
– ¾-inch thick pine board (6″ x 8″ minimum per stand)
– 1¼-inch wood screws and waterproof wood glue
– 120-grit and 220-grit sandpaper
– Food-safe wood stain and polyurethane
– Self-adhesive felt pads (prevents surface scratches)
Tool Requirements by Project Complexity
Basic single-plate stands need only four tools: a miter saw for precise cuts, drill with 1/8-inch bits, sanding block, and clamps. Multi-tier systems demand advanced gear like routers for perfect dados and biscuit joiners for seamless alignment. For metal wire stands, create a bending jig from scrap wood with 15-degree angle cuts—this ensures consistent curves that prevent plate slippage. Rent specialized tools like routers for under $20 if you lack them; most hardware stores offer daily rentals.
Pro tip: Test your jig on scrap material first. A single misaligned bend ruins expensive metal rods—better to sacrifice $1 worth of pine during practice.
Build a Single-Plate Wooden Stand in 45 Minutes
Cut Base and Back Support to Precision
Start by cutting two identical 6″ x 4″ x ¾” pieces from your board. This exact size supports 10-11 inch dinner plates while maintaining stability—wider bases look bulky, narrower ones tip easily. Mark one piece “BASE” and the other “BACK” with pencil to avoid assembly errors. For salad plates (7-8 inches), reduce base depth to 3 inches; for chargers (12-13 inches), increase to 5 inches minimum.
Create the Plate-Cradling Groove
Using a router with ⅛-inch straight bit, cut a ¼-inch wide groove ½-inch from the back edge of your base piece. Groove depth must be exactly ⅛-inch—deeper grooves cause plates to lean dangerously, shallower ones won’t hold rims securely. No router? Score lines with a utility knife, then chisel out material in 1/16-inch increments. Test fit frequently with an actual plate; you want the rim to sit flush with the base surface.
Critical warning: Never cut grooves in assembled stands—this causes wood splitting. Always route before final assembly.
Assemble with Glue and Strategic Screws
Apply wood glue along the entire 6-inch edge of your back support. Position it perpendicular to the base, ensuring the groove faces upward toward the back. Clamp tightly and let cure 30 minutes. Pre-drill two 1¼-inch screw holes through the base into the back support—this prevents splitting pine. Wipe excess glue immediately with damp cloth before it dries.
Finish for Long-Term Protection
Sand from 120-grit to 220-grit until edges feel smooth as glass. Apply stain with lint-free cloth, wiping excess within 5 minutes. After 24 hours drying, brush on two polyurethane coats, lightly sanding between with 320-grit paper. Attach four felt pads to bottom corners—this creates micro-spacing that prevents moisture trapping and furniture scratches.
Construct an Adjustable Multi-Plate Display System

Build the Dadoed Base for Custom Spacing
Cut a 12″ x 8″ base from 1-inch thick wood. Using your router, create ¼-inch wide dados at 4-inch intervals along the 8-inch side. Mark dados with blue painter’s tape first to prevent wood tear-out during cutting. These slots let you rearrange dividers instantly when switching between salad plates and chargers.
Craft Interchangeable Dividers with Perfect Grooves
Cut 8″ x 4″ dividers from ¾-inch wood, adding ¼-inch thick tongues on bottom edges to slide smoothly into dados. Each divider needs an identical plate groove cut along its top edge—this ensures consistent 15-degree lean angles regardless of position. Test all dividers with plates before final assembly; minor sanding adjustments now prevent frustration later.
Assemble the Side Frame for Rock-Solid Stability
Build two identical side frames using 1″ x 1″ square dowels: two 8-inch vertical pieces connected by three 6-inch horizontals. For strongest joints, use dowel connectors (easier for beginners) rather than mortise-and-tenon. Attach frames to the base with glue and 2-inch screws, checking alignment with a combination square. Load test with plates immediately—if any wobble occurs, tighten screws incrementally until solid.
Create a Modern Metal Wire Plate Holder Stand
Select and Prepare Your Metal Rods
Choose ¼-inch aluminum rods for lightweight portability (ideal for display shelves) or 3/16-inch steel for heavy plate collections. Aluminum requires no rust protection but costs 20% more. For steel, lightly heat rods with a propane torch until barely warm to the touch—this prevents cracking during bending. Never overheat; glowing metal loses structural integrity.
Bend Rods Using Your Homemade Jig
Secure your scrap wood jig (with 15-degree angle cuts) in a vise. Insert rod and bend slowly to form a U-shape with 6-inch base and 4-inch uprights. Check angles with a protractor—15 degrees is the sweet spot for plate retention without slippage. For salad plates, reduce to 12 degrees; for chargers, increase to 18 degrees.
Add Cross-Supports to Prevent Spreading
Cut two 4-inch pieces and bend 90-degree angles to form L-shaped braces. Attach between the uprights 1 inch below the top using epoxy for aluminum or silver solder for steel. Test stability by pressing down firmly—you should feel zero flex. Finish with 400-grit sanding and metal polish for aluminum, or rust-inhibiting primer and spray paint for steel.
Solve Common Problems Before They Happen
Stop Stability Issues at the Design Stage
Wobbling bases usually stem from uneven surfaces—attach adjustable furniture feet ($3/pair) to compensate. Plate slippage means your groove is too shallow; deepen by 1/32-inch increments until plates stay put. Forward tipping requires immediate correction: increase base depth by 1 inch or add a hidden counterweight (like a lead strip) under the rear felt pad.
Fix Fit Problems Without Starting Over
Groove too tight? Sand edges with folded 220-grit paper wrapped around a plate rim—test fit every 30 seconds. Groove too loose? Insert thin cork strips into the groove; they compress slightly to grip plate rims. Uneven displays occur when angles misalign—disassemble and verify all pieces with a combination square before regluing.
Maximize Value With Smart Customization
Personalize Within Your Budget
Laser engraving names or dates on back supports costs under $10 at maker spaces. For DIY charm, use wood-burning tools to create custom patterns—practice on scrap wood first. Two-tone effects cost nothing: stain base and back support different colors before final assembly.
Upgrade Functionality for Daily Use
Add battery-powered LED strips behind back supports for dramatic evening displays. Create hinged back supports using brass hinges for adjustable viewing angles. Build modular bases with interlocking tabs so you can expand from single to multi-plate systems as your collection grows.
Building your own plate holder stand transforms dish storage from a chore into a point of pride. Start with the simple wooden method tonight using tools already in your garage—you’ll have a custom display in under an hour. As your skills grow, tackle multi-tier systems that organize entire collections or sleek metal stands that become conversation pieces. Remember: precise grooves prevent slippage, proper angles ensure stability, and quality finishes protect both plates and furniture. Every handmade stand you create costs less than store-bought versions while delivering perfect fit and heirloom durability. Grab your saw and start building—your grandmother’s china deserves this tribute.


