

Your saddle deserves better than leaning against a dusty wall or collapsing on the floor. Learning how to make a saddle holder solves this daily frustration while protecting your expensive leather investment. Most riders waste money on flimsy commercial racks that wobble under weight or scratch delicate saddles—yet building your own takes under $20 and fits your exact space.
This guide cuts through the confusion with five field-tested designs proven in real barns. You’ll discover how to make a saddle holder for English or Western saddles, whether you need a permanent wall mount for your tack room or a portable PVC stand for horse shows. Each plan includes precise measurements, material hacks, and critical safety checks most tutorials skip. Stop compromising—build a holder that lasts years, not months.
Choose Between Wood and PVC for Your Saddle Holder

Solid Wood Options for Heavy Western Saddles
Opt for 2×4 lumber or hardwood like oak when building saddle holders for Western saddles exceeding 30 pounds. Pine boards work for lighter English saddles but risk warping under heavy weight. Always use stainless steel screws—regular hardware rusts within months in humid barn environments. For wall-mounted racks, add 1×6 support arms cut at 45-degree angles to distribute weight away from the mounting point.
Lightweight PVC for Portable English Saddle Storage
Schedule 40 PVC pipes create ultra-portable saddle holders under $10. Use 1/2-inch diameter for English saddles (max 20 lbs) or upgrade to 3/4-inch for Western models. Unlike wood, PVC won’t splinter leather and survives vehicle transport. Pro tip: Sand all cut edges smooth—rough PVC scratches saddle flaps during loading. For permanent stands, apply PVC primer before cementing joints; temporary versions dry-fit with electrical tape wraps for quick assembly.
Critical Material Selection Mistakes to Avoid
Never use particleboard or MDF in tack rooms—moisture causes swelling within weeks. Avoid galvanized hardware near leather; zinc corrosion stains expensive saddles. For outdoor mounts, skip standard polyurethane; choose spar urethane (marine-grade) for UV and weather resistance. Always buy 10% extra materials: One mis-cut support arm ruins the entire project when building saddle holders.
Build a Wall-Mounted Saddle Rack in Under 2 Hours
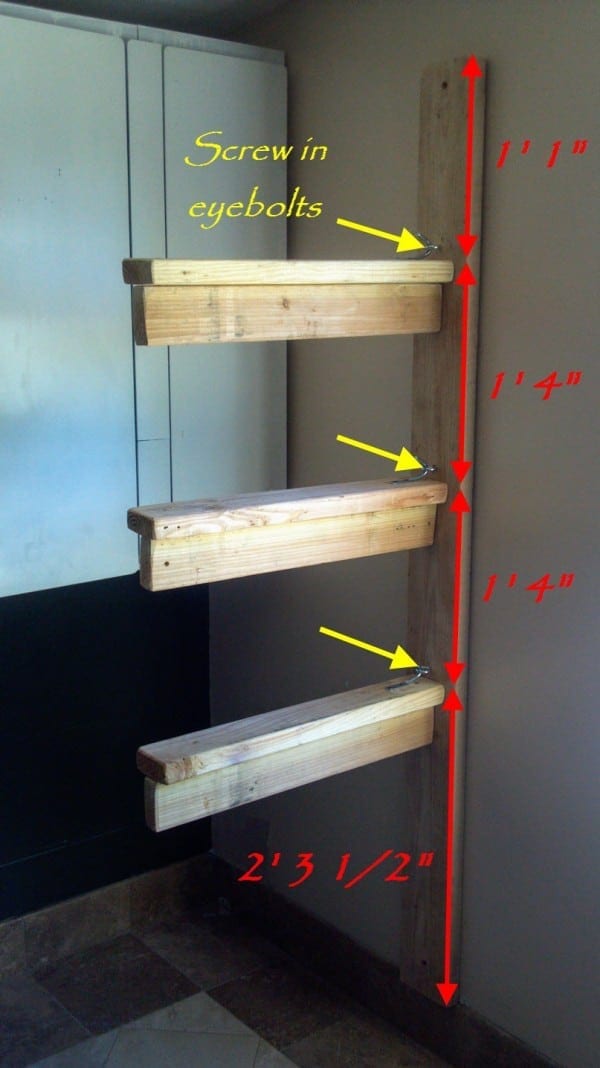
Simple 2-Hour Build Plan for Small Tack Rooms
Cut a 36″×6″ backboard from 1×6 pine. Attach two 12″×6″ support arms at 45-degree angles using 2.5″ wood screws. Sand all edges to 220-grit smoothness—rough wood shreds saddle flocking. Mount with 50-lb wall anchors if no studs align; for stud mounting, sink screws 1.5″ deep into center. Test stability with sandbags before adding your saddle. This design holds two English saddles safely.
Corner Space Saver for Cramped Barns
Maximize dead space with a 30″×24″ corner saddle holder. Build triangular supports from 1×4 boards instead of bulkier 1×6. Pre-drill every hole to prevent splitting near board ends. Add 1/4″ felt strips where saddle contact occurs—this stops leather scuffs from wood grain. Mount both sides into wall studs for triangulated strength; never rely on anchors alone in corners. Fits snugly in 90-degree nooks, saving 40% floor space versus freestanding racks.
Create a Free-Standing Stand for 3-4 Saddles
Heavy-Duty Design for Multiple Saddles
Construct a 48″ tall×24″ wide base from 2×4 lumber. Add cross braces every 12″ and diagonal rear bracing—this prevents tipping when loading heavy Western saddles. Install saddle arms at 16″ intervals using 3″ construction screws. For show venues, attach locking caster wheels; they let you roll the entire rack to the trailer. Crucially, test weight limits with sandbags first: A fully loaded rack must support 120+ lbs without wobble.
Collapsible Wooden Stand for Trailers
Build X-shaped supports from 1×4 boards connected by heavy-duty door hinges. This folds flat to just 6″ thick—ideal for horse trailer storage. Add a latch at the top to lock arms open during use. When collapsed, it stores under seats or in saddle trunks. Unlike PVC, wood won’t flex under weight, but always reinforce hinge points with corner brackets to prevent sagging. Assembly takes 3-4 hours but saves $150 versus commercial portable racks.
Assemble a $10 PVC Portable Saddle Holder in Minutes

Budget Build with Foolproof Measurements
Cut PVC pipes to these lengths: two 18″ bases, two 24″ uprights, two 12″ support arms, and two 8″ cross braces. Dry-fit all pieces with T-connectors and elbows first—PVC stretches slightly during insertion. If joints feel loose, wrap pipe ends with electrical tape before cementing. For Western saddles, use 3/4-inch PVC and add a center cross brace between support arms. Total cost: $10 vs. $72+ for store-bought versions.
Weight Capacity Hacks Most Tutorials Miss
1/2-inch PVC holds English saddles under 20 lbs but fails with heavier Western models. Upgrade to 3/4-inch for 35-lb capacity—this adds $4 but prevents mid-show collapses. Never stack saddles on PVC stands; the design only supports one saddle per arm. In vehicles, drape a blanket over your saddle holder to deter theft; thieves target visible tack. Let cement cure 4 hours before first use—rushing causes joint separation under load.
Size Your Saddle Holder Perfectly for English or Western Saddles
Exact Width Measurements to Prevent Damage
English saddles need 12-14″ between support arms; Western require 16-18″. Measure your saddle’s stirrup bar distance and add 2″ for clearance—this prevents pommel pressure. For Australian stock saddles, use 14-16″ spacing. Too narrow? Saddle trees crack. Too wide? Panels sag and lose shape. Always test with your actual saddle before final assembly; mock-ups save ruined projects.
Height Placement That Prevents Back Strain
Wall-mounted racks belong 48-54″ off the floor—this lets you lift saddles without bending. Freestanding stands work best at 32-36″ height for easy loading. Portable holders for vehicles should be 24-28″ tall to fit in truck cabs. Stand too low? You’ll strain your back lifting. Too high? Saddles slide off during transport. Use a level when mounting—crooked racks cause uneven weight distribution and saddle tilting.
Avoid Critical Safety Mistakes When Building Saddle Holders
Woodworking Hazards That Ruin Saddles
Skipping sanding creates microscopic splinters that shred leather over time. Always finish edges to glass-smoothness. Never mount racks above 54″ high—falling saddles cause serious injury. Before trusting a wall rack, load it with sandbags equal to your saddle’s weight and leave overnight. If screws pull out, reinstall into studs or use heavy-duty masonry anchors for concrete walls.
PVC Assembly Risks You Can’t Ignore
Rough cut edges on PVC scratch car interiors during transport—sand every piece with 120-grit paper. Never cement joints without primer; weak bonds fail under saddle weight. In freezing temps, PVC becomes brittle—store portable stands indoors when not in use. Check fittings annually for loosening; a single wobbly elbow can collapse the entire structure.
Customize Your Saddle Holder with Built-In Storage
Add Bridle Hooks and Tool Shelves in 30 Minutes
Screw 2″ cup hooks under saddle arms to hang bridles—keeps everything organized. Attach a 4″-deep shelf below the main support for grooming brushes and sweat scrapers. For Western tack rooms, mount a 1″ dowel across the front as a blanket bar. These additions cost under $5 but transform basic racks into full tack stations.
Finish Options That Match Your Barn Aesthetic
Walnut-stained wood with brass hardware suits traditional stables. Spray-paint PVC white for modern show barns. Distress painted wood with sandpaper and seal with matte varnish for rustic charm. Avoid dark stains on portable stands—they show scratches faster. Always apply three coats of finish with light sanding between layers for pro results.
Maintain Your DIY Saddle Holder for Long-Term Use
Wood Care Schedule to Prevent Cracking
Check screws monthly for looseness—vibration from barn doors causes gradual slackening. Inspect for hairline cracks quarterly, especially near joints. Reapply spar urethane annually on outdoor racks; indoor versions need refreshing every 18 months. Wipe spills immediately—sweat and saddle soap degrade finishes faster than weather.
PVC Longevity Boosters for Trailers and Shows
Unlike wood, PVC needs only damp-cloth cleaning after events. Check fittings yearly for sun damage; UV exposure makes pipes brittle in 3-5 years. Replace faded stands before shows—they look unprofessional next to gleaming tack. Never store PVC holders under direct sunlight; heat warps pipes even when disassembled. Keep a spare T-connector in your trailer for field repairs.
Stop letting your saddle suffer on the floor. Building your own saddle holder takes one weekend but pays off for years in protected leather and organized tack rooms. Start with the wall-mounted design—it’s the fastest win for beginners. Measure twice, sand every edge, and test with weights before trusting your saddle. Your gear deserves proper support, and nothing beats the pride of crafting exactly what you need. Grab your tools this weekend and transform that storage headache into a barn upgrade you’ll use daily.


