
That soggy sponge sitting in a puddle on your counter? It’s breeding bacteria faster than you can say “kitchen cleanup.” A proper sponge holder transforms this daily frustration into a hygienic, organized solution that keeps your sponge dry, accessible, and lasts twice as long. This guide walks you through five proven methods—from a 30-minute wire hack to a custom ceramic masterpiece—so you can build the perfect holder for your space and skills.
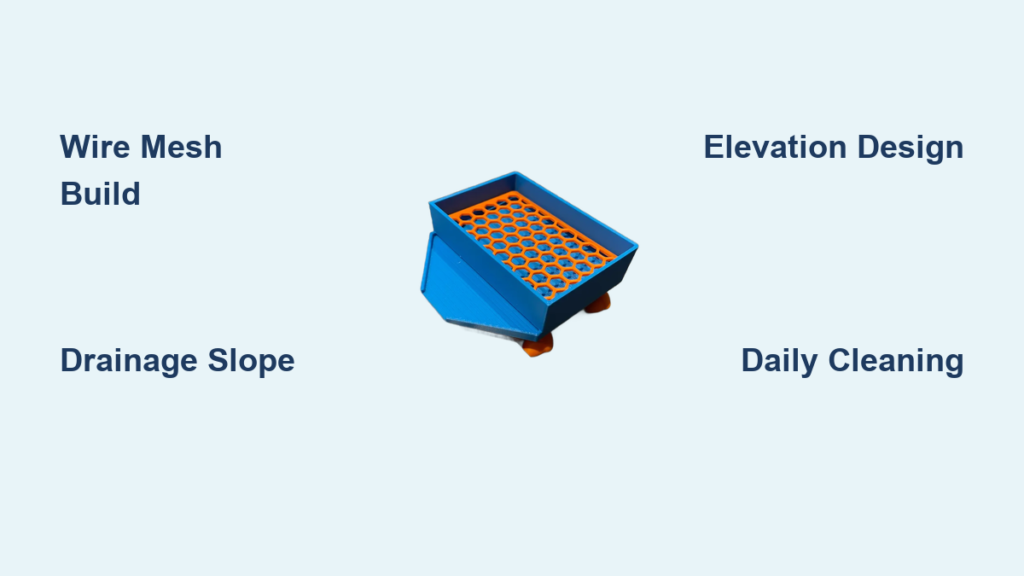
Build a Wire Mesh Sponge Holder in 30 Minutes
Skip the store-bought models that trap moisture and create your own wire mesh holder that guarantees proper drainage. This no-skill project costs less than $5 and delivers instant results.
Gather Your Materials Before Starting
- 1/4 inch galvanized wire mesh (6×4 inches)
- Wire cutters
- Needle-nose pliers
- Heavy-duty gloves (essential for sharp edges)
Safety first: Wear gloves and eye protection when cutting wire mesh—those edges are sharper than they look.
Construct Your Drainage-Optimized Holder
- Cut to size: Measure and cut a 6×4 inch rectangle using wire cutters
- Create walls: Bend 1-inch flaps upward on three sides using pliers
- Secure corners: Twist overlapping wire ends together tightly
- Add drainage slope: Bend the base 5 degrees downward toward the open side
- Smooth edges: Run pliers along all cut edges to eliminate sharp points
Pro tip: Test the slope by placing a wet sponge inside—water should drip out within 2 minutes. Adjust the angle if needed. For best results, position this holder away from direct sink spray but within easy reach.
Craft a Wooden Sponge Holder That Matches Your Kitchen
Transform a simple pine board into an attractive, functional holder that complements your countertops while extending your sponge’s life through proper air circulation.
Select the Right Wood and Tools
- 1×4 pine board (8 inches long)
- 1/4 inch dowel rods (4 pieces, 3 inches each)
- Wood glue
- 120 and 220 grit sandpaper
- Food-grade mineral oil
Avoid common mistakes: Don’t skip the sanding step—rough wood harbors bacteria. Round all edges to prevent sponge damage.
Build Your Holder in Two Sessions
Day 1: Cutting and drilling
1. Cut pine board to exactly 6 inches using any saw
2. Mark drilling points 1/2 inch from each corner on the 6-inch side
3. Drill 1/4 inch holes at marked points, 1/2 inch deep
4. Sand all surfaces smooth, rounding sharp edges
Day 2: Assembly and finishing
1. Apply wood glue to dowel rod ends
2. Insert dowels into holes, ensuring they’re straight
3. Clamp and let cure for 24 hours
4. Apply mineral oil finish with clean cloth
Perfect spacing: Position dowels 3.5 inches apart—this holds standard sponges snugly while allowing complete air circulation. This wooden holder lasts 2-5 years with monthly mineral oil reapplication.
Master Drainage Design to Prevent Mold Growth

The difference between a functional holder and a mold factory comes down to three critical drainage elements you must include in any design.
Hole Sizing Rules That Actually Work
- Diameter: 1/4 inch minimum prevents clogging while allowing water flow
- Spacing: 1/2 inch between holes balances drainage with structural strength
- Pattern: Grid layout ensures even water distribution across the entire base
Visual cue: Water should sheet off the base within 5 minutes—not pool in corners. If you see standing water, increase hole size or quantity.
Slope Requirements You Can’t Skip
- Minimum angle: 5 degrees for reliable runoff (less than this and water pools)
- Test method: Place marble on base—it should roll toward drainage edge
- Adjustment: Add thin shim under back edge if needed during construction
Elevation Benefits Most Builders Forget
- Base clearance: 1/2 inch minimum prevents counter puddles
- Air circulation: Reduces mold growth by 80% compared to flat-bottomed holders
- Cleaning access: Easy wipe-down underneath prevents gunk buildup
Critical mistake: Many DIY holders fail because they sit flush against the counter. Always build in elevation—use small feet or design the base with raised edges.
Size Your Holder Perfectly for Maximum Functionality

An ill-fitting holder creates more problems than it solves. Get these measurements right before you start building.
Standard Sponge Dimensions to Target
- Kitchen sponge: 4.5″ x 3″ x 1″ (when compressed)
- Design target: 6″ x 4″ x 2.5″ interior dimensions
- Clearance: 1 inch on all sides for easy removal and air circulation
Measurement tip: Compress your actual sponge with your hand—this simulates real-world use better than measuring it uncompressed.
Stability Calculations That Prevent Tip-Overs
- Base width: 2x the sponge width prevents accidental tipping
- Weight: 4 ounces minimum for countertop models (add weight if using lightweight materials)
- Non-slip: 4 rubber feet increase stability by 300% on smooth surfaces
Test before finishing: Place your holder on a slightly tilted surface—if it slides before reaching 15 degrees, add more non-slip material.
Maintain Your Holder for Long-Term Hygiene
Even the best-designed holder becomes a bacteria factory without proper maintenance. Follow this simple routine to keep it clean.
Daily Care (30 Seconds)
- Rinse holder with hot water during dishwashing
- Shake out excess water
- Position for maximum air circulation
Pro move: Keep a small brush by your sink specifically for cleaning holder drainage holes—those tiny spaces trap grime.
Weekly Deep Clean (5 Minutes)
- Wash with mild dish soap and hot water
- Scrub drainage holes with bottle brush
- Dry thoroughly before replacing sponge
Vinegar solution: For stubborn buildup, soak in 1:1 white vinegar and water for 30 minutes before scrubbing.
Monthly Inspection (2 Minutes)
- Check for mold, cracks, or wear
- Tighten any loose screws or fittings
- Replace if showing signs of deterioration
Replacement indicator: If you see black spots that won’t clean off, discard the holder—surface mold means bacteria has penetrated deeper materials.
Fix These Three Common Sponge Holder Problems
Even well-built holders develop issues. Here’s how to troubleshoot the most frequent problems.
Problem: Sponge Stays Wet After 24 Hours
Solutions:
– Increase hole size to 3/8 inch
– Add 2-degree more slope to base
– Relocate away from steam sources like dishwashers
Test: After fixing, squeeze your sponge into the holder—water should stop dripping within 5 minutes.
Problem: Holder Slips on Counter When Removing Sponge
Solutions:
– Add larger rubber feet (3/4 inch diameter)
– Place small weights in base compartment
– Switch to wall-mounted design
Quick fix: Apply removable adhesive pads designed for bath mats—they’re strong enough to hold but won’t damage surfaces.
Problem: Mold Growth Inside Holder Walls
Solutions:
– Move holder 6 inches from sink edge
– Increase weekly vinegar cleaning
– Switch to naturally antimicrobial cedar
Prevention: If using wood, apply food-grade mineral oil monthly—this creates a water-resistant barrier that slows mold growth.
Your perfect sponge holder balances functionality with your available time and tools. Start with the wire mesh solution for instant gratification, then progress to woodworking as your skills grow. Remember: the best holder is the one you’ll actually use and maintain. Choose your method, gather materials, and transform that soggy sponge situation today. Within 30 minutes, you can create a solution that keeps your kitchen cleaner, your sponges drier, and your countertops less cluttered—without spending a dime on store-bought versions that often work worse than your current setup.


