

You’re standing in front of the mirror, razor in hand, ready for a smooth shave—only to discover the blade holder refuses to budge. That stubborn resistance when you try to open your razor is more than just annoying; it can derail your entire morning routine. Whether you’re wrestling with a vintage safety razor that hasn’t seen action in years or a modern cartridge system clogged with hair and lather, this universal shaving dilemma affects every man who values a close cut. The frustration peaks when you risk nicks from prying with tools or worse—damaging the razor entirely.
The good news? Every razor follows predictable mechanical principles once you understand its specific design. This guide cuts through the confusion with precise, model-specific techniques for opening any blade holder safely. You’ll learn why mechanisms jam, how to free stuck components without force, and critical safety steps most tutorials skip.
Stop risking cuts or ruining expensive razors. By the end of this guide, you’ll open any razor blade holder confidently—saving time, money, and your skin.
Safety Razor Twist Mechanisms
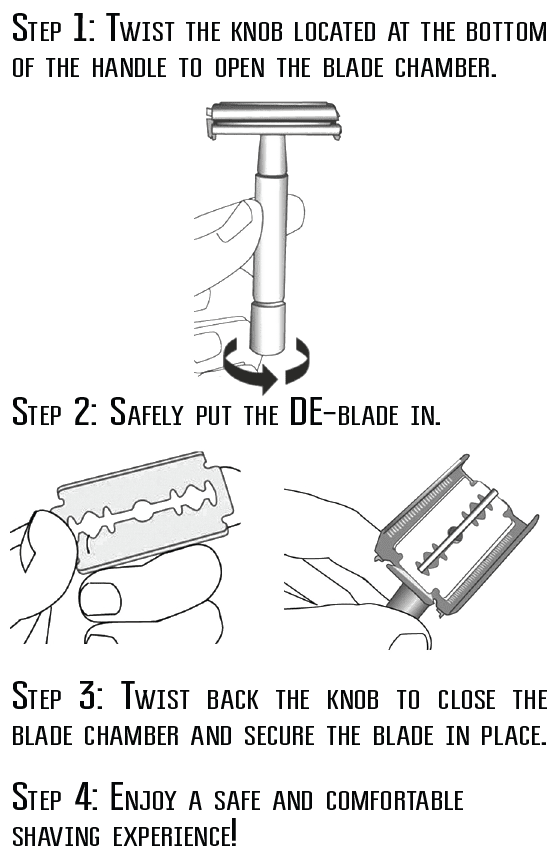
Twist-to-open safety razors rely on a cam mechanism that locks the blade plate securely. The trick isn’t brute force but controlled rotation to release internal tension. Forcing it causes cross-threading that ruins the razor.
Twist Counterclockwise at the Base Collar
Grip the handle firmly below the knurled section and rotate the bottom collar counterclockwise. Expect mild resistance during the first quarter-turn as the cam disengages. If you hear grinding, stop immediately—this signals stripped threads. For stuck units, wrap the collar in a rubber band for better grip before twisting. Never use pliers; they scar metal surfaces.
Lift the Top Plate Straight Up
After loosening, the plate should lift vertically without side-to-side wiggling. If it sticks, hold the razor head over your palm and tap the handle base downward. This jolt dislodges soap residue jamming the mechanism. For persistent jams, skip to the hot water soak method in the stuck holder solutions section.
Butterfly Door Safety Razor Techniques
Butterfly-door razors open via hinged plates that pivot outward, but mineral buildup often freezes the hinges. Forcing them warps delicate metal, making future openings impossible.
Rotate the Handle Base Clockwise
Hold the razor head steady with one hand while twisting the handle base clockwise. Watch for the doors to separate gradually—you’ll hear a distinct click at full opening. If resistance builds before the click, stop. This isn’t a screw mechanism; over-rotation bends hinge pins permanently.
Clean Hinges Before Reassembly
Before inserting a new blade, inspect hinges for white crusty deposits. Dip an old toothbrush in vinegar, scrub gently, then rinse under warm water. Dry thoroughly with a microfiber cloth. Skipping this step guarantees repeat sticking, as moisture traps residue inside the hinge channels.
Cartridge Razor Release Button Secrets

Cartridge systems hide release mechanisms in deceptive locations—often buried under grip ridges or behind sliding panels. Prying with tools shatters plastic tabs, rendering the razor useless.
Locate Hidden Release Points
Gillette Fusion models hide buttons under the rear handle grip, while Schick Hydro uses a front slider disguised as texture ridges. Run your fingernail along seams near the cartridge connection; you’ll feel a slight give where the mechanism sits. If you can’t find it, check manufacturer videos—many brands bury this in tiny print.
Press and Slide Simultaneously
Depress the button fully while sliding the cartridge forward in one fluid motion. If it resists, remove hair clogs first: soak the connection point in warm water for 2 minutes, then use a toothpick to clear debris from the button channel. Never insert metal objects—they crack internal plastic levers.
Vintage Razor Three-Piece Disassembly
Pre-1970s razors use pin-and-plate systems where the handle unscrews from both top and bottom plates. Forcing the top cap causes hairline cracks that leak lather during shaves.
Identify Your Razor’s Construction
Examine the head: if a central post screws through the blade, it’s a three-piece design. If the entire top twists off as one unit, it’s two-piece. Three-piece razors (like Merkur 34C) require full handle removal before accessing the blade—never twist the top cap alone.
Orderly Disassembly Sequence
Unscrew the handle completely from the base plate first. The top cap then lifts straight off, exposing the blade. Note the blade orientation: sharp edges must align with the comb teeth. Store parts on a towel in assembly order—reversing plates causes uneven blade exposure and razor burn.
Freeing Stuck Razor Holders Without Damage
90% of stuck mechanisms result from dried shaving cream or hard water deposits—not mechanical failure. Heat and acids dissolve buildup safely when applied correctly.
Hot Water Expansion Method
Submerge only the head in near-boiling water for 90 seconds. Remove and immediately attempt opening while metal parts expand from heat. Works instantly for soap-jammed razors but fails on corroded units. Never soak vintage razors with wooden handles—water swells the wood, cracking the head.
Vinegar Soak for Mineral Deposits
Mix equal parts white vinegar and warm water in a shallow dish. Soak the head for 8 minutes (no longer—vinegar eats metal finishes). Scrub hinges with a soft toothbrush, then rinse under cold water for 30 seconds to neutralize acid. Dry immediately with compressed air; air-drying leaves vinegar residue that accelerates rust.
Blade Removal Safety Protocols
Double-edge blades are sharper than kitchen knives. Mishandling during removal causes deep cuts requiring stitches. Never skip these steps.
Secure Grip Techniques
Hold blades only by the short, non-sharp edges using needle-nose pliers wrapped in rubber bands. If bare-handed, pinch the blade between thumb and forefinger on the dull ends while resting it on a towel for traction. Always point sharp edges away from your body—never toward your palm.
Emergency Disposal Protocol
Drop blades directly into a dedicated metal blade bank (never plastic—it shatters). If none is available, fold a stiff paper envelope into a pouch, slide the blade inside, and seal it with tape before trash disposal. Pharmacies like Walgreens accept sealed blade containers for industrial recycling—call ahead for drop-off days.
Reassembly Mistakes That Cause Future Jams
Misaligned blades or over-tightening during reassembly creates immediate resistance next time you open the razor. Avoid these costly errors.
Verify Blade Centering Before Closing
Place the razor head on a flat surface and sight down the blade edges. Both sides must extend equally beyond the head’s grooves. Misalignment stresses the mechanism unevenly, causing one side to stick shut. For butterfly razors, ensure doors close flush—any gap means hinge damage.
Strategic Lubrication Points
Apply one drop of mineral oil (not WD-40) to screw threads and hinge pins only. Wipe excess immediately with a lint-free cloth. Over-lubrication attracts hair and lather, creating new jams within weeks. Reapply only after every 10 shaves or when opening feels gritty.
Troubleshooting Persistent Opening Failures
Specific symptoms indicate precise problems—diagnose before acting to avoid irreversible damage.
Handle Spins But Head Won’t Open
This means stripped threads. Stop all twisting immediately. Disassemble completely to inspect: if thread grooves are flattened, the razor needs professional rethreading or replacement. Forcing it further shreds remaining threads, making repair impossible.
Cartridge Release Button Won’t Move
Debris jams the button channel. Use a flattened paperclip end to sweep the slot vertically, not horizontally. If the button still resists, the internal spring is broken—this requires replacement, not repair. Never drill out stuck buttons; you’ll destroy the handle’s structural integrity.
Preventive Maintenance That Eliminates 90% of Jams
Daily habits prevent most opening failures. Dedicate 30 seconds post-shave to avoid future headaches.
Post-Shave Rinse Protocol
After each use, hold the razor head under running water for 20 seconds while working the mechanism open/closed. This flushes hair from hinges. Shake vigorously over the sink—trapped water breeds corrosion in 48 hours.
Monthly Deep Cleaning Cycle
Disassemble completely (if possible) and soak parts in rubbing alcohol for 5 minutes. Use an old toothbrush to clean between blade grooves. Rinse with distilled water to prevent mineral deposits, then air-dry on a razor stand for 24 hours before reassembly.
Mastering how to open a razor blade holder transforms frustrating mornings into smooth routines. Remember: patience beats force every time—90% of “broken” razors just need vinegar soaks or hinge cleaning. For twist mechanisms, counterclockwise rotation at the base collar is non-negotiable. Cartridge users must locate hidden release points before forcing anything. Always prioritize blade safety: grip only by dull edges and use dedicated disposal containers. Implement the 30-second post-shave rinse ritual to prevent 90% of jams before they start. Your perfect shave begins with a razor that opens reliably—no more wrestling with stuck mechanisms or risking cuts from desperate prying. Keep this guide bookmarked for your next blade change; you’ll wonder why you ever struggled with something so simple.


