
That bitter aftertaste in your morning brew? Or the persistent “descale” light flashing despite fresh vinegar cycles? Your Keurig’s hidden water filter is likely clogged with minerals and overdue for replacement. But when you spot that small handle sticking up from the reservoir, prying it open feels like cracking a safe. Most users yank, twist, or jam tools into the assembly—only to snap fragile plastic tabs and trigger expensive repairs. The truth? Opening your Keurig water filter holder takes under two minutes when you know the precise pinch-and-release technique. This guide reveals the exact method to access, replace, and reinstall your filter without damaging tabs or spilling water everywhere. Skip the guesswork and reclaim fresh-tasting coffee in 90 seconds flat.
Locate Your Keurig Filter Holder Inside Reservoir
Your Keurig hides its water filter system inside the left-side reservoir—not as an external attachment. Look for a 2-inch vertical handle protruding above the water line; this belongs to the upper filter holder. The complete assembly consists of two interlocking pieces: the upper holder with the handle and a lower mesh-bottom piece that traps debris. Many users miss this location entirely, assuming filters attach externally like pitcher systems. Your machine’s discreet internal design protects the filter from accidental bumps but creates confusion when replacement time arrives.
Identify Model-Specific Reservoir Differences
While reservoir sizes vary between compact models like the K-Mini and larger units like the K-Elite Plus, the filter holder position remains identical across all Keurig machines with built-in filtration. The handle always points straight up and centers near the reservoir’s front-left corner. If your machine lacks this handle (common in older K-Class models), it uses drop-in filters without a holder—confirm your model via the serial number sticker under the water reservoir.
Remove Keurig Reservoir Top Safely Before Accessing Filter
Before touching the filter handle, detach the reservoir top cover to expose the interior. Lift straight upward with even pressure—no twisting required. Most models release with a soft pop as rubber seals disengage. If resistance occurs, check for hidden latches along the back edge near the handle. Never force the cover; excessive pressure cracks plastic hinges. For stubborn seals, run a fingernail along the rim to break the suction seal first.
With the top removed, inspect the reservoir floor. Mineral deposits often accumulate around the filter holder base, creating a white crust that complicates removal. Empty any remaining water to prevent spills during filter extraction. Note the reservoir’s fill line markings—this helps avoid overfilling later.
Extract Complete Filter Unit From Reservoir

Grasp the vertical handle firmly between thumb and forefinger. Pull straight upward with steady pressure—no twisting or wiggling. The entire assembly (upper holder, lower holder, and old filter) lifts out as one unit. Expect minor water drip; the design channels excess water inward to minimize mess. If the unit resists, mineral buildup likely bonds it to the reservoir floor. Soak the base in warm water for 60 seconds to dissolve deposits before retrying.
Critical warning: Never pull the handle sideways. Lateral force snaps the plastic tabs connecting upper and lower holders. If stuck, rotate the entire unit slightly left/right while pulling straight up—this breaks mineral adhesion without stressing tabs.
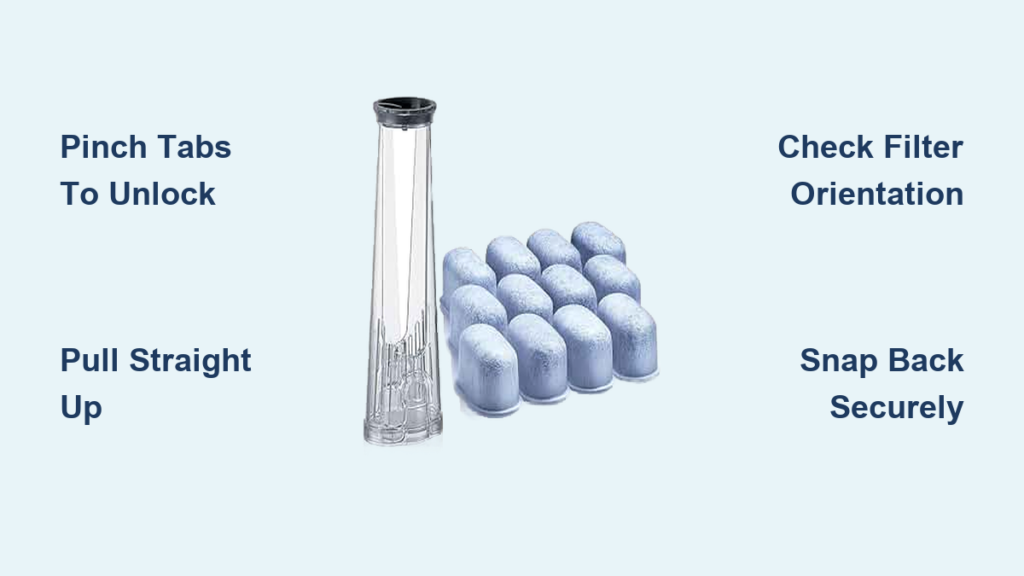
Pinch Filter Holder Tabs to Unlock Assembly
The release mechanism hides at the bottom of the extracted unit. Locate two small rectangular tabs protruding from the lower holder’s sides—these snap into slots on the upper holder. Position your thumbs on the outer faces of both tabs. Pinch inward firmly while simultaneously pulling the lower holder downward with your other fingers. The pieces separate with a soft click when tabs release.
Fix Stuck Tabs With These Pro Techniques
Mineral deposits often stiffen tabs over time. If pinching fails:
– Soak the assembly’s base in warm water for 30 seconds
– Use a soft toothbrush to scrub tab crevices
– Apply gentle pressure with rubber-grip pliers (wrap tabs in cloth first)
– Never insert screwdrivers or knives—this cracks tabs permanently
Remove Old Filter Without Spilling Charcoal Debris
Lift the saturated filter straight out of the upper holder. It resembles a small white fabric pouch, typically 1.5 inches tall. Note its orientation: the rounded top must face upward during reinstallation. Old filters often appear gray or brown from trapped minerals. Discard in regular trash—charcoal inside is non-toxic but shouldn’t enter drains.
Rinse both holders under running water immediately. Swirl water through the mesh screen of the lower holder to flush trapped particles. Inspect the upper holder’s interior for charcoal residue; use a bottle brush if needed. Skipping this step risks contaminating your new filter.
Prepare New Keurig Filter With Proper Activation
New filters arrive bone-dry and float in water. Submerge completely in a cup of cold tap water for 5–10 minutes until fully saturated and sinking. This activates the charcoal filtration media. After soaking, rinse under running water for 60 seconds while gently squeezing the filter—this removes loose carbon particles that would otherwise cloud your coffee.
Avoid These New Filter Mistakes
- Skipping the soak step (causes air pockets and poor filtration)
- Using hot water (degrades filter integrity)
- Installing dry filters (reduces effectiveness by 70%)
- Rinsing too briefly (leads to charcoal in first brews)
Install Filter With Correct Orientation and Secure Closure

Place the rinsed filter into the upper holder with its rounded top facing upward. The flat bottom must align with the mesh screen of the lower holder. Position the lower holder over the filter, ensuring tabs align with upper holder slots. Press downward firmly around the edges until you hear a distinct snap. Gaps or wobbling indicate improper seating—realign and press harder.
Set Replacement Reminder Dial Correctly
Older filter models feature a rotating dial on the upper holder’s top. Advance it exactly two months ahead (e.g., from March to May). Newer models omit this dial—mark your calendar digitally instead. Never set reminders beyond 60 tank refills, as heavy usage degrades filters faster.
Reinstall Filter Unit Into Keurig Reservoir
Align the lower holder’s grooves with the reservoir floor’s raised plastic guides. These guides prevent rotation and ensure proper water channel alignment. Press straight down with palm pressure until a solid click confirms seating. Test stability by tugging the handle—zero movement indicates correct installation. If the unit lifts easily, realign and press harder; improper seating causes leaks and filter displacement.
Replace Reservoir Top and Test System
Snap the reservoir cover back into place, starting from the front edge. Press firmly around the entire rim until all seals engage. Fill with fresh cold water to the MAX line. Run a cleansing brew cycle (without pod) to flush residual charcoal from the new filter. Discard this water—your first coffee brew should now taste clean and balanced.
Maintain Strict Filter Replacement Schedule
Replace your Keurig filter every 2 months or after 60 tank refills—whichever comes first. This applies even with distilled or bottled water use, as filters also capture machine oils and organic residues beyond minerals. Waiting for bad-tasting coffee means you’ve exceeded the filter’s capacity by weeks.
Combine Filter Changes With Deep Cleaning
Use filter replacement as your monthly maintenance trigger:
– Scrub reservoir with mild dish soap and soft sponge
– Descale machine with white vinegar every 3rd filter change
– Wipe reservoir seals with damp cloth to prevent mold
– Store unused filters in original packaging away from moisture
Pro tip: Place a small waterproof label on your reservoir with the installation date. Two months vanishes quickly—mineral buildup accelerates after 65 days, reducing brew temperature and flow rate by 30%.
Troubleshoot Common Filter Holder Problems

Filter Unit Won’t Seat Properly
If the assembly won’t click into the reservoir:
– Mineral deposits block guide grooves—soak base in vinegar for 10 minutes
– Tabs didn’t fully release during assembly—re-open and re-snap holders
– Reservoir floor is warped—replace reservoir ($15 part)
Water Leaks Around Filter Base
Leaks indicate failed seating or damaged tabs:
– Replace cracked lower holder ($8 part)
– Clean reservoir guide channels with toothpick
– Ensure no debris traps between holder and reservoir
Handle Breaks During Removal
If the handle snaps:
– Use needle-nose pliers to grip the broken stem
– Pull straight up with steady pressure
– Order a replacement holder kit immediately (Keurig part #16406)
Replacing your Keurig water filter holder shouldn’t require engineering skills. By mastering the precise pinch-and-pull technique on those hidden tabs, you’ll avoid costly damage and keep coffee tasting pristine. Remember: the handle exists solely for filter access—never yank it during normal operation. Stick to the 2-month replacement cadence, and your Keurig will deliver optimal performance for years. Now that you’ve conquered the filter, tackle mineral buildup with our step-by-step Keurig descaling guide—your machine’s next critical maintenance step.


