
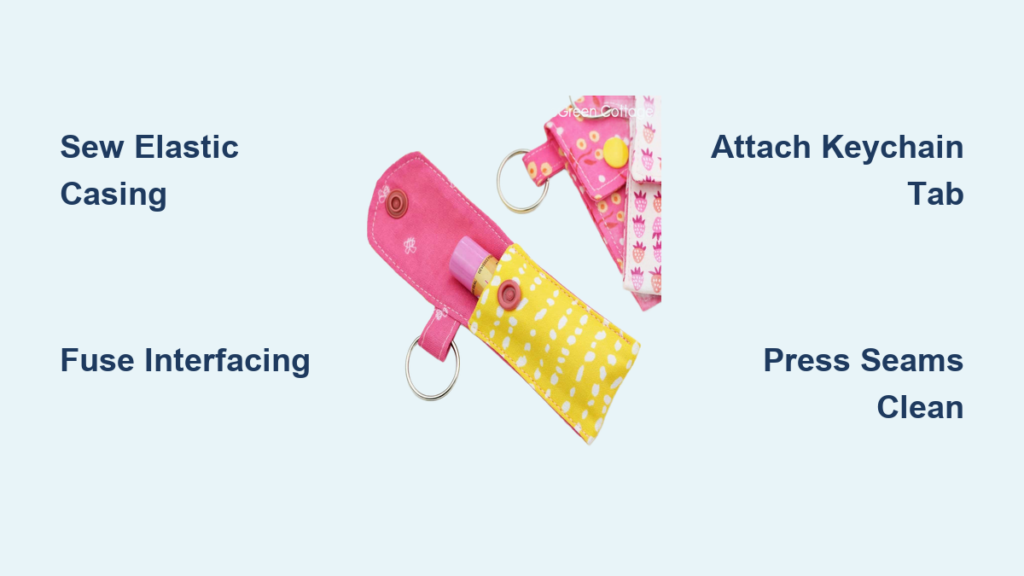
That frantic search for lip balm when chapped lips strike? It ends today. Every handbag, backpack, and pocket deserves a custom chapstick holder that keeps your balm instantly accessible instead of lost in the abyss of your belongings. How to sew a chapstick holder is simpler than you think—transforming fabric scraps into a functional accessory that clips securely to keys or straps. This guide delivers three foolproof methods: a beginner’s version for first-time sewers, a polished lined design for pro results, and a no-sew felt hack for craft emergencies. You’ll complete your first holder before most microwave meals finish cooking.
Stop wrestling with slippery tubes that vanish between car seats. Your DIY chapstick holder ensures hydration relief is always clipped within reach, whether you’re hiking trails or rushing to meetings. Let’s turn that quilting cotton scrap into your new pocket-sized essential.
Required Fabric and Hardware for Your Chapstick Holder

Fabric & Stabilizer Choices That Won’t Fail
Never guess measurements again: Cut a 4″ × 6″ rectangle from quilting cotton, lightweight canvas, or denim for the outer shell—these hold structure without stiffness. For the lining, use 4″ × 6″ of flannel or batik cotton to cushion your balm tube. Critical detail: Fuse a 3¾” × 5¾” piece of lightweight woven interfacing to the outer fabric’s wrong side. This prevents sagging while keeping the holder flexible enough to slide over chapstick caps. Skip heavy interfacing—it’ll make the pocket too rigid for standard 2.6″ tubes.
Keychain Hardware That Survives Daily Abuse
Avoid flimsy failures: Install a 1″ swivel lobster clasp (not a basic key ring) so your holder rotates freely when clipped. Thread 2″ of ¼” knit elastic through the casing—this stretchy material withstands hundreds of insertions without snapping. Use all-purpose polyester thread in a contrasting color to highlight your stitching; it’s stronger than cotton thread for high-stress seams. Pro upgrade: For boutique durability, add key-fob hardware plus a 2″ × 4″ fabric strip to create a riveted tab that won’t tear out.
Tools That Cut Construction Time in Half
Skip the frustration: A rotary cutter slices perfect rectangles faster than scissors, while a pressing mat lets you fuse interfacing without damaging your ironing board. Game-changer: Slide a safety pin onto elastic ends before threading—they won’t twist or snag inside the casing. Keep a chopstick nearby to push out corners after turning; blunt knitting needles work too but risk puncturing thin fabrics. Never skip the iron: pressed seams prevent puckering during topstitching.
Quick Pattern and Cutting Guide for Perfect Fit
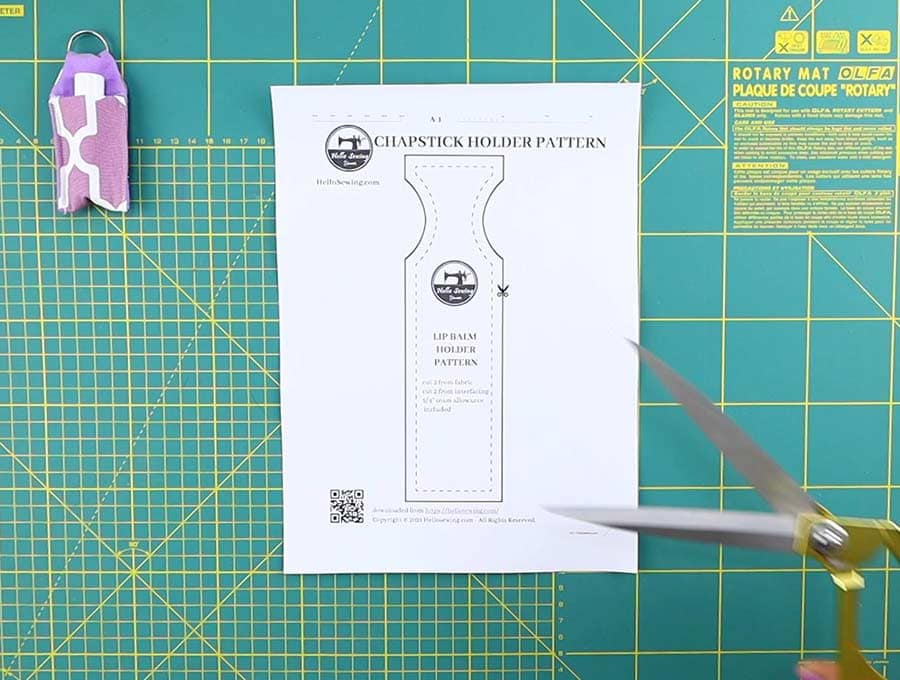
Cut List That Works for Every Lip Balm Tube
One template fits all: Your 4″ × 6″ main and lining pieces create a snug 3½” × 1¼” pocket—ideal for Burt’s Bees, Carmex, and EOS oval tubes. Critical adjustment: If making holders for family members, cut lining pieces ¼” smaller than outer fabric. This prevents the lining from peeking out after washing. For the keychain tab, a 2″ × 4″ strip yields a 1″-wide loop that won’t strain when clipped to heavy keyrings. Remember: All seam allowances are ¼” unless noted—deviate and your holder will be too tight for chapstick caps.
Why Finished Dimensions Make or Break Functionality
The 0.25″ rule: After sewing, your holder must measure exactly 3½” long. Shorter? Tubes won’t fully insert. Longer? Balm rattles loose. The 1¼” width accommodates both standard cylindrical and oval balms. Visual cue: When folded, the top edge should stand ½” above your chapstick’s cap—this extra space lets you grip the tube without fumbling. Test your dimensions by placing a chapstick on the cut fabric before sewing; trim excess if the tube protrudes more than ¼”.
Beginner Method: Basic Sewn Holder in 20 Minutes
Prepare Fabric Pieces Without Fumbling
Fuse interfacing to your main fabric’s wrong side, then fold it lengthwise right sides together to form a 2″ × 6″ rectangle. Critical step: Press this fold with steam—it creates a crisp center seam that guides your stitching. Skip this, and your holder will twist when turned right-side out. Pin the folded edge securely; loose fabric shifts during sewing, causing uneven gathers.
Sew Elastic Casing in 60 Seconds Flat
Fold the 4″ top edge’s raw edge ½” inward twice to encase raw edges, pressing after each fold. Stitch ⅛” from the inner fold, leaving a 1″ gap at the end for elastic insertion. Common mistake: Sewing too close to the edge causes casing tears. Keep your needle ¼” from the outer fold for strength. Backstitch at the gap’s start and end to reinforce this stress point.
Insert and Secure Elastic Like a Pro
Thread a safety pin through one elastic end, guiding it through the casing until both ends meet at the gap. Trick: Pin the elastic ends together before threading to prevent one end from disappearing inside. Stitch a tight zigzag bar tack across the gap, catching both elastic ends. Distribute gathers evenly by pinching the casing—never pull elastic taut, or your holder won’t accommodate chapstick caps.
Form the Body Without Distorted Corners
Sew the long raw edge with a ¼” seam allowance, then press the seam open. Turning tip: Use your chopstick to push out corners while the fabric is still warm from pressing—cooled fabric resists shaping. Turn the holder right-side out immediately after pressing; delayed turning causes stubborn wrinkles.
Attach Keychain Tab That Won’t Rip Off
Fold your 2″ × 4″ tab strip lengthwise right sides together, stitching a ¼” seam. Turn it right-side out, press with the seam centered, then fold into a loop. Slide the lobster clasp through before basting the raw edges. Critical reinforcement: Position the tab so its raw edges sit ½” below the holder’s top edge during final assembly—this hides stitching and adds strength.
Final Assembly That Locks Everything in Place
Insert the lining wrong-side out into the holder, aligning side seams. Slide the tab between layers at the back top edge. Topstitch ⅛” around the entire upper perimeter, slowing your machine at the tab to avoid puckering. This single seam secures the tab and encases all raw edges—no separate stitching needed.
Polished Method: Lined Holder with Hidden Elastic
Cut Slightly Larger Pieces for Flawless Seams
Increase all pieces by ½”: outer fabric (4½” × 6½”), lining (4½” × 6½”), interfacing (4¼” × 6¼”). This extra margin lets you clip corners without cutting threads, eliminating bulky seams. Pro insight: Interface only the outer fabric—lining stays soft against your chapstick tube.
Create Elastic Exit That Won’t Fray
Mark a dot 1″ from the top edge on the outer fabric. Stitch a ½” buttonhole here, then interface behind it. Why this beats slits: Buttonholes resist unraveling through repeated elastic threading. Position it centered on the back seam so gathers distribute evenly.
Sew and Turn for Boutique-Quality Results
Place outer and lining fabrics right sides together, sewing three sides with ¼” seams. Clip corners diagonally, then turn right-side out. Pressing secret: Push the lining ⅛” inward at the top edge before pressing—this creates a subtle “hem” that hides lining show-through after washing.
Install Elastic for Invisible Security
Thread 3″ elastic through the buttonhole using a bodkin. Secure one end inside the side seam with a square stitch, pull to gather the top, then secure the other end. Test before final stitching: Insert your chapstick to ensure elastic tension holds it snugly but allows easy removal.
Add Professional Tab That Lasts Years
Fold a 2″ × 6″ strip into thirds lengthwise, topstitching both long edges. Thread through key-fob hardware, then rivet it to the holder’s back seam. Hardware tip: Bar-tack the rivet points with your sewing machine first—this prevents leather punch slippage during riveting.
No-Sew Felt Shortcut for Craft Night Emergencies

Cut and Glue a Holder in Under 5 Minutes
Cut one 3″ × 7″ rectangle from craft felt. Fold up 4″ from the bottom to form the pocket, then apply fabric glue along both side edges with ¼” margins. Glue hack: Squeeze a thin bead onto wax paper first, then pick it up with a toothpick for precision. Press edges together for 30 seconds—hot glue sets faster but risks melting felt fibers.
Add Key Ring Without Holes or Hardware
Punch a small hole at the top center using a leather awl. Thread 12″ of grosgrain ribbon through, knotting the ends around a split key ring. Kid-friendly version: Skip the hole—glue the ribbon ends directly to the felt back for instant attachment.
Troubleshooting Quick Fixes for Common Sewing Nightmares
Elastic Issues That Ruin Your Holder
- Too loose? Rip the bar tack, shorten elastic by ½”, and re-stitch—never stretch elastic while sewing.
- Twisting mid-project? Thread safety pins onto both elastic ends before insertion to maintain flat positioning.
Fit Problems That Make Holders Useless
- Tube rattles loose? Fuse an extra interfacing layer to the outer fabric—avoid adding batting which thickens seams.
- Too tight for caps? Trim seam allowances to ⅛” with small scissors before final assembly.
Turning Woes That Distort Your Work
- Stubborn corners? Clip a tiny V-shape into the seam allowance at corners before turning—never cut threads.
- Lining rolls out? Topstitch ⅛” from the edge instead of ¼”, then press with steam to set the fold.
Customizing Your Holder for Gifts and Seasons
Seasonal Themes That Spark Joy
- Holiday: Red-and-green plaid with a miniature jingle bell glued to the tab—add felt antlers for Rudolph flair.
- Summer: Nautical stripes paired with braided cotton rope threaded through the keychain instead of elastic.
- Back-to-school: Embroider a student’s initials on denim fabric using metallic thread for locker-ready style.
Quick Personalization That Takes 2 Minutes
- Monogram: Hand-stitch initials with 3 strands of embroidery floss before assembly—use running stitch for speed.
- Color code: Assign each family member a signature fabric (e.g., blue for dad, floral for mom) to prevent mix-ups.
- Gift-ready: Stitch three matching holders, tuck in sample-sized balms, and tie with coordinating ribbon.
Care and Longevity Tips for Daily Wear
Washing Without Ruining Your Work
Machine wash cold inside a mesh lingerie bag—never use bleach which degrades elastic. Air-dry flat away from direct heat; pressing requires a warm iron on the fabric side only. Critical: Remove metal hardware before washing to prevent snags.
Hardware Care That Prevents Rust
Wipe lobster clasps with a vinegar-dampened cloth monthly to dissolve mineral deposits, then dry immediately. For plastic rings: Soak in soapy water for 5 minutes, then scrub crevices with an old toothbrush. Always check elastic tension after washing—replace if stretched beyond 2.5″.
You’ve just mastered how to sew a chapstick holder that outlasts store-bought versions—no sewing machine required for the felt version. Batch-produce five during your lunch break using the assembly-line method: cut all fabric, fuse all interfacing, then power through stitching. Clip one to your keys tonight and never face chapped-lip panic again. For extra impact, stitch matching holders for coworkers using their favorite fabric prints—this $3 DIY project makes the ultimate “I saw you scratching your lips” office gift.


