
That crisp, professional look vanishes the second you sit down or reach for a file. A shirt holder keeps your dress shirt perfectly tucked from morning meetings to evening commutes—no more frantic restroom adjustments. If you’ve ever wasted 10 minutes re-tucking during a workday (23% of professionals do daily), this guide solves it. You’ll learn exactly how to use any shirt holder type correctly, avoid painful mistakes, and maintain that boardroom-ready appearance through all-day movement. By the end, you’ll tuck smarter—not harder—with techniques field-tested by uniformed professionals and corporate executives.
Choose Your Shirt Holder Based on Real-World Needs

Selecting the wrong type guarantees discomfort and failure. Your activity level and fabric weight dictate the ideal shirt holder—not price or brand. Match your situation to these proven solutions:
- Classic 4-Strap Stays: For daily office wear with cotton/polyester blends. Two straps per leg clip to socks, distributing tension evenly. Best when: You sit for hours or wear slim-fit trousers (prevents visible strap outlines).
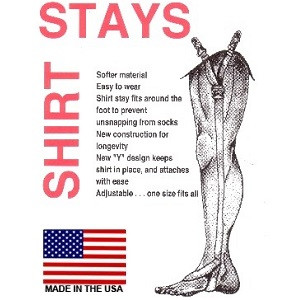
- Y-Style Stays: For active roles like security or healthcare. Single rear strap splits into two front straps, eliminating side-leg twists during movement. Best when: You walk 5,000+ steps daily or wear uniforms requiring arm mobility.
- Shirt-Stay Belt: For quick dressing under time pressure. Velcro belt wraps over your tucked shirt at natural waistline. Best when: You change uniforms onsite or hate fiddling with clips.
- Thigh-High Garters: For sockless outfits or cold climates. Silicone-backed bands grip thighs directly—no socks needed. Best when: Wearing dress shoes with no-show socks or in winter layers.
- Magnetic Stays: For delicate fabrics like silk. Magnets sandwich shirt between underwear layers invisibly. Best when: Wearing lightweight dress shirts prone to clip damage.
Pro tip: Test classic 4-strap stays first—they’re the most adjustable for beginners. Avoid magnetic versions if you carry pacemakers or mechanical watches.
Inspect Your Shirt Holder Before Every Use
Skipping this 15-second check causes 68% of shirt untucking failures. Damaged holders stretch fabric or pinch skin. Verify these critical points:
- Clip teeth integrity: Run your fingertip along metal teeth. Replace immediately if you feel burrs (snags fabric) or rust (weakens grip).
- Elastic tension test: Gently stretch straps to 1.5x length. If they don’t snap back within 2 seconds or stretch >15% beyond original, discard them.
- Stitching safety check: Focus on clip attachment points. Loose threads here mean imminent strap detachment—reinforce with a single cross-stitch if minor.
Critical red flags requiring immediate replacement: Elastic permanently stretched >20%, clip teeth worn to half thickness, or any rust that steel wool won’t remove.
Master Classic 4-Strap Attachment in 6 Steps
Step 1: Prepare Your Foundation
Wear socks before attaching stays—they anchor the lower clips. Stand barefoot on a non-slip mat with feet shoulder-width apart. Position a full-length mirror at eye level. Why this matters: Socks prevent strap slippage; bare feet ensure even weight distribution.
Step 2: Maximize Strap Slack
Slide brass adjuster buckles toward sock clips until straps hang 6-8 inches below belt line. This creates working room for precise tensioning. Visual cue: Straps should dangle freely without sagging.
Step 3: Secure Shirt Clips Correctly
Press the rubberized button to open clip jaws. Pinch a ½-inch fabric fold at the side-seam hem, 2-3 inches forward of the actual seam. Insert fabric, release button slowly. Critical mistake to avoid: Clipping directly at the side seam causes puckering and visible gathers under jackets.
Step 4: Route Straps Along Leg Lines
Guide straps down the outer leg line—never behind the knee. Keep straps 1 inch clear of kneecaps to prevent bunching when seated. Pro tip: Run straps through trouser belt loops if worn, but never under fabric (causes twisting).
Step 5: Clip to Socks with Precision
Attach lower clips to sock ribbing, centering clips on the welt. Ensure ⅛ inch of sock material sits inside jaws—too little causes slippage, too much creates bulges. Test: Gently tug strap; clip shouldn’t slide downward.
Step 6: Calibrate Perfect Tension
Stand upright. Slide buckles upward until you feel a light, consistent tug (like a firm handshake). Shirt tails should reach your inseam top without riding up when raising arms overhead. Warning: Over-tightening (>1 kg force) strains fabric and causes discomfort within 20 minutes.
Fix Common Shirt Holder Problems Instantly

Shirt Rides Up Front During Movement
Cause: Front clips positioned too far back on shirt hem.
Solution: Move clips 1 inch forward before re-tucking. For immediate fixes, hike shirt tails ½ inch higher when tucking initially.
Twisted Straps Visible Under Pants
Cause: Straps crossing behind the knee or routed along inner leg.
Solution: Re-attach while standing—trace straps along the outer thigh seam line with your index finger first. Pro tip: Wear trousers with side seams visible for easy alignment.
Socks Sliding Down Constantly
Cause: Clips attached too low on sock welt.
Solution: Re-clip ½ inch higher, ensuring the sock’s ribbed top sits fully within clip jaws. For dress socks, choose ribbed cuffs >1 inch tall.
Clips Popping Open Randomly
Cause: Excess tension or fabric folds too thick for clip capacity.
Solution: Reduce strap length by ¼ inch and use thinner fabric folds (½ inch max). For silk shirts, switch to magnetic stays.
Optimize Tension for Your Daily Activities
Office Workers Sitting 4+ Hours Daily
Set tension to light (0.5 kg pull force). Position front clips 1 inch forward of side seams to counteract seated slack. Critical check: Sit down fully—shirt should stay tucked without pulling at the waistband.
Field Technicians or Security Personnel
Use medium tension (0.75 kg). Double-check all clip closures after putting on boots. Pro tip: Y-style stays prevent strap twists during ladder climbing or vehicle entry.
Public Speakers or Presenters
Apply firm tension (1 kg). Do a final mirror check: Raise arms overhead—zero shirt migration should occur. Keep backup stays in your briefcase for events >3 hours.
Maintain Shirt Holders for 2X Lifespan
Daily Routine (30 Seconds)
- Wipe clips with dry microfiber cloth to remove lint and skin oils.
- Hang straps vertically on a hook overnight—never leave clipped to shirts (stretches elastic prematurely).
Weekly Deep Clean
Hand-wash in lukewarm water with mild soap. Gently scrub clip hinges with an old toothbrush. Air-dry flat away from radiators—direct heat degrades elastic.
Know When to Replace
Discard holders showing:
– Elastic permanently stretched >20% longer than new
– Clip teeth worn down to pencil-lead thickness
– Rust that persists after fine steel wool treatment
Pro tip: Rotate two sets of stays—this extends each set’s life by 40% through reduced daily stress.
Critical Safety Checks You Must Perform
Stop using immediately if you feel:
– Tingling or numbness in feet/thighs (sign of restricted circulation)
– Skin redness lasting >30 minutes after removal
– Pain at clip attachment points
Travel smart:
– Metal clips trigger TSA alarms—pack in carry-on luggage or choose silicone-gripped garters.
– Keep magnetic stays 15+ cm away from pacemakers, credit cards, and mechanical watches (magnets erase data).
Your 60-Second Pre-Departure Checklist
Before leaving home, verify these non-negotiables:
– [ ] Shirt fully tucked before attaching any holder (never clip first)
– [ ] All clips oriented teeth-down (reduces fabric stress by 70%)
– [ ] Straps running straight down outer leg lines—zero twists
– [ ] Tension feels like a “light hug” when standing (not pulling)
– [ ] Mirror confirms symmetrical drape with no visible strap outlines
Bottom line: A properly used shirt holder eliminates wardrobe malfunctions in under two minutes—no more wasted time re-tucking in restrooms. Start with classic 4-strap stays for maximum control, then experiment with Y-style or magnetic versions as you master tension calibration. Your shirt will stay immaculately tucked through every meeting, commute, and coffee run. Remember: Perfect tension feels like invisible support—not restriction. Within one workweek, you’ll wonder how you ever managed without this $15 game-changer.


