
Nothing ruins dinner faster than grabbing a hot pan with a flimsy towel. Quality pot holders protect your hands and add personality to your kitchen—but store-bought versions often skimp on heat protection or style. Making your own pot holder lets you choose fabrics that match your decor while ensuring maximum safety with proper thermal layers.
This guide walks you through three proven methods, from a simple beginner project to advanced techniques with pockets and professional binding. You’ll learn exactly which materials keep you safe, how to layer for maximum heat resistance, and finishing techniques that make your pot holders look store-bought.
Why Your Fabric Choice Determines Heat Safety
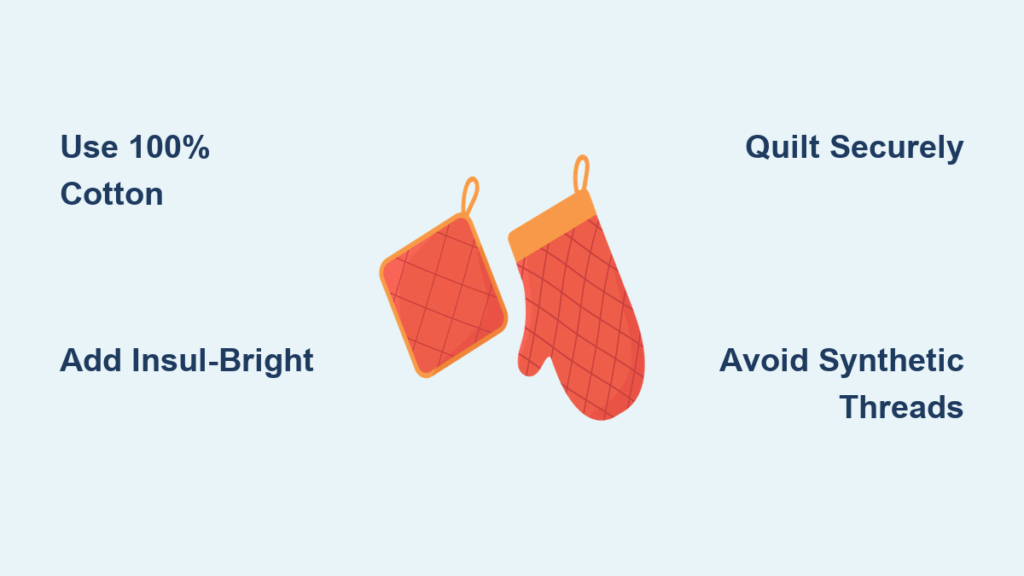
Heat-Resistant Materials You Must Use
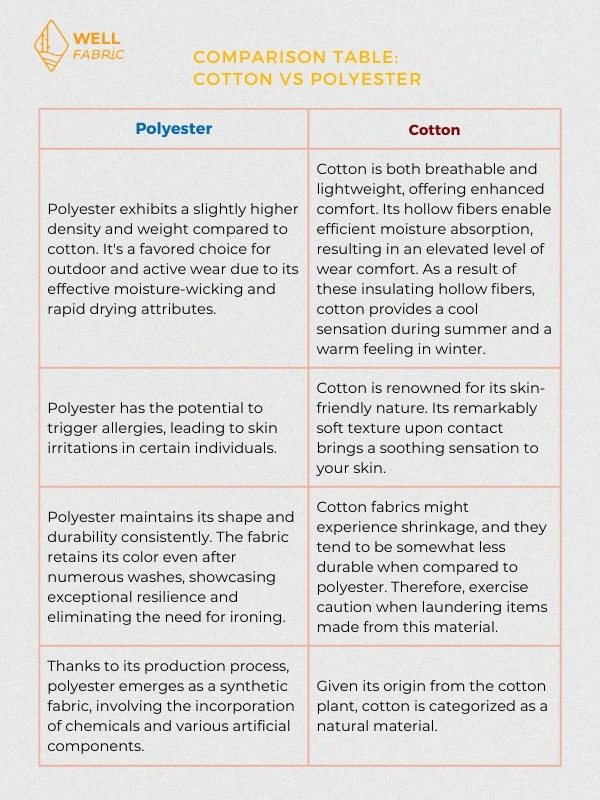
Your pot holder’s safety depends entirely on using the right materials. 100% cotton fabric isn’t just recommended—it’s essential for preventing burns. Synthetic fabrics like polyester melt when they contact hot pans, potentially causing serious injury. When cutting your 9″×9″ fabric squares, always verify they’re 100% natural fiber. Insul-Bright thermal batting contains a metallic layer that reflects heat away from your hands, while cotton quilt batting absorbs and dissipates heat through its fibers. Never substitute cotton thread for polyester thread, as synthetic threads weaken and melt under high temperatures.
Dangerous Material Combinations to Avoid
Many crafters unknowingly create fire hazards by using inappropriate materials. Polyester blends in fabric or binding will melt onto hot cookware, creating a sticky, dangerous situation. Nylon thread becomes brittle and snaps under heat stress, causing seams to fail when you need them most. Rayon fabrics scorch easily and lose structural integrity after minimal heat exposure. Always check fabric content labels—anything less than 100% cotton, linen, or denim puts you at risk. Your pot holder must withstand temperatures exceeding 400°F without degrading.
Method 1: Emergency Pot Holder in 30 Minutes
Cut and Prepare Your Layers
Gather two 9″×9″ fabric squares, one Insul-Bright square, and one cotton batting square. For the hanging loop, cut a 5″×2″ strip from your fabric. Fold this strip lengthwise with wrong sides together, press firmly, then fold each raw edge to the center crease. Fold once more along the original crease to enclose all raw edges. Topstitch 1/8″ from each long edge to create a sturdy loop that won’t unravel during use.
Layer and Stitch for Maximum Protection
Place Insul-Bright shiny side up as your foundation layer. Position your first fabric square right side up on top, followed by the second fabric square right side down. Complete the stack with cotton batting on top. Pin all layers together tightly with Wonder Clips (they won’t slip like pins through thick layers). Sew around the perimeter with a 1/4″ seam allowance, leaving a 3″ gap on one side. Insert your hanging loop between layers at a corner before finishing the seam, making sure it’s securely sandwiched between fabric layers.
Finish and Quilt for Durability
Trim corners close to stitching (but don’t cut through!) to reduce bulk. Turn the pot holder right side out through the gap using a blunt turning tool to push out crisp corners without tearing fabric. Fold the raw edges of the gap inward and press flat. Topstitch around the entire edge 1/4″ from the perimeter to close the gap and reinforce seams. Finally, quilt through all layers with an X pattern from corner to corner—this critical step prevents thermal layers from shifting when handling hot dishes.
Method 2: Professional Bias-Bound Pot Holder
Create a Perfectly Quilted Base
Cut two 10″×10″ fabric squares for your base. Layer them right sides together with Insul-Bright and cotton batting sandwiched between. Quilt horizontal lines 1.5″ apart across the entire piece, then repeat for the second side. Trim both quilted pieces to exact 9″ squares using a rotary cutter for precision—this ensures clean edges for binding application.
Apply Binding Like a Pro
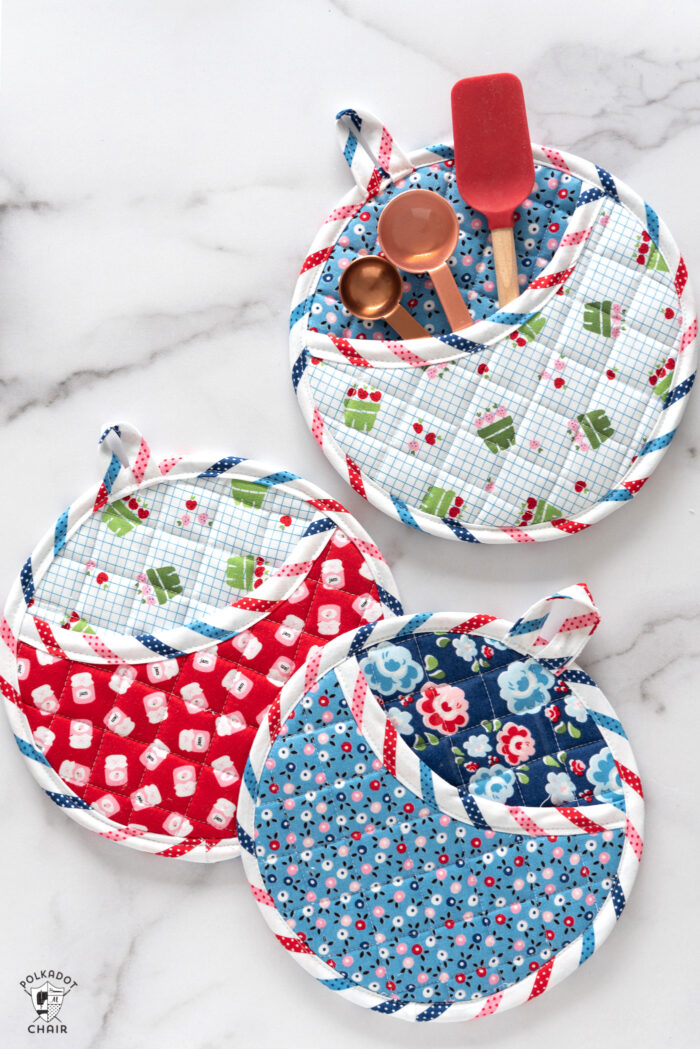
Start binding at the top center corner with 100% cotton bias tape. Sew with a 1/2″ seam allowance, mitering corners by folding the tape 90° and tucking it under your presser foot before pivoting. When you reach the starting point, overlap the binding ends by tucking the beginning into the tail for a seamless join. Hand-stitch the back of the binding with an invisible ladder stitch—this technique creates a professional finish that withstands repeated washing. Use the binding tail to create a secure hanging loop attached to a corner.
Method 3: Scrap Fabric Quick Fix (15 Minutes)
Simplify Construction with Available Materials
When you need a pot holder immediately, cut two 10″×10″ squares from any 100% cotton scrap fabric. Layer them right sides together with Insul-Bright (or even an old cotton dish towel) between them. Sew around the edges with a 1/2″ seam allowance, leaving a 4″ gap for turning. Create a simple loop from a 1.5″×4″ strip folded in half lengthwise, sewn along the long edge, and turned right side out with a safety pin.
Complete Your Emergency Pot Holder
Turn the layered fabric right side out through the gap and press flat. Close the gap with a topstitch around the entire edge. Attach your loop at a corner with a box stitch for reinforcement. While this version lacks the thermal protection of dual batting layers, it’s perfect for moderately hot dishes and demonstrates the basic construction technique. Always test new pot holders with warm—not hot—cookware first to verify heat resistance.
Troubleshooting Real Pot Holder Problems
Fix Bulky, Lumpy Corners Immediately
When corners puff out after turning, this indicates excessive fabric bulk in seam allowances. Trim seam allowances to 1/8″ and clip corners diagonally before turning—this simple adjustment creates sharp, professional corners that lie flat when handling hot pans. Never cut too close to stitching, as this compromises structural integrity.
Prevent Layer Shifting During Sewing
Insul-Bright’s slippery surface causes layers to shift mid-seam, creating weak spots. Use Wonder Clips every 2″ around the perimeter and engage your sewing machine’s walking foot to feed all layers evenly. Sew slowly through thick sections, especially at corners where multiple layers converge.
Creative Ways to Customize Your Pot Holders
Design Seasonal Kitchen Sets
Transform your kitchen’s look with themed pot holders using holiday fabrics for Thanksgiving, bright summer prints for outdoor entertaining, or rustic plaids for fall baking. Coordinate with matching oven mitts and tea towels using the same thermal construction techniques for a unified kitchen aesthetic that doesn’t compromise safety.
Create Unique Shapes for Special Uses
Round pot holders made with 9″ circle templates protect curved cookware better than squares. Rectangular 6″×9″ versions handle casserole dishes perfectly. For ultimate grip, add a thumb section to create mitt-shaped pot holders that won’t slip off your hand when lifting heavy Dutch ovens.
Critical Safety Steps Before First Use
Verify Your Pot Holder’s Heat Resistance
Before trusting your handmade pot holder with hot cookware, perform these safety checks: Ensure all seams are secure with no gaps where heat could penetrate. Confirm thermal batting completely covers the entire surface area. Check that binding is sewn tightly with no loose threads that could catch on pans. Most importantly, test with a warm (not hot) pan first to verify heat protection before using with high-temperature cookware.
Replace When Safety Compromised
Discard pot holders showing any scorch marks, even minor discoloration indicates compromised heat resistance. Replace immediately if thermal batting develops holes or layers separate during washing. Frayed binding edges create weak spots where heat can penetrate—don’t risk burns by continuing to use damaged pot holders.
Your handmade pot holders will last for years with proper materials and construction. The key is using 100% cotton throughout and never skipping the thermal layer. Start with the basic version for your first project, then experiment with pockets and decorative quilting as you gain confidence.
Ready to upgrade your entire kitchen? Use these same techniques to create matching oven mitts, trivets, and tea towels for a coordinated look that protects your hands in style.


