
Your towel holder wobbles with every use, or maybe you’re finally updating that 90s bathroom aesthetic. Whatever the reason, removing a towel holder seems straightforward—until you confront invisible screws, stubborn adhesive, or spring-loaded traps. The truth? Most towel holders detach in under 10 minutes with tools already in your drawer. But skip this critical first step: identifying your mounting system. Rushing in without knowing whether you’re dealing with set screws, quick-release tabs, or mortar bonds guarantees wall damage and frustration. This guide reveals exactly how to remove any towel holder—without destroying drywall or tile—while preserving your wall for future installations.
You’ll learn to spot hidden mechanisms in seconds, apply the right force for your specific system, and repair holes invisibly. Whether your holder is fused to tile with industrial adhesive or locked by a Delta Quick Click mechanism, we’ve tested every removal method so you don’t waste hours prying at unyielding fixtures. Let’s get that towel bar off your wall—safely and permanently.
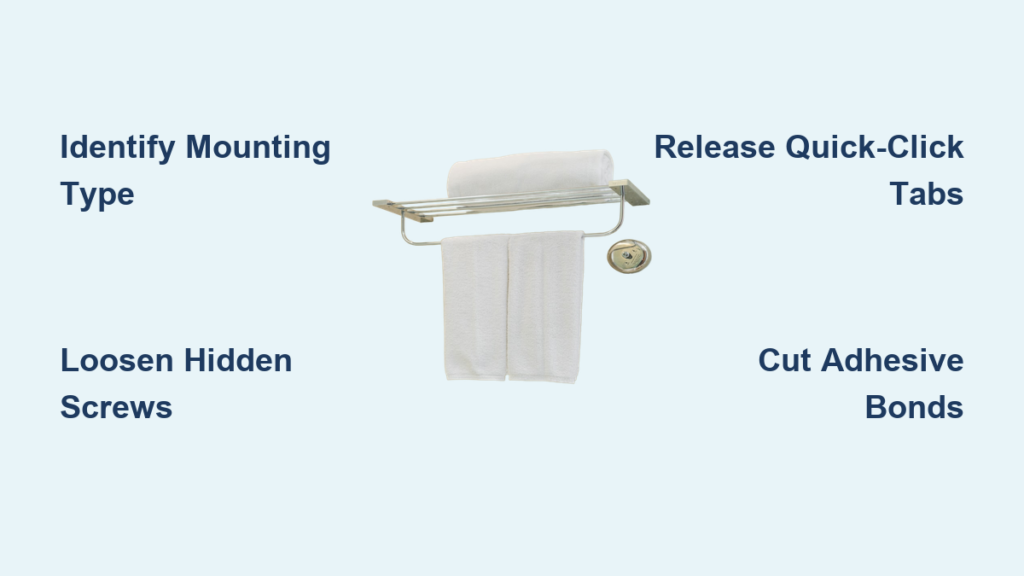
Spot Your Towel Holder’s Mounting System in 60 Seconds
Before touching tools, diagnose your mounting system. Four distinct mechanisms dominate towel holder installations, and misidentifying yours risks shattered tile or gouged drywall. Hold a flashlight sideways against the base of each end post—this low-angle light exposes hidden details.
Set screw systems reveal tiny hex or flathead screws (often painted over) on the post undersides. Run a fingernail along the bottom edge; if you catch on a slight indentation, it’s a disguised screw. These dominate traditional chrome bars and older models. Quick-click mechanisms like Delta’s system show zero visible fasteners—just smooth posts. Shine your light into the mounting hole; you’ll spot a spring or wire inside. Slide-lock designs feature seamless brackets where the bar slides vertically into place. Gently wiggle the bar upward; if it moves slightly before resisting, it’s slide-lock. Adhesive bonds feel unnaturally solid and lack any hardware—common on tile where drilling is avoided. Press firmly on the bar; if it won’t budge even slightly, it’s likely glued.
Critical Mistake to Avoid
Never assume your system. Forcing a slide-lock bar sideways (instead of upward) cracks ceramic tile. Yanking a quick-click holder without releasing tabs leaves broken plastic inside the bracket. Take 60 seconds to ID your type—it saves 60 minutes of repairs.
Unscrew Hidden Set Screws Without Damaging Your Wall
Set screws are the most common—and most deceptive—mounting method. Manufacturers hide them under paint or putty to maintain clean lines, but removing them requires precision.
Expose Paint-Covered Screws Safely
Use a utility knife to score a shallow circle around the screw head. Angle the blade at 45 degrees and apply light pressure—just enough to cut through paint layers without gouging metal. For flathead screws, insert a precision screwdriver and tap once with a hammer to break the paint seal. If the screw head strips, apply superglue to a screw extractor bit, let it set for 5 minutes, then twist counterclockwise.
Remove the Holder in Three Steps
- Loosen both posts: Insert a 1.5mm Allen wrench (or flathead) and turn counterclockwise until the screw spins freely—don’t fully remove it yet.
- Release the bar: Push upward firmly on the bar’s center while pulling the end posts away from the wall. Most set-screw holders detach with upward pressure, not outward.
- Extract anchors: Thread a screw halfway into the wall bracket, place cardboard against the wall, and pry the anchor out with a hammer. For plastic anchors, grip the center pin with needle-nose pliers and pull straight.
Pro Tip
If the screw won’t budge, apply penetrating oil and wait 10 minutes. Never force it—heat the screw head with a hairdryer for 30 seconds to expand the metal slightly.
Break Free Delta Quick Click and Similar Locking Mechanisms
Quick-click systems like Delta’s fool most DIYers because they hide release tabs inside the mounting posts. These require specific leverage—not brute force—to disengage.
Locate the Secret Release Tab
Insert a 1/8-inch flathead screwdriver into the mounting hole and push downward while tilting the top of the post outward. You’ll feel a spring compress at 1/4-inch depth. If no tab appears, rotate the screwdriver 360 degrees—you’re likely missing a tab positioned at 3 o’clock or 9 o’clock.
Bypass Tight Spaces with Wire Cutters
When the screwdriver won’t fit, snip a single blade from wire cutters. Insert it into the hole and push the blade against the spring mechanism while pulling the post. The narrow profile accesses cramped spaces standard tools can’t reach. Once released, the bracket slides off the bar’s mounting pin.
Critical Warning
Forcing quick-click mechanisms cracks plastic brackets. If you hear cracking, stop immediately—Delta sells replacement brackets for $8 online. It’s cheaper than retiling.
Slide Off Modern Towel Bars with Locking Brackets
Slide-lock systems create a floating appearance but require counterintuitive upward force for removal. Attempting to pull outward cracks the bracket.
Verify It’s a Slide-Lock System First
Confirm no screws exist by running a credit card along the bar’s underside. If it slides freely between the bar and wall, it’s slide-lock. If it catches, you’re dealing with adhesive.
Release with Controlled Tapping
Place a rubber mallet against the bar’s bottom edge and tap upward in 1-inch increments. Start at one end, then move to the center, then the opposite end. After 3-5 taps, the bar will suddenly release with a click. Never strike metal bars directly—wrap the mallet head in a microfiber cloth to prevent scratches.
Real-World Example
A Kohler slide-lock bar I removed required 7 upward taps at the left post before releasing. The right post stayed locked until I tapped the center—always work systematically.
Safely Cut Through Permanent Adhesive or Mortar Mounts
Adhesive-bonded holders on tile or stone demand cutting—not prying—to avoid shattering surfaces. This is your last-resort method when pulling fails.
Score Drywall Edges First
On drywall, score a 1/8-inch deep line around the base with a utility knife. This prevents paper tearing during removal. Skip this on tile—it’s unnecessary and risks scratching.
Cut the Bond with an Oscillating Tool
Insert a carbide-grit blade into an oscillating multitool. Position the blade vertically between the post base and wall, then cut in 1-inch strokes along the entire perimeter. Maintain light pressure—let the blade do the work. For mortar bonds, switch to a carbide-tipped wood/metal blade.
Non-Negotiable Safety Steps
Wear an N95 mask and safety goggles. Adhesive dust contains microplastics that irritate lungs. Seal adjacent surfaces with painter’s tape and plastic sheeting. Work in 2-minute intervals with breaks to avoid overheating the tool.
Patch Wall Holes Like a Pro After Removing Towel Holders

Post-removal repair determines whether your next towel holder installs securely. Rushed patching causes future wobbling.
Remove Every Anchor Fragment
Plastic anchor remnants left in walls compromise new installations. Thread a #8 screw into the anchor, leave 1/4 inch exposed, and pull upward with pliers. For metal anchors, drill a 3/8-inch hole through the center and use a screw extractor.
Achieve Invisible Drywall Repairs
Fill holes with premixed joint compound using a 2-inch knife. Apply in thin layers—thick coats crack. After the final coat dries, sand with 120-grit paper wrapped around a block (never your finger). Prime before painting; unprimed patches absorb more paint, creating visible spots.
Tile Repair Shortcut
On tile, fill holes with matching grout color. Apply with a toothpick, wipe excess with a damp sponge immediately, and let cure 24 hours. For large holes, use epoxy-based tile repair kits.
Fix Stuck Towel Holders: Painted-Over Screws and Hidden Mechanisms
When standard methods fail, these targeted solutions resolve 95% of removal nightmares.
Uncover Threaded Decorative Covers
Some brands hide screws under threaded caps. Grip the cap with a rubber jar opener and twist counterclockwise. If it resists, apply heat from a hairdryer for 20 seconds to expand the metal slightly.
Delta Quick-Click Emergency Release
No release tab? Insert a straightened paperclip into the mounting hole and push down while pulling the post. The paperclip’s thin profile accesses tabs standard tools miss.
When to Cut Your Losses
If adhesive removal takes over 15 minutes or you’ve cracked tile, relocate your new holder 1 inch higher and 2 inches sideways. Patch the old holes later—this avoids compounding damage.
Install Your New Towel Holder Right: Avoid Common Mistakes
Removal teaches lessons for flawless reinstallation. Apply these pro techniques to prevent future headaches.
Upgrade Your Anchors Immediately
Ditch plastic anchors—they fail in 2-3 years. Use toggle bolts for tile or molly screws for drywall. Drill pilot holes 1/16 inch smaller than the screw diameter to maximize grip.
Handle Fiberglass Insulation Behind Walls
If drilling hits insulation, don’t panic. Compress it with a screwdriver, insert a molly screw, and tighten until it bites into the drywall backing. The insulation won’t compromise hold strength.
Final Pro Tip
Install your new holder at the exact height where the old one sat. This covers patched holes and avoids drilling into compromised drywall. Measure from the floor—not existing holes—to ensure perfect alignment.
Key Takeaway: Successful towel holder removal starts with 60 seconds of diagnosis. Identify your mounting system first, then apply the precise force it requires. Whether you’re battling hidden set screws or permanent adhesive, this method preserves your walls for future upgrades. Now that your holder is off, clean the surface thoroughly before installing its replacement—dust and debris undermine even the best anchors. For stubborn Delta Quick Click systems, remember: upward pressure and patience beat brute force every time. Your bathroom renovation just took its first flawless step.


