

That awkward moment when you’re seated on the toilet and realize the paper is just out of reach—too high, too far, or requiring an uncomfortable twist. Most homeowners install toilet paper holders randomly, then endure years of frustration. The good news is you can install toilet paper holder correctly in just 15 minutes with proper measurements and techniques. This guide delivers exact height standards, precise placement guidelines, and step-by-step instructions to mount your holder securely on any surface—drywall, tile, or plaster—ensuring effortless access for years to come.
Optimal Mounting Height Standards
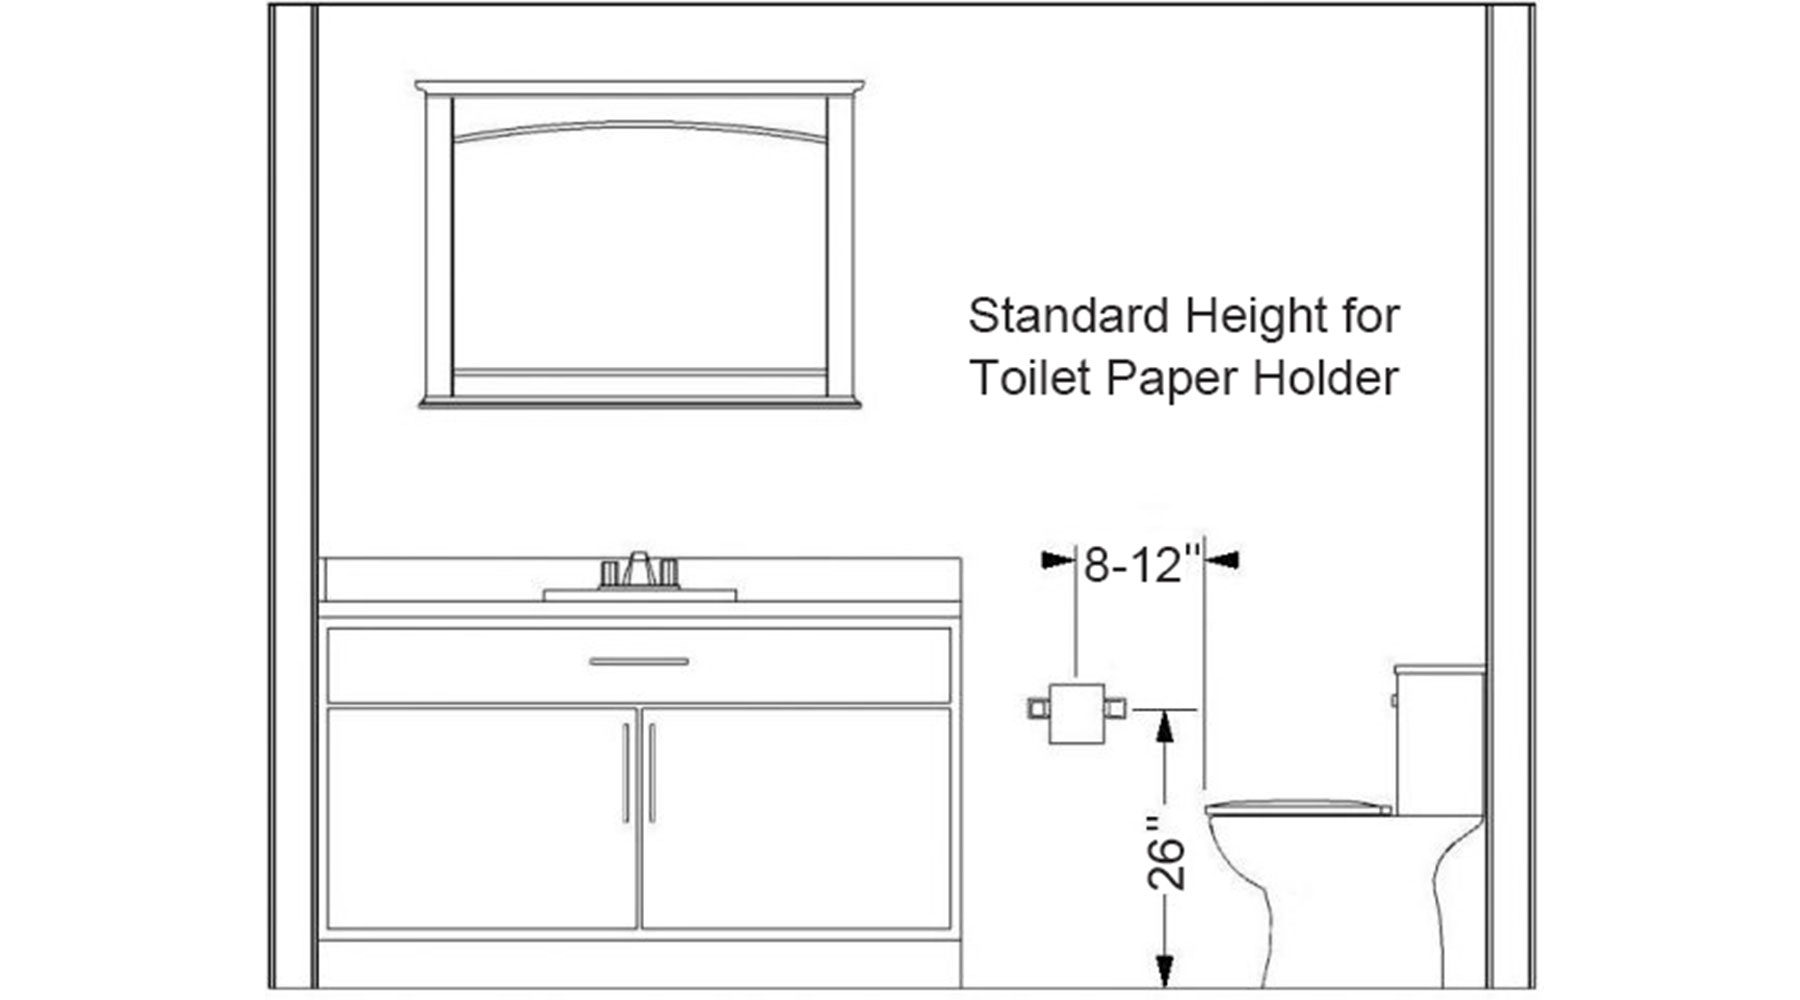
Standard Residential Height
Measure exactly 26 inches from your finished floor to the center point where the spindle will sit. This height accommodates seated reach for 95% of adults and older children, eliminating unnecessary stretching or repositioning. Always measure from the actual floor surface—not the baseboard—to ensure accuracy. When properly positioned at this height, users can comfortably grasp and tear paper without straining their back or shoulders. This standard works across nearly all bathroom layouts and toilet styles, making it the go-to measurement for residential installations.
ADA Accessibility Range
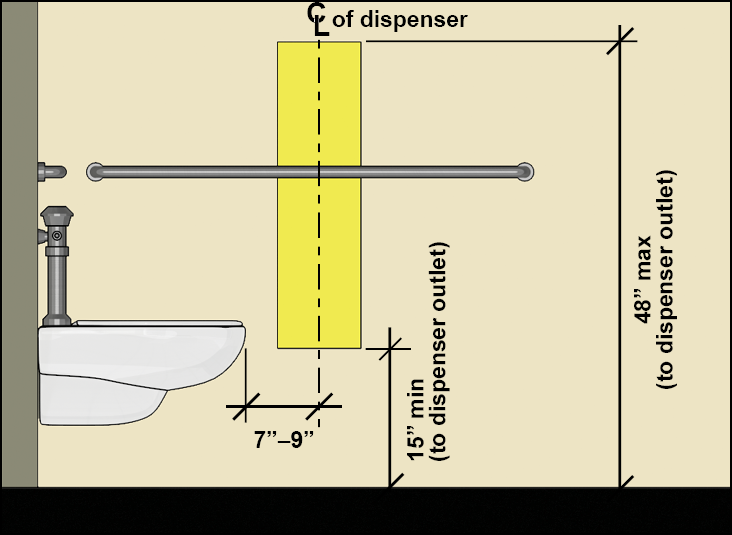
For bathrooms designed with accessibility in mind, maintain a height between 19-36 inches from floor to centerline. The ideal range for most accessible installations falls between 21-24 inches, accommodating wheelchair users while still serving standing adults. This specification follows Americans with Disabilities Act guidelines that address forward reach requirements for individuals with limited mobility. Installing within this range creates immediate accessibility benefits and future-proofs your bathroom for aging in place or changing household needs.
Perfect Placement Distance from Toilet
Reach Zone Calculation
Position your toilet paper holder 8-12 inches from the front edge of the toilet bowl to the center of the holder. This measurement—not from the tank—ensures proper reach regardless of toilet design. This placement creates a natural diagonal path for your hand to reach the paper without twisting your torso. When correctly positioned, users can maintain proper posture while seated, reducing strain on the back and shoulders during repeated use. This seemingly small measurement difference significantly impacts daily comfort.
Horizontal Positioning
Place the holder 8 inches left of the toilet’s centerline for standard right-handed use. This creates an optimal diagonal reach path that feels natural for most people. If your household includes left-handed users, consider positioning the holder 8 inches to the right of the centerline instead. This subtle adjustment accommodates natural arm movement patterns, making paper access effortless rather than requiring an awkward cross-body reach that strains the shoulder.
Required Tools and Materials
Essential Tools:
– Electric drill with appropriate bits
– Quality level (bubble or laser)
– Measuring tape
– Pencil for precise marking
Mounting Supplies:
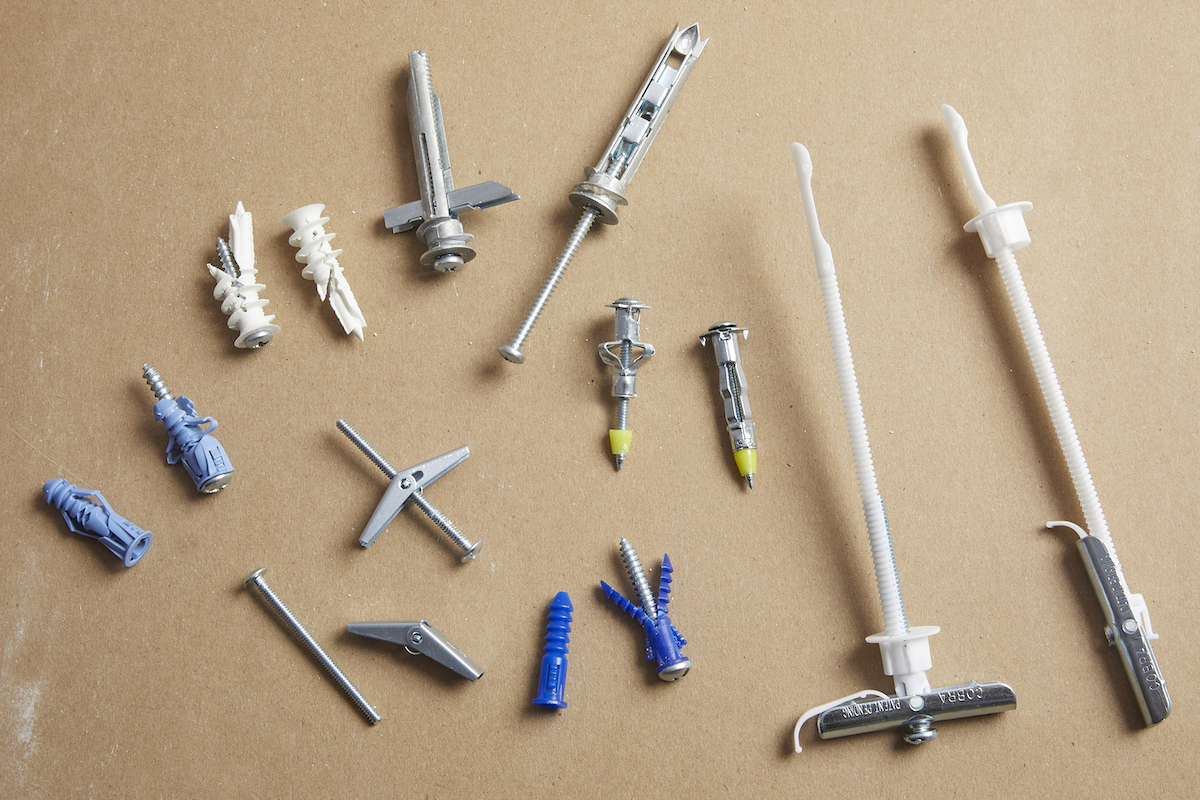
– Wall anchors (for drywall installations)
– Screwdriver matching holder screws
– Stud finder (highly recommended)
– Carbide-tipped drill bits (for tile walls)
Pre-Installation Preparation
Wall Assessment Check
Before drilling, determine your wall composition by gently tapping it. A hollow sound indicates standard drywall requiring anchors, while a solid sound suggests plaster or tile. For tile walls, you’ll need specialized carbide bits and potentially epoxy anchors. This critical step prevents cracked tiles or stripped drywall anchors. If you’re uncertain about your wall type, test in an inconspicuous area first—this small precaution avoids visible damage during your toilet paper holder installation.
Measurement Verification
Mark both height (26 inches) and distance (8-12 inches from toilet) with pencil, then double-check these measurements while seated on the toilet. Errors become permanent holes requiring patching. Use your level to ensure the holder will sit perfectly horizontal—nothing looks sloppier than a crooked toilet paper holder. For households with varying heights, consider testing the position with multiple family members to find the most universally comfortable placement.
Step-by-Step Mounting Process
Mark Drill Points
Hold the mounting bracket against the wall at your verified height and position. Use your level to ensure perfect horizontal alignment, then mark the drill holes through the bracket’s screw openings with a pencil. These precise marks prevent misalignment that could compromise both functionality and aesthetics. For tile installations, apply masking tape over your marks to prevent drill bit slippage—a small step that prevents costly tile cracks.
Create Pilot Holes
Drill pilot holes using the appropriate bit for your wall material. For drywall without studs, drill holes sized specifically for your wall anchors. Tile walls require carbide-tipped bits, slow speed, and steady pressure—start drilling at an angle before straightening to prevent surface damage. The size of your pilot holes directly impacts anchor security, so match them precisely to your anchor specifications rather than guessing.
Install Anchors and Bracket
Tap wall anchors firmly into drywall holes until flush with the surface. For tile installations, consider epoxy anchors for maximum security. Align the mounting bracket over your holes and secure with provided screws, tightening firmly but avoiding overtightening that could strip anchors or crack tile. Before attaching the roll holder itself, test the bracket’s stability by applying gentle pressure—this catches weak installations before they become problematic.
Common Installation Challenges
Drywall Without Studs
When you can’t find studs behind your mounting location, use toggle bolts or plastic expansion anchors rated for at least 50 pounds—well above the weight of even jumbo toilet paper rolls. Standard holders require minimum 1/4″ anchors for reliable support. Test anchor security by pulling firmly before attaching the holder; if you feel movement, replace with larger anchors. This extra step prevents the frustrating wobble that develops when anchors gradually pull through drywall.
Tile Wall Solutions
For tile installations, apply masking tape over drill marks to prevent bit slippage. Use carbide-tipped bits designed specifically for ceramic tile and drill at slow speed with consistent pressure—rushing causes cracks. Consider epoxy-based anchors for maximum security on tile surfaces, as they bond directly with both tile and mounting hardware. This specialized approach ensures your toilet paper holder remains secure despite tile’s brittle nature.
Accessibility and Universal Design
Multi-User Benefits
Mounting at 22-26 inches serves multiple household members effectively. Children reach independently without assistance, seated users avoid standing, and elderly users reduce fall risk by eliminating unnecessary movement. This height range also accommodates future wheelchair needs without requiring renovation, making your bathroom immediately more versatile. The slight adjustment from standard height pays dividends across all age groups and abilities.
Resale Value Impact
Homes featuring ADA-compliant placements (19-36 inches) appeal to broader buyer demographics. Aging-in-place features add measurable value and market differentiation in competitive real estate markets. Installing your toilet paper holder within these ranges demonstrates thoughtful design that anticipates future needs, potentially increasing your home’s value by appealing to buyers who prioritize accessibility.
Toilet Paper Orientation Guide
Over Method (Recommended)
Roll paper over the top of the roll for easier access. This orientation simplifies locating the loose end and enables one-handed tearing—critical when seated comfortably. It also keeps paper away from wall contact, reducing moisture absorption and maintaining cleanliness. The “over” method aligns with how most people naturally reach for toilet paper, making it the preferred choice for 90% of households according to bathroom ergonomics studies.
Under Method
Roll paper under the roll for a neater appearance in certain decorative holder designs. This orientation can reduce accidental unrolling in high-traffic bathrooms but requires two-handed tearing that may be difficult for users with limited mobility. While largely a matter of personal preference, the under method often creates more frustration than it solves for most households.
Maintenance and Long-Term Care
Monthly Inspection
Check for loosening screws or wobbling brackets monthly—especially in high-traffic bathrooms. Tighten immediately to prevent progressive wall damage. Look for early signs of anchor failure like drywall cracking around screws or subtle movement when handling the holder. Addressing minor issues promptly extends your installation’s lifespan by years and prevents more significant wall repairs down the line.
Weight Considerations
Standard holders manage 0.5-1 pound (single roll). For double-roll or jumbo holders, verify mounting hardware weight ratings and upgrade to reinforced anchors if necessary. Overloading standard anchors is the most common cause of premature failure—don’t assume your holder can handle commercial-sized rolls without appropriate support.
Special Installation Scenarios
Children’s Bathrooms
Mount at 22-24 inches to accommodate shorter reach while allowing growth. This height encourages independence by enabling children to access paper without assistance. The slightly lower position prevents precarious standing or stretching that could lead to slips or falls in the bathroom—safety benefits that far outweigh any aesthetic considerations.
Assisted Living Applications
Adhere strictly to the 21-24 inch range for optimal wheelchair access. Position precisely at 21 inches for facilities serving varying mobility levels, ensuring forward reach compliance without requiring users to strain. This exact positioning makes the difference between independent access and requiring assistance for a basic bathroom function.
Pro Tip: Before drilling final holes, have family members sit on the toilet and reach to your marked position. Adjust slightly if anyone struggles—those extra 30 seconds save years of daily annoyance. Your perfectly positioned toilet paper holder is now ready for decades of comfortable use. Check anchor tightness annually, and you’ll never deal with a wobbly or awkwardly placed roll again.


