
Tangled earrings spilling from drawers or lost in jewelry boxes plague nearly every earring enthusiast. That frustrating moment when you finally locate your favorite pair only to discover a missing back is all too familiar. The solution doesn’t require expensive store-bought organizers or complicated craftsmanship—building your own personalized earring holder takes less time than sorting through your current mess and costs pennies compared to retail alternatives.
This guide walks you through transforming ordinary household materials into beautiful, functional earring displays that match your unique collection size and decor style. Whether you own just a few precious pairs or a treasure trove of statement pieces, you’ll discover exactly how to create storage that keeps every earring visible, accessible, and tangle-free. By the end of this guide, you’ll have a custom solution that grows with your collection while adding personality to your space.
Select Your Ideal Earring Holder Design
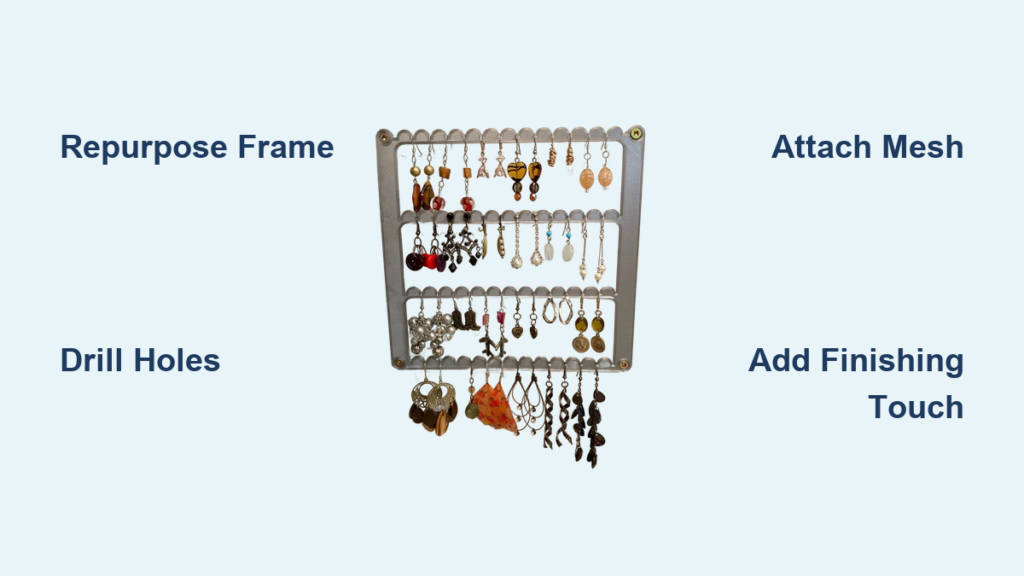
Transform Picture Frames into Wall Displays
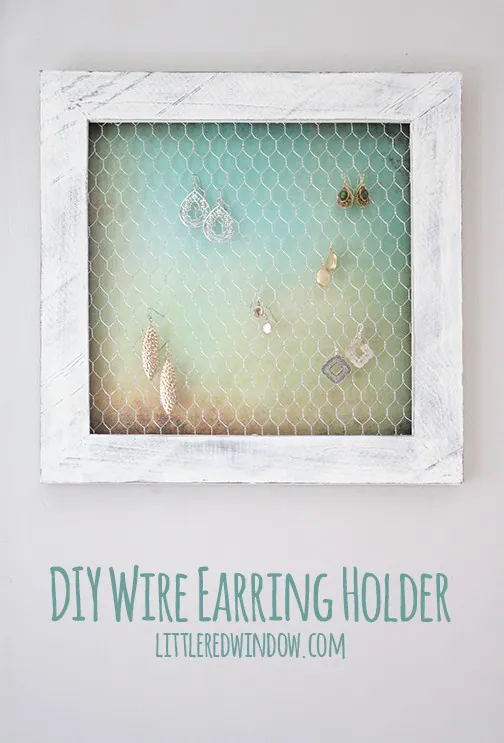
Repurposing an old picture frame creates vertical storage that maximizes wall space while keeping your entire collection visible. Remove the glass backing and replace it with wire mesh or chicken wire cut slightly smaller than the frame opening. This design works especially well for bedrooms with limited surface area, comfortably accommodating up to 50 pairs depending on frame size. The open structure lets you see every pair at a glance while preventing tangles that occur in closed boxes.
Craft Compact Desktop Organizers
For those who prefer keeping daily-wear earrings within immediate reach, a small wooden block or sturdy box makes the perfect desktop solution. Drill evenly spaced holes across the top surface to hold earring posts securely. This compact design fits neatly on dressers or nightstands and accommodates 15-25 pairs without cluttering your space. Unlike flimsy store-bought options, your custom creation can be sized precisely to match your collection and decor, with the added benefit of using materials you likely already have.
Design Portable Travel Roll Cases
Frequent travelers need specialized storage that protects delicate earrings during transit. Create a fabric roll organizer with secure pockets sized for different earring types—studs, hoops, and dangles. Sew in button closures or ribbon ties to keep the roll securely fastened inside purses or luggage. The soft fabric construction prevents scratching while the roll-up design makes it incredibly space-efficient. Unlike rigid cases, this flexible solution conforms to any available space in your travel bag without sacrificing protection.
Build Hidden Drawer Inserts
Maintain clean surface aesthetics while organizing substantial collections with custom drawer inserts. Cut foam board or thin plywood to fit your existing drawers, then add staggered holes or slots to hold earrings vertically. This solution keeps your collection completely hidden when drawers are closed yet instantly accessible when open. Customize the dimensions to match any drawer size and create compartments for different earring styles. The beauty of this approach is that it transforms wasted drawer space into highly functional storage without altering your room’s appearance.
Gather Essential Materials Without Breaking the Bank
Stock Your Basic Supply Kit
Every successful earring holder starts with the right foundation materials. You’ll need a base component like a wood piece, picture frame, sturdy cardboard, or small box depending on your chosen design. For attachment points, consider wire mesh, chicken wire, fishing line, ribbon, or craft wire. Secure everything with reliable adhesives such as hot glue, wood glue, or strong double-sided tape. Basic tools including wire cutters, pliers, scissors, and measuring tape will handle most projects, with a drill needed only for wooden block designs. Complete your creation with finishing touches like paint, fabric scraps, or decorative paper that match your personal style.
Discover Budget-Friendly Alternatives
Crafting doesn’t require expensive specialty materials—get creative with what you already own. Instead of purchasing wire mesh, visit craft stores for affordable plastic canvas that works equally well. Replace wooden bases with sturdy cardboard from shipping boxes or foam board remnants. Unwind old wire hangers to create free craft wire for loops and hooks. Don’t feel pressured to buy new paint—leftover wall paint samples or even nail polish can add beautiful color accents to your project. These substitutions maintain quality while keeping costs minimal.
Shop Smart for Craft Supplies
Maximize your budget by shopping strategically for any additional materials. Dollar stores often carry picture frames, decorative elements, and basic tools perfect for small projects. Thrift shops offer unique wooden pieces ideal for bases at a fraction of retail cost. Check craft store clearance sections for discounted wire, ribbon, and fabric remnants—many stores discount seasonal items by 70% when rotating stock. By focusing on these budget-friendly sources, you can complete your entire project for under $10 while supporting sustainable crafting practices.
Build a Wire Mesh Frame Holder Step-by-Step
Prepare Your Frame Base
Begin by removing the glass and backing from your picture frame while preserving the inner lip that holds everything together. If using unfinished wood, lightly sand rough edges with medium-grit sandpaper to create a smooth surface. Apply a thin coat of primer to prevent paint from soaking unevenly into the wood, allowing it to dry completely before proceeding. This preparation ensures your final product looks professional and lasts longer with daily use.
Install Secure Wire Mesh
Cut your wire mesh approximately one inch smaller than the frame opening using heavy-duty scissors—wear gloves to protect against sharp edges. Position the mesh against the frame’s inner lip and secure it from the back using hot glue applied every two inches. Press firmly for 30 seconds at each attachment point to ensure strong adhesion, then allow the glue to cool completely before handling. This creates a stable foundation that will securely hold your earrings without sagging.
Create Functional Hanging Points
Measure and mark wire intersections where earrings will hang, spacing marks one inch apart for optimal visibility and accessibility. Test different earring types at various points to confirm proper fit before finalizing your layout. For dangling styles, add small hooks or nails along the frame’s bottom edge to prevent swinging. This thoughtful placement ensures your entire collection remains organized and easy to access.
Apply Professional Finishing Touches
Complete your frame with a spray paint application in your chosen color—metallic gold creates an elegant display while matte black offers modern contrast. Allow paint to dry thoroughly between coats for best results. Alternatively, wrap frame edges with decorative washi tape for colorful accents without the mess of paint. Finish with a clear protective coat to guard against daily wear and maintain your holder’s appearance for years.
Craft a Simple Wooden Block Organizer
Prepare Your Wood Base
Select a wood block approximately 4×6 inches and 1-2 inches thick—scrap pieces from 2x4s work perfectly for this project. Sand all surfaces smooth using medium-grit sandpaper, paying special attention to edges and corners that could snag delicate earrings. Wipe the block clean with a damp cloth to remove all dust particles before proceeding. This preparation creates a smooth, professional-looking base that won’t damage your jewelry.
Mark Precise Hole Placement
Measure and mark hole positions ½ inch apart in straight rows across the top surface, using a ruler to maintain consistent spacing. Proper spacing prevents crowding when earrings are inserted and makes selection easier. For a collection of 20 pairs, create four evenly spaced rows of five holes each. This systematic approach ensures your holder accommodates your current collection with room for future additions.
Drill Clean, Consistent Holes
Using a 1/16 inch drill bit, carefully drill holes ¾ inch deep at each marked position. Work slowly to prevent wood splitting, especially near edges. Test each hole with your thickest earring posts to confirm proper fit—slightly enlarge any tight holes using a larger bit if necessary. Consistent hole depth ensures all earrings sit at the same height for a neat, organized appearance.
Finish and Personalize
Apply your chosen wood stain or paint to match existing decor, allowing adequate drying time between coats. For personalized flair, consider adding decorative elements like fabric scraps or decorative paper through decoupage techniques. Complete your organizer with a clear polyurethane sealant to protect against moisture and daily wear. This finished product not only organizes your earrings but becomes a beautiful display piece that reflects your personal style.
Troubleshoot Common Earring Holder Issues
Fix Wire Mesh Problems
Address sagging mesh by reinforcing the back with additional hot glue strips applied every two inches across the frame. If sharp edges cause concern, file wire ends smooth or cover them with decorative tape for safety. For heavy collections, consider doubling the mesh layer or using a stronger gauge wire to prevent long-term stretching and maintain structural integrity.
Resolve Wooden Block Challenges
Repair split wood by filling cracks with wood filler, sanding smooth once dry, and touching up with matching paint. Prevent future splits by drilling holes slowly with sharp bits and considering pre-drilled pilot holes for particularly dense woods. If earrings feel loose in their holes, add small rubber washers to posts or insert plastic tubing for a custom fit that keeps earrings securely in place.
Adjust Fabric Holder Issues
Combat fabric stretching by switching to sturdier canvas material or adding interfacing behind attachment points. Replace oversized buttons with smaller versions to reduce weight stress on the fabric. Address fraying edges by applying zigzag stitches or fray-check liquid to prevent unraveling. These simple adjustments ensure your fabric holder remains functional and attractive with regular use.
Maintain Your Custom Earring Holder
Establish Simple Care Routines
Implement weekly dusting using a soft brush or microfiber cloth to keep wire mesh displays looking fresh. Wipe wooden surfaces with a slightly damp cloth—avoid harsh cleaners that could damage finishes or adhesives. Spot-clean fabric holders using a gentle soap solution applied with a soft cloth, focusing only on soiled areas to preserve the material’s integrity.
Plan Seasonal Refreshes
Rotate earring placement monthly to prevent wear on specific attachment points. Touch up any paint chips immediately to maintain appearance and prevent potential rust on metal components. During each rotation, check all screws, buttons, or attachment points and tighten as needed. These small maintenance tasks extend your holder’s lifespan significantly.
Consider Future Upgrades
As your skills and collection grow, explore enhancement options like adding LED strip lighting behind wire mesh for dramatic display effects. Install small mirrors along frame edges for quick try-ons. Create matching accessories like necklace hooks or ring holders using similar techniques to build a cohesive jewelry organization system that evolves with your needs.
Your custom earring holder represents more than just storage—it’s a personalized display that celebrates your unique style and solves a daily frustration. By starting with one simple design today, you’ll transform that chaotic jewelry drawer into an organized masterpiece that grows with your collection. The satisfaction of creating functional beauty with your own hands proves that the best organizational solutions often come from your imagination and everyday materials.


