

Ever fumbled through your wallet trying to find a pen while standing in line, or accidentally recorded a check amount wrong because you were rushing? You’re not alone—nearly 70% of checkbook users experience transaction errors due to poor organization. The solution sits right in your wallet: your checkbook holder. When you know how to use a checkbook holder properly, it transforms from a simple case into your personal financial command center, keeping every transaction accurate and stress-free.
This essential tool isn’t just for carrying checks—it creates a complete system for managing your money on the go. By the end of this guide, you’ll know exactly how to position your register, access checks efficiently, maintain your holder, and troubleshoot common issues. Whether you’re writing your first check or looking to streamline your current process, these techniques will save you time and prevent costly mistakes.
Why Your Checkbook Holder Has Specific Compartments
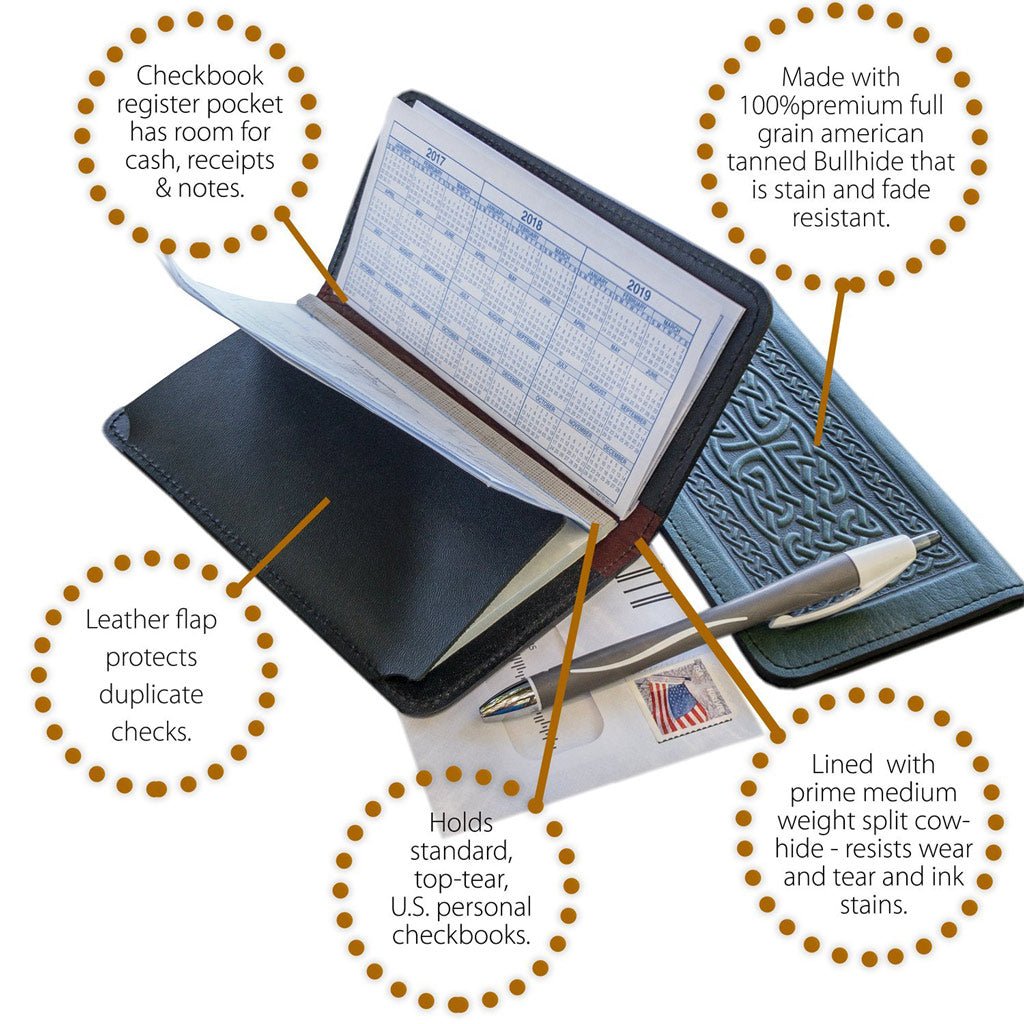
Your checkbook holder isn’t randomly designed—every element serves a specific financial purpose. Understanding why components are positioned where they are helps you maximize efficiency during transactions.
The left compartment exists specifically for your transaction register, not by accident but by design. When you open your holder, your register automatically faces you in the optimal position for recording transactions. This placement works whether you’re right or left-handed—your dominant hand can easily flip pages while your other hand stabilizes the holder.
The right compartment holds your physical checkbook, engineered for one-handed access. Quality holders position the checkbook so the top check sits slightly elevated, allowing you to remove it with a single smooth motion without disturbing your transaction register. This separation prevents accidental check tearing or register smudging during busy checkout moments.
Proper Checkbook Holder Setup in 2 Minutes
Positioning Your Transaction Register Correctly
Slide your transaction register into the left compartment with the spine facing the center fold. The pages should flip freely without catching on the holder’s edges—this isn’t optional but essential for smooth operation. If your register feels too tight, gently flex the spine back and forth before inserting it to loosen the binding.
Pro tip: Before inserting your register, tear off any plastic wrapping completely. Residual plastic strips can cause pages to stick together during critical transactions, leading to missed entries or duplicate recordings.
Installing Your Checkbook for Instant Access
Place your checkbook in the right compartment with the first check positioned at the top edge of the holder. Check numbers must run in ascending order from top to bottom—this sequence prevents confusion when tracking your check usage. Test the check removal by gently pulling the top check; it should slide out cleanly without resistance.
If checks stick when you try to remove them, adjust the checkbook’s position slightly forward or backward in the compartment. The ideal placement allows the check to release with minimal pressure while keeping the remaining checks securely in place. Never force a check out, as this can damage both the holder and your financial records.
Daily Transaction Workflow That Prevents Errors
Recording Transactions Without Mistakes
Open your checkbook holder flat on any stable surface before beginning your transaction. Write the complete check first—payee name, date, amount in numbers and words, and signature—before recording in your register. This sequence prevents the common error of writing “check #105” in your register but accidentally writing check #106.
Immediately after signing the check, flip to your register and record:
– The exact check number
– Current date
– Payee name (match what’s on the check)
– Precise amount (double-check against the written amount)
– Updated balance calculation
Expert note: Always use the same pen for both checks and register entries. Switching pens creates visual inconsistency in your records, making it harder to spot errors during monthly reconciliation.
Quick Access Techniques for Busy Checkout Lines
Keep your holder closed when not actively writing checks—this protects sensitive financial information from prying eyes. Develop muscle memory by storing it in the same pocket or purse compartment daily. Consistent placement means you’ll retrieve it instantly during transactions without fumbling.
Some frequent check writers prefer keeping their holder slightly open during shopping trips. While this speeds up the check-writing process, it increases spine wear over time. Balance convenience with longevity based on how often you write checks—daily users should prioritize full closure after each transaction.
Maintaining Your Checkbook Holder for Long-Term Reliability

Daily Protection Habits That Prevent Damage
Close your holder completely after every transaction. This simple action prevents moisture damage from accidental spills, keeps checks from falling out during movement, and protects your register pages from tearing. Never leave your holder open in your wallet or purse—compressed open holders cause permanent spine damage.
Test the closure mechanism each time you close your holder. A secure magnetic or snap closure should require deliberate pressure to open. If you notice the holder opening accidentally in your bag, replace it immediately—financial security depends on reliable closure.
Monthly Inspection Routine for Peak Performance
Examine your holder monthly for early signs of wear. Focus your inspection on four critical areas:
– Spine integrity: Look for cracking or separation at the fold line
– Compartment security: Ensure both register and checkbook remain firmly in place
– Edge condition: Address any fraying before it compromises document security
– Closure strength: Test magnets with a small metal object for consistent attraction
Replace your holder immediately if checks begin falling out or the register compartment fails to hold securely. A compromised holder creates more problems than it solves, potentially leading to lost checks or inaccurate financial records.
Troubleshooting Common Checkbook Holder Problems
Fixing Register Fit Issues in 30 Seconds
If your transaction register won’t fit properly in the left compartment:
– Verify your register dimensions match your holder’s specifications
– Remove all plastic wrapping and cardboard inserts completely
– Gently trim register edges if absolutely necessary (avoid cutting into written sections)
Never force a register into the compartment—that damages both the register binding and the holder lining. If trimming is required, use scissors to remove only the very edge of the register cover, no more than 1/16 of an inch.
Solving Sticking Check Problems Immediately
Humidity or pressure can cause checks to fuse together inside the holder. If checks stick when you try to remove them, gently fan the check edges while still in the holder to create separation. Store your holder in climate-controlled areas to prevent future sticking—avoid leaving it in hot cars or humid bathrooms.
Pro tip: Before important transactions, test check removal at home. If checks stick, place a thin sheet of wax paper between the checkbook and holder lining to reduce static cling.
Repairing Failing Magnetic Closures
Weak magnets often indicate age or exposure to extreme temperatures. Test magnet strength by seeing how many small metal objects it can hold. If attraction feels minimal, replacement is necessary—never rely on a failing closure for financial security.
Temporary fixes like adding magnetic strips provide limited relief but compromise the holder’s sleek design. For daily check writers, plan to replace holders showing closure issues immediately to maintain financial security.
Maximizing Your Checkbook Holder’s Lifespan
Optimal Storage Conditions for Longevity
Store your checkbook holder in dry environments with stable temperatures between 60-75°F. Keep it away from direct sunlight, which fades printed information and weakens materials. Never store it near magnetic items like credit cards or hotel keys—these can demagnetize the closure mechanism.
Always store your holder in an upright position rather than flat. This maintains the spine’s shape and prevents compartment stretching that leads to document slippage. In wallets with multiple compartments, give your holder its own dedicated space rather than cramming it with other items.
Clear Indicators It’s Time for Replacement
Replace your checkbook holder when you notice:
– Visible cracking along the spine fold line
– Compartment stretching that allows documents to slip out
– Closure mechanisms that fail to secure properly
– Persistent check loss during normal handling
– Register pages that no longer flip smoothly
Quality holders typically last 1-2 years with daily use. Occasional users may get 3-5 years of service, but never compromise security for convenience—replace your holder at the first sign of failure.
Your checkbook holder is more than just a protective case—it’s the foundation of accurate financial tracking. By positioning your register on the left and checkbook on the right, maintaining consistent closure habits, and performing regular inspections, you’ll transform check writing from a chore into an effortless routine. The few minutes spent mastering how to use a checkbook holder properly pays dividends in saved time, reduced stress, and most importantly, accurate financial records that keep your budget on track. Start implementing these techniques today, and you’ll wonder how you ever managed your finances without this simple yet powerful organizational tool.


