
That moment when your pattern calls for cables and you reach for whatever’s handy—a bobby pin, a piece of scrap yarn, or even a kitchen skewer—is about to become a thing of the past. Properly using a cable stitch holder transforms frustrating cable crossings into seamless, professional-looking results that maintain perfect stitch tension. Forget makeshift solutions that snag yarn or distort your work—when you know how to use cable stitch holder tools correctly, you’ll create crisp, clean cables every time.
Cable stitch holders aren’t optional extras—they’re precision instruments designed specifically for maintaining stitch integrity during cable crossings. Whether you’re working on a simple scarf or an intricate Aran sweater, understanding how to use cable stitch holder tools properly prevents dropped stitches and uneven tension that can ruin hours of knitting. In this guide, you’ll discover exactly how to select, position, and work with these essential tools to elevate your cable knitting from amateur to expert level.
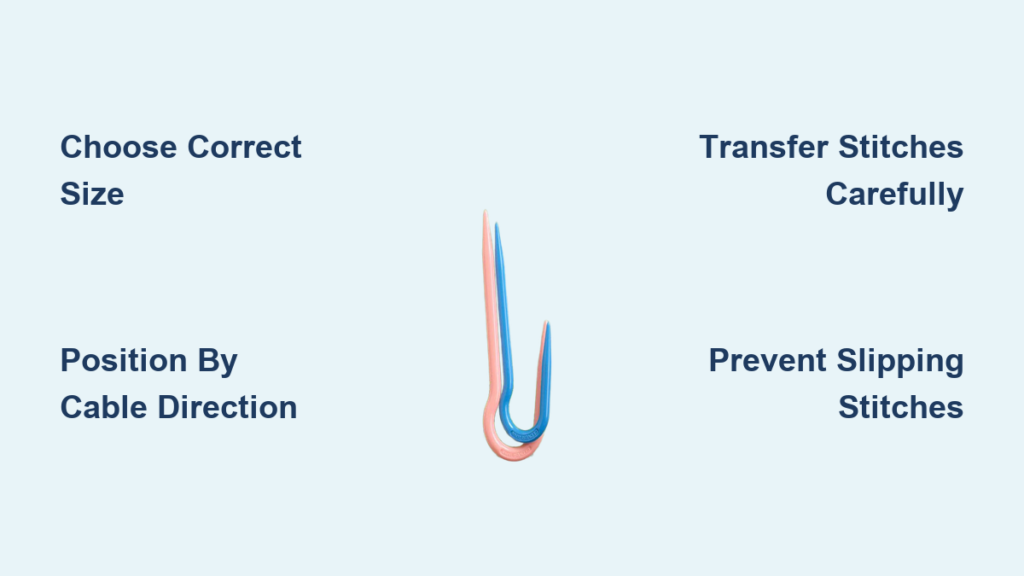
Select the Right Cable Holder for Your Project
Match Holder Type to Your Pattern Needs
Your first critical decision is choosing between the three main types of purpose-built holders. Circular Stitch Holders with their stainless steel needle and adjustable cord work best for holding multiple rows of stitches open, particularly in projects like sweater shoulders or sock toes. Cable Stitch Holders in their distinctive curved shapes are specifically engineered for temporary stitch holding during cable crossings. For reversible projects or when you need to access stitches from both ends, Double-Ended Stitch Holders with their capped design provide secure, flexible storage.
Choose Correct Size for Your Yarn Weight
Using a holder that matches your yarn weight prevents distorted stitches and frustration. Standard Cable Stitch Holders come in small, medium, and large sizes, while U-shaped versions offer the same sizing progression. For fine fingering weight yarns, select the smallest holder that allows stitches to slide smoothly without stretching. Worsted weight projects need medium holders, while bulky and super bulky yarns require jumbo U-shaped versions. The resource material emphasizes this critical matching: “These uniquely shaped holders allow you to temporarily remove stitches and hold them in place” only when properly sized for your project.
Execute Perfect Cable Crossings
Transfer Stitches Without Distortion
When your pattern reaches the cable section, work to the specified stitch count, then carefully slide those stitches from your working needle onto the cable holder. For Circular Stitch Holders, simply slide stitches onto the cord portion and insert the needle into the rubber stopper to secure them. With Cable Stitch Holders, slide stitches along the curved portion until they sit securely in the deepest part of the curve. The resource notes these tools “maintain the shape and structure of your knitting” specifically through this proper transfer technique.
Position Holder Based on Cable Direction
Your cable’s direction determines holder placement. For left-crossing cables (where stitches cross to the left), position your holder in front of your work. Right-crossing cables require the holder behind your work. U-shaped holders provide extra security here—their design “allows you to temporarily remove stitches and hold them in place until reintroduced” exactly where your pattern requires. Always ensure the curve faces away from your work to prevent snagging on adjacent stitches.
Complete the Cable Crossing Sequence
With stitches secured on your holder, work the next group of stitches as directed by your pattern. Maintain normal tension—don’t pull tighter thinking you’ll compensate for the held stitches. After completing this section, return the held stitches to your working needle. For Double-Ended Stitch Holders, remove one cap, slide stitches onto your needle, then replace the cap. The resource highlights how these tools “preserve their shape” during this critical transfer back to active knitting.
Troubleshoot Common Cable Holder Issues

Fix Slipping Stitches on the Holder
If stitches slide off your holder mid-cable, you’ve likely chosen the wrong type for your yarn. Smooth yarns like silk require U-shaped holders that “provide more security” according to the resource material. For circular holders, adjust the bead on the opposite side of the rubber stopper to “snug up the stitches and preserve their shape.” Never force stitches onto a holder that’s too small—that’s when knitters resort to “scrap yarn, safety pins, embroidery floss, straws, paper clips, or kitchen skewers” which compromise project integrity.
Solve Holder Interference Problems
When holders get in the way during complex patterns, switch to Double-Ended versions. Their capped design lets you position the holder parallel to your work rather than perpendicular. Simply “remove one cap, slide stitches onto the smooth center pin, then replace the cap” as the resource instructs. This streamlined approach works especially well for traveling cables or tight spaces where traditional curved holders become cumbersome.
Optimize Holder Performance for Complex Projects
Implement Lifelines with Circular Holders
For intricate cable patterns spanning multiple rows, use Circular Stitch Holders as built-in lifelines. Thread a contrasting waste yarn through the cord portion before securing your stitches. The resource specifically mentions this bonus feature: “Acts as an excellent life line—easy to insert and remove, even in complex stitch patterns.” Should you make a mistake several rows later, you can rip back to this secure point without losing your cable structure.
Manage Multiple Cable Sections Simultaneously
When patterns require holding stitches for multiple cable crossings, organize your holders by size and position. Keep small holders for fine details in front of work, medium for main cables behind work, and large holders vertically positioned for maximum visibility. The resource emphasizes that having properly sized tools “becomes even more important” as “projects become more intricate.”
Maintain Your Cable Holders for Longevity
Clean After Each Use
Wipe holders with a soft cloth to remove yarn oils and fibers that can cause stitches to stick. For stubborn residue, use mild soap and water as the resource suggests for maintaining “reliable, well-designed tools.” Dry thoroughly before storage—moisture causes metal holders to corrode, affecting their smooth stitch transfer.
Store Properly to Maintain Shape
Keep holders in their original packaging or a dedicated notions case. The curved designs of Cable Stitch Holders can deform if crushed under heavier items, compromising their ability to “hold them in place until reintroduced” as intended. U-shaped versions particularly need proper storage to maintain their precise curvature.
Choose the Right Holder Before You Begin
Assess Project Complexity First
Simple 2×2 cables need only basic Cable Stitch Holders, while complex Aran patterns benefit from having multiple types available. The resource stresses that “having reliable, well-designed tools becomes even more important” as projects grow in complexity. Invest in a complete set early—three standard Cable Stitch Holders plus one Circular version covers 90% of cable knitting needs.
Consider Travel Requirements
For portable cable knitting, Double-Ended Holders with their capped design prevent accidental stitch loss in your project bag. The resource notes these tools are essential “whether you’re working on a complex design at home or traveling with your project.” Pack a small case with one of each holder type plus stitch markers for complete cable knitting readiness anywhere.
Your cable stitch holder transforms from confusing metal curve to indispensable tool once you master these techniques. Start with simple 2-stitch cables using the correct sized holder, perfect your transfer technique, then gradually tackle more complex patterns. Remember the key insight from the resource material: “Why settle for makeshift solutions?” when purpose-built tools exist that “maintain the shape and structure of your knitting” exactly as needed. The next time your pattern calls for cables, you’ll confidently reach for your properly sized holder instead of improvising with whatever’s handy—knowing exactly how to use cable stitch holder tools for professional results every time.


