Nothing transforms a room quite like the warm glow of candlelight dancing across handcrafted wood surfaces. When you create your own woodworking candle holder, you’re not just building functional decor—you’re crafting personalized ambiance that reflects your skill and style. Whether you’re a beginner with basic tools or an experienced woodworker seeking new challenges, this guide delivers everything you need to transform raw lumber into stunning candle holders that impress.
From rustic reclaimed wood centerpieces to sleek modern geometric designs, woodworking candle holders offer the perfect balance of creativity and practicality. You’ll learn to match your skill level with appropriate projects, select the ideal wood species for your vision, and implement construction techniques that ensure both beauty and safety. Most importantly, you’ll discover how to create pieces that guests will admire and ask where they can buy one.
Match Your Skill Level to These 3 Woodworking Candle Holder Styles
Shaker-Inspired Simplicity for Beginners
Start with Shaker-style candlestands featuring clean lines that highlight wood grain rather than hide it. These traditional American designs require only straight cuts and careful sanding—perfect for first-time projects. The signature flared base and simple turned candle cup create elegant height without overwhelming your space. Many beginners complete their first Shaker candlestand in under four hours using basic table saw cuts and minimal sanding.
Modern Geometric Designs for Intermediate Makers
Challenge yourself with angular geometric holders that deliver visual impact through precise 45-degree cuts. Create hexagonal or octagonal bases by alternating wood species like maple and walnut for striking contrast. This technique develops essential woodworking skills while producing contemporary pieces that catch the eye. Remember to cut slightly oversized first, then refine dimensions with careful passes—precision matters most with geometric designs.
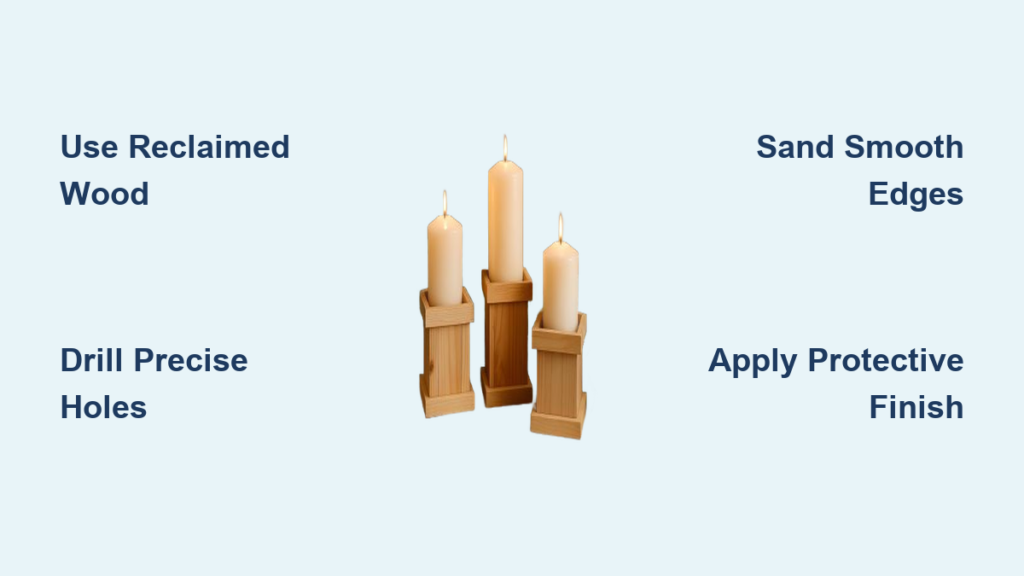
Rustic Reclaimed Wood Projects for All Levels
Embrace imperfections with weathered barn wood or pallet timber that tells its own story. Knots, nail holes, and saw marks become character-defining features rather than flaws to hide. Simply disassemble pallets marked “HT” for heat-treated wood, remove nails, and cut around damaged areas. The weathered patina creates instant rustic appeal—just seal with clear finish to lock in the aged appearance. One standard pallet yields 8-10 individual holders, making this perfect for craft show inventory.
Select Perfect Wood Species for Your Candle Holder

Premium Hardwoods for Heirloom Quality
Cherry wood develops a rich reddish patina over time, ideal for pieces you’ll treasure for decades. Its fine grain takes finishes beautifully and polishes to glass-smooth perfection. Walnut provides dramatic dark contrast that makes tealight holders glow with warm ambiance. Maple offers consistent light grain perfect for minimalist Scandinavian-inspired pieces. These premium options command higher prices but deliver unmatched longevity.
Budget-Friendly Alternatives That Shine
Birch emerges as the unsung hero for unfinished projects—beautiful, durable, and significantly more affordable than premium hardwoods. Cedar’s natural aromatic properties add sensory appeal, particularly for tea candle holders in relaxation spaces. When working with reclaimed materials, mesquite offers exceptional density and striking grain patterns, though its hardness requires sharp tools and patience. Many crafters find these woods produce equally stunning results at fraction of the cost.
Master Construction Techniques for Flawless Results
Table Saw Fundamentals for Geometric Designs
Most angular holders start with precise table saw cuts. Rip stock to consistent widths first, then use a miter gauge for perfect 45-degree angles. Always cut slightly oversized, then sneak up to final dimensions with careful passes. For cylindrical pieces, create octagonal blanks first, then sand to round—much safer than attempting round cuts on the table saw. This method produces professional-looking results even for beginners.
Lathe Turning Basics for Traditional Candlesticks
Turned candlesticks represent traditional woodworking at its finest. Start with square blanks mounted between centers, roughing to round with a spindle gouge. Create gentle curves using a skew chisel, working from the tailstock toward the headstock. The key is sharp tools and light cuts—let the tool do the work rather than forcing it through the wood. Many woodworkers consider candlesticks their first serious turning project.
Size Guide for Every Candle Type You’ll Encounter
Match Candle Cups to Actual Dimensions
Measure your actual candles rather than relying on labeled sizes, which vary between manufacturers. Tealights require 1-5/16″ cups minimum, while standard pillar candles need 2-1/2″ to 2-5/8″ cups. Taper candles fit 5/8″ to 7/8″ holes depending on base diameter. The 1-7/8″ Country Candle Cup remains the most popular size with 50 five-star reviews. Always test holders with actual candles before gifting or selling.
Height Considerations for Perfect Placement
3-4 inch holders work beautifully as accent pieces on shelves or clustered in groups. 6-9 inch heights create dramatic table centerpieces without obstructing dinner conversation. 10-11 inch statement pieces command attention on mantels or console tables. The 9″ Candlestick maintains a perfect 5.0/5.0 rating from 16 reviews, proving this height consistently satisfies customers.
Gather These Exact Tools for Your Woodworking Candle Holder
Essential Starter Kit for Beginners
You need surprisingly few tools to begin. A quality table saw handles 90% of cuts, while a miter saw ensures perfectly square ends. Drill press creates precise candle cup holes, though a handheld drill with careful marking works for simpler projects. Sandpaper in 120, 220, and 400 grits produces professional finishes. Don’t forget wood glue and clamps for assembly—many rustic designs deliberately embrace rough cuts as design elements.
Advanced Tool Upgrades for Quality Results

A lathe opens traditional candlestick possibilities, while a band saw enables curved designs. Router bits create decorative edges and custom profiles. Forstner bits drill clean, flat-bottomed candle cups—1-1/2″ and 2-1/8″ sizes cover most candle types. Consider a drum sander attachment for your drill press to smooth curved surfaces efficiently. Many successful makers began with borrowed tools or community workshop access.
Step-by-Step Construction Process for Your First Holder
Simple Block Construction in Under an Hour
Begin with 2×2 hardwood scraps cut to desired height. Mark center points on both ends, then drill candle cup holes using Forstner bits. Chamfer edges slightly with sandpaper to prevent chipping. Apply finish of choice—oil brings out grain patterns, while paint creates modern color-blocked looks. This project takes under an hour from start to finish and builds confidence for more complex designs.
Layered Geometric Design with Contrasting Woods
Start with maple and walnut for striking combinations. Cut identical squares, then offset each layer by 45 degrees for visual interest. Use dowel joints for strength, drilling matching holes in each layer before assembly. Sand flush between layers for seamless appearance. The finished piece appears complex but uses only straight cuts and simple joinery—ideal for intermediate woodworkers.
Finishing Techniques That Make Your Candle Holder Shine
Oil Finishes for Natural Beauty
Tung oil provides water-resistant protection while enhancing grain depth—perfect for dining room pieces. Danish oil offers faster drying and slightly more sheen, ideal for gifts requiring quick turnaround. Apply thin coats with lint-free cloths, letting each coat cure fully before adding the next. Three coats typically provide excellent protection without overwhelming the wood’s natural character.
Rustic Surface Treatments for Weathered Appeal
Create authentic barn wood appearance by brushing boards with a wire brush to raise grain, then applying diluted white or gray paint. Wipe away excess for naturally weathered look. Burnt wood finish (Shou Sugi Ban technique) chars the surface for dramatic black appearance, then seal with oil for longevity. These techniques transform ordinary wood into conversation-starting centerpieces.
Safety First: Prevent Fires with Smart Woodworking Practices
Heat-Resistant Design Essentials
Never let candles burn within 2 inches of wood surfaces. Design holders with metal candle cups or liners to prevent direct wood contact. For pillar candles, create wells deeper than candle height to contain drips. Always test holders with actual candles before gifting or selling—some woods can scorch even without direct flame contact. Safety should always guide your woodworking candle holder designs.
Safe Assembly Practices You Must Follow
When drilling candle cups, secure workpieces firmly to prevent spinning. Use sharp Forstner bits to reduce burning and ensure clean cuts. Sand all surfaces thoroughly—splinters near open flame pose obvious hazards. Apply finishes in well-ventilated areas, allowing complete curing before first use. These precautions protect both you during construction and users after completion.
Budget-Friendly Project Ideas That Sell
Scrap Wood Masterpieces Under $5
Turn leftover 2×4 pieces into charming tealight holders. Cut 3-inch sections, drill 1-3/8 inch holes 1/2 inch deep, then sand smooth. Group three to five pieces for instant centerpiece appeal. Total cost: under $2 for the entire set using materials destined for the burn pile. Many crafters sell these at markets for $15-25 per set.
Quick Weekend Builds for Immediate Satisfaction
Create a six-candle centerpiece using 1×6 pine boards. Rip strips to 2-inch widths, cut varying lengths (4, 6, and 8 inches), then drill matching candle cups. Stagger heights for visual interest, or keep consistent for formal settings. This entire project takes under three hours from board selection to final finish—perfect for craft show inventory or handmade gifts.
Building woodworking candle holders offers the perfect entry point into functional woodworking while creating pieces you’ll actually use and enjoy. Start simple with scrap wood projects, then gradually tackle more complex designs as confidence grows. Remember—the best candle holder is the one that brings warmth to your home, regardless of its complexity. Whether you’re crafting a single tealight holder from pallet scraps or designing an elaborate six-candle centerpiece, each piece represents hours of creative satisfaction and the timeless appeal of handmade wooden objects.